FortiManager
SecTrail CM enables automatic deployment and renewal of SSL certificates to all managed FortiGate devices by establishing agentless connections to the FortiManager central management platform.
Connection Requirements
| Requirement | Detail | Description |
|---|---|---|
| Protocol | REST API (HTTPS) | FortiManager's native REST API is used |
| Port | 443 | Standard HTTPS port or custom management port |
| Authentication | Username and Password | Authentication via Username and Password |
| User Permission | Admin or Certificate Manager role | Certificate upload and configuration permission |
Automated Operations
SecTrail CM automatically performs the following operations on FortiManager:
- Certificate and Key Upload: Secure transfer of SSL certificate and private key to ADOM local store
- Certificate Import: Distributing certificate and key to managed devices via FortiManager
- SSL Profile Update: Updating SSL inspection profiles
- Policy Install: Installing updated policies to target devices
- Configuration Commit: Committing workspace and making configuration persistent
Configuration Steps
1. Creating FortiManager User
Navigate to Automation > Device Users and create a user for FortiManager.
2. Adding FortiManager Device to SecTrail CM
Click Automation > Devices > Add New Device button and enter the following information:
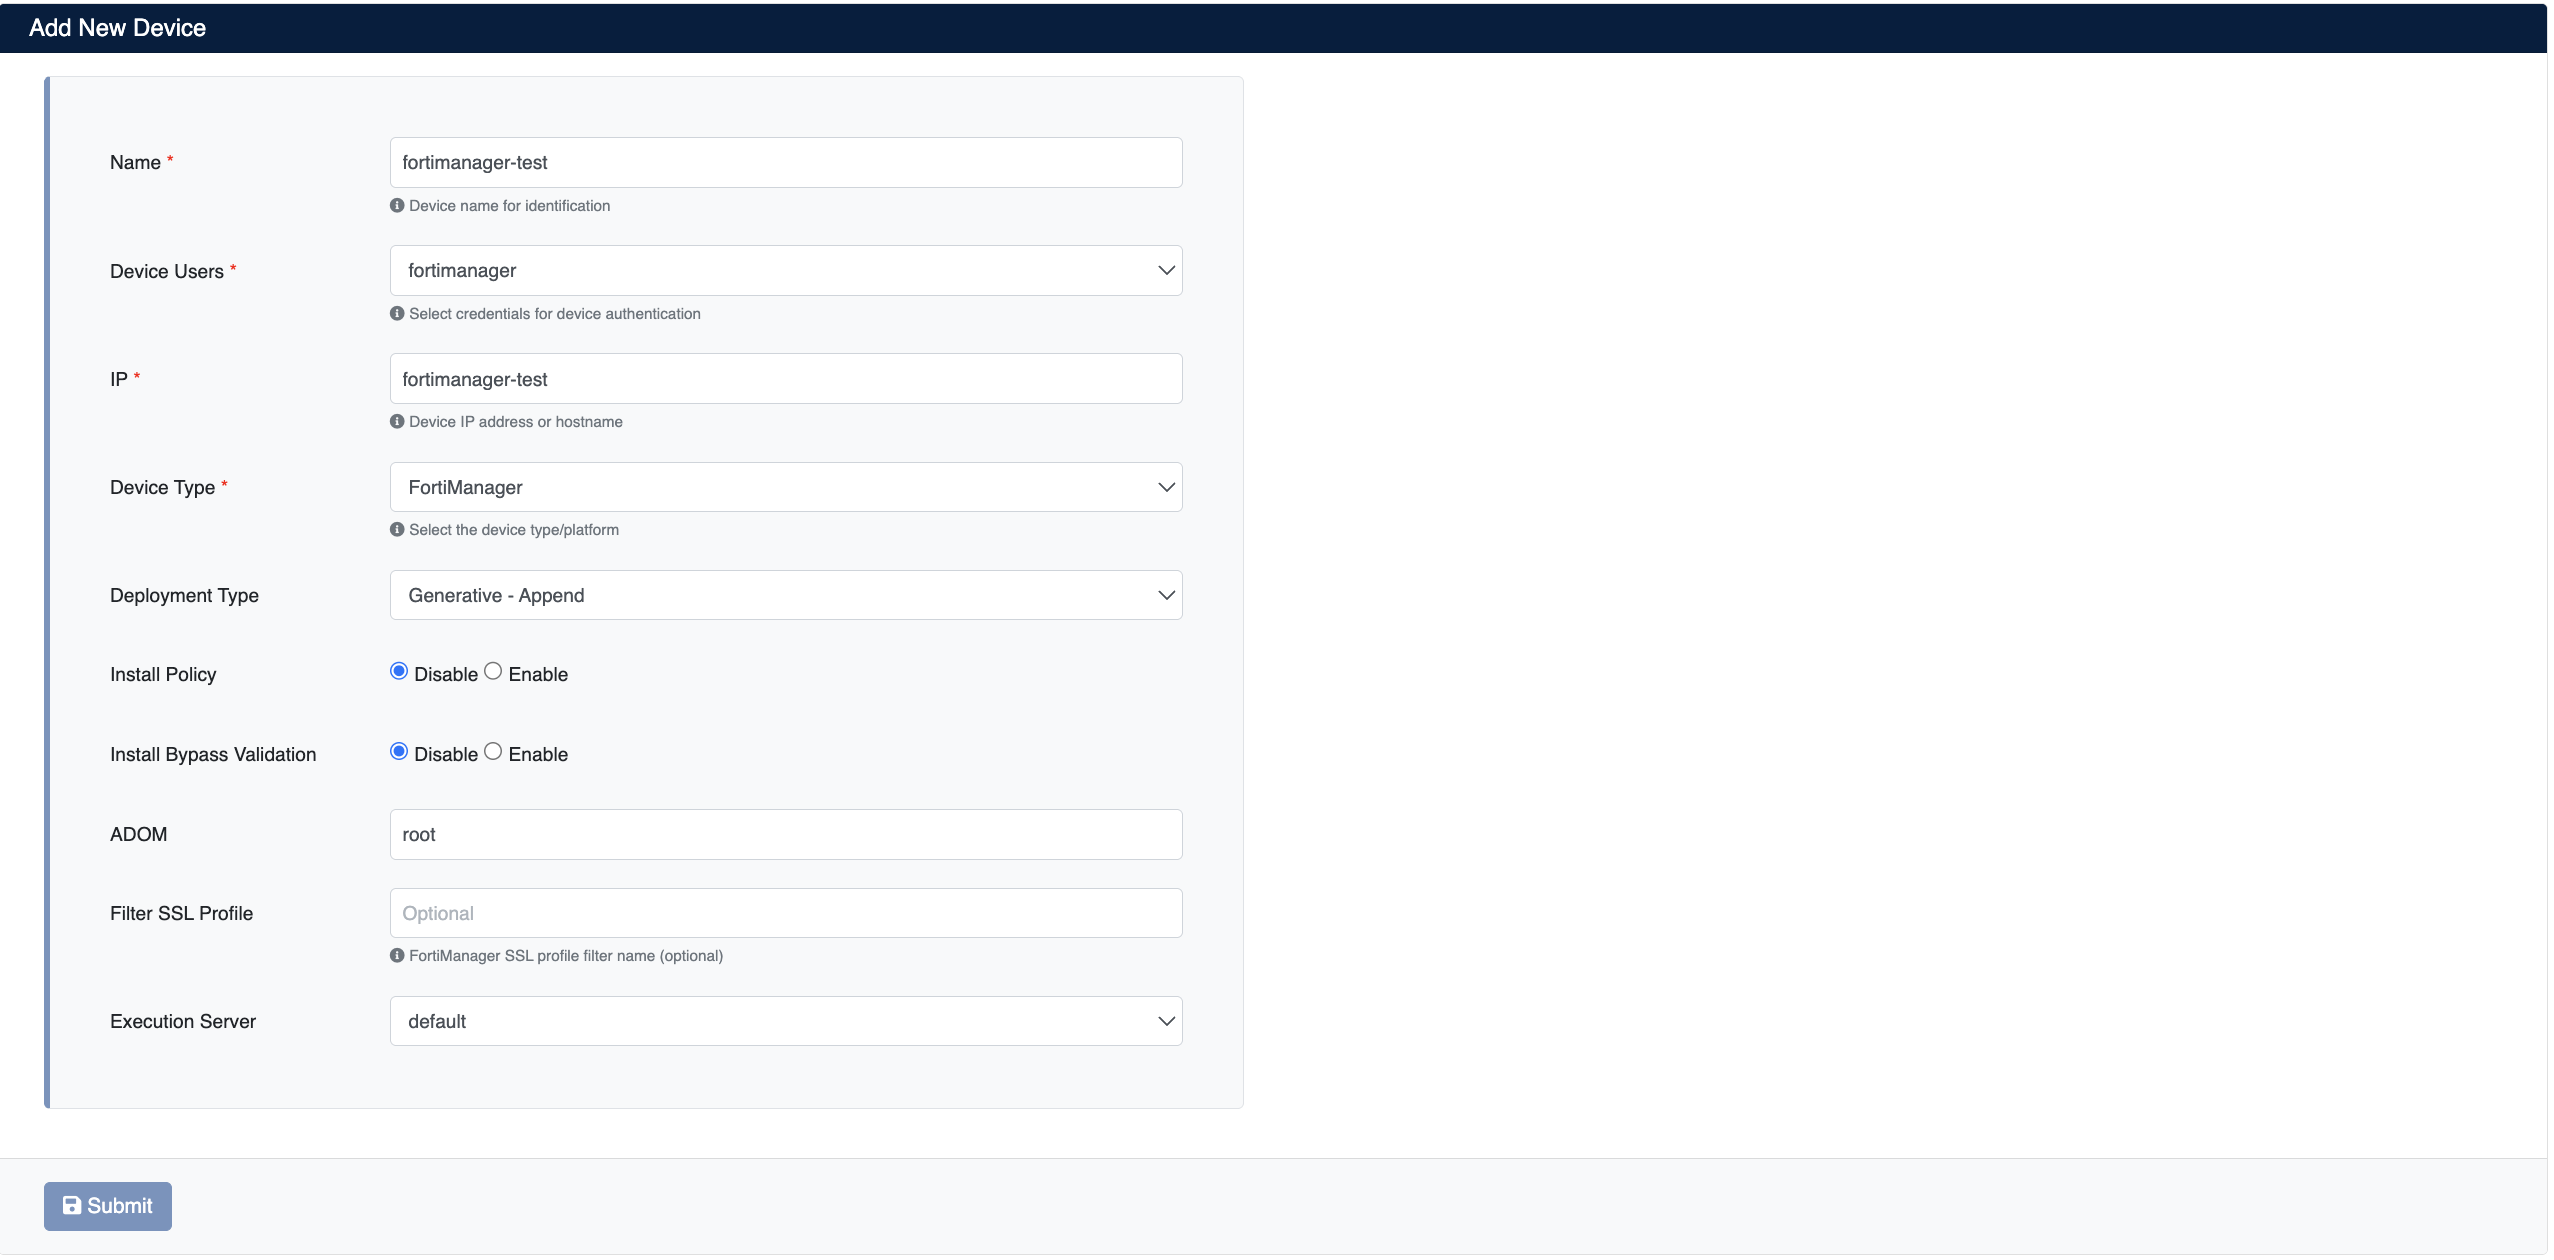
- Name: Provide a descriptive name for the device
- Device Users: Select the user created in Step 1
- IP: Enter the FortiManager management IP address or hostname
- Device Type: Select
FortiManagerfrom the dropdown menu - Deployment Type: Select deployment type
- Generative - Append: Creates a new SSL profile, adds the new certificate to it, and associates it with matching policies
- Generative - Replace: Creates a new SSL profile, replaces the certificate within it, and associates it with matching policies
- Override - Append: Adds the new certificate to the existing SSL profile
- Override - Replace: Removes the current certificate from the existing SSL profile and adds the new one
- Install Policy: Should updated policies be installed to devices? (Disabled/Enabled)
- Install Bypass Validation: Should validation be bypassed during policy installation? (Disabled/Enabled)
- ADOM: FortiManager ADOM name (e.g.
root) - Filter SSL Profile: FortiManager SSL profile filter name (optional)
- Execution Server: Server to use for executing deployment operations
After the FortiManager device is added to SecTrail CM, all certificates on devices managed by FortiManager are automatically included in the discovery period and scanned regularly. Automatic alarms are created for certificates that are about to expire or have issues.
3. Viewing Device Information
After the device is added, it will be displayed in the Automation > Devices list. Click on the row to view device details:
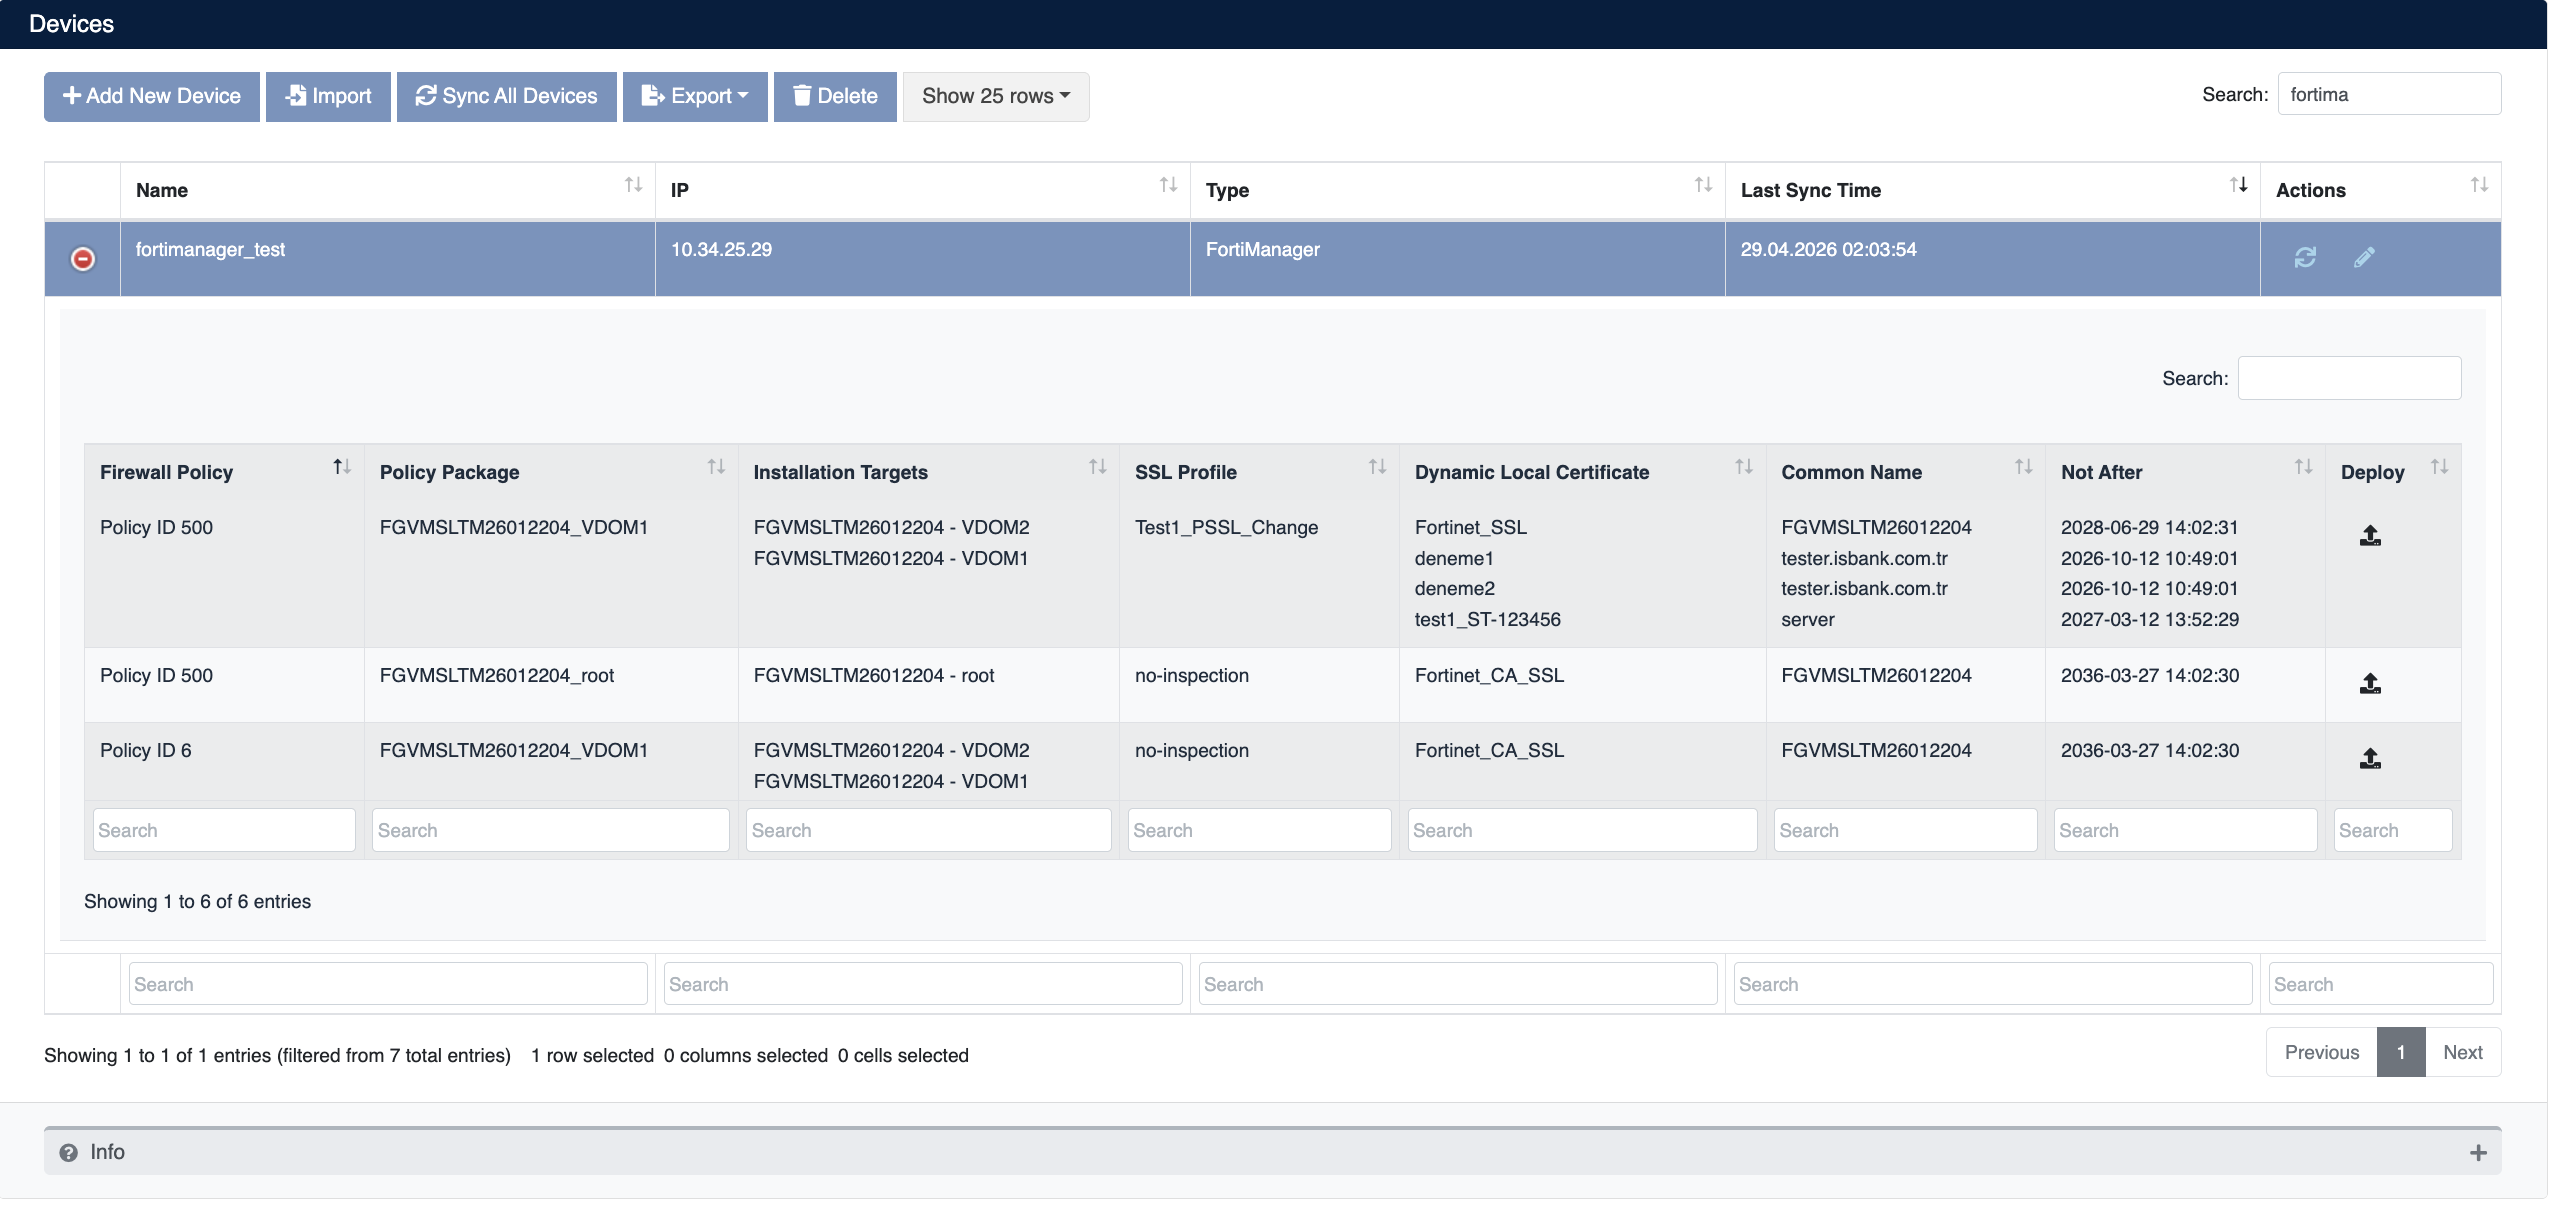
- Firewall Policy: Name of the firewall policy associated with the certificate
- Policy Package: Policy package the rule belongs to
- Installation Targets: Target FortiGate devices the policy will be installed to
- SSL Profile: SSL inspection profile name associated with the certificate
- Dynamic Local Certificate: Dynamic local certificate mappings on managed devices
- Common Name: Common Name (CN) information of the certificate
- Not After: Certificate expiration date
- Deploy: For certificate deployment
Certificate Deployment
Step 1: Virtual Server and Certificate Selection
- Select your FortiManager device from Automation > Devices
- In the device details, find the policy where you want to deploy the certificate
- Click the Deploy button on the relevant row
- In the Deploy Certificate window that opens:
- Virtual Servers: Target virtual server information is displayed (SSL Profile / Installation Targets / Common Name format)
- Deploy Type: Displays the configured deployment type (e.g. Generative-Append)
- Certificate: Select the certificate you want to deploy from the dropdown menu
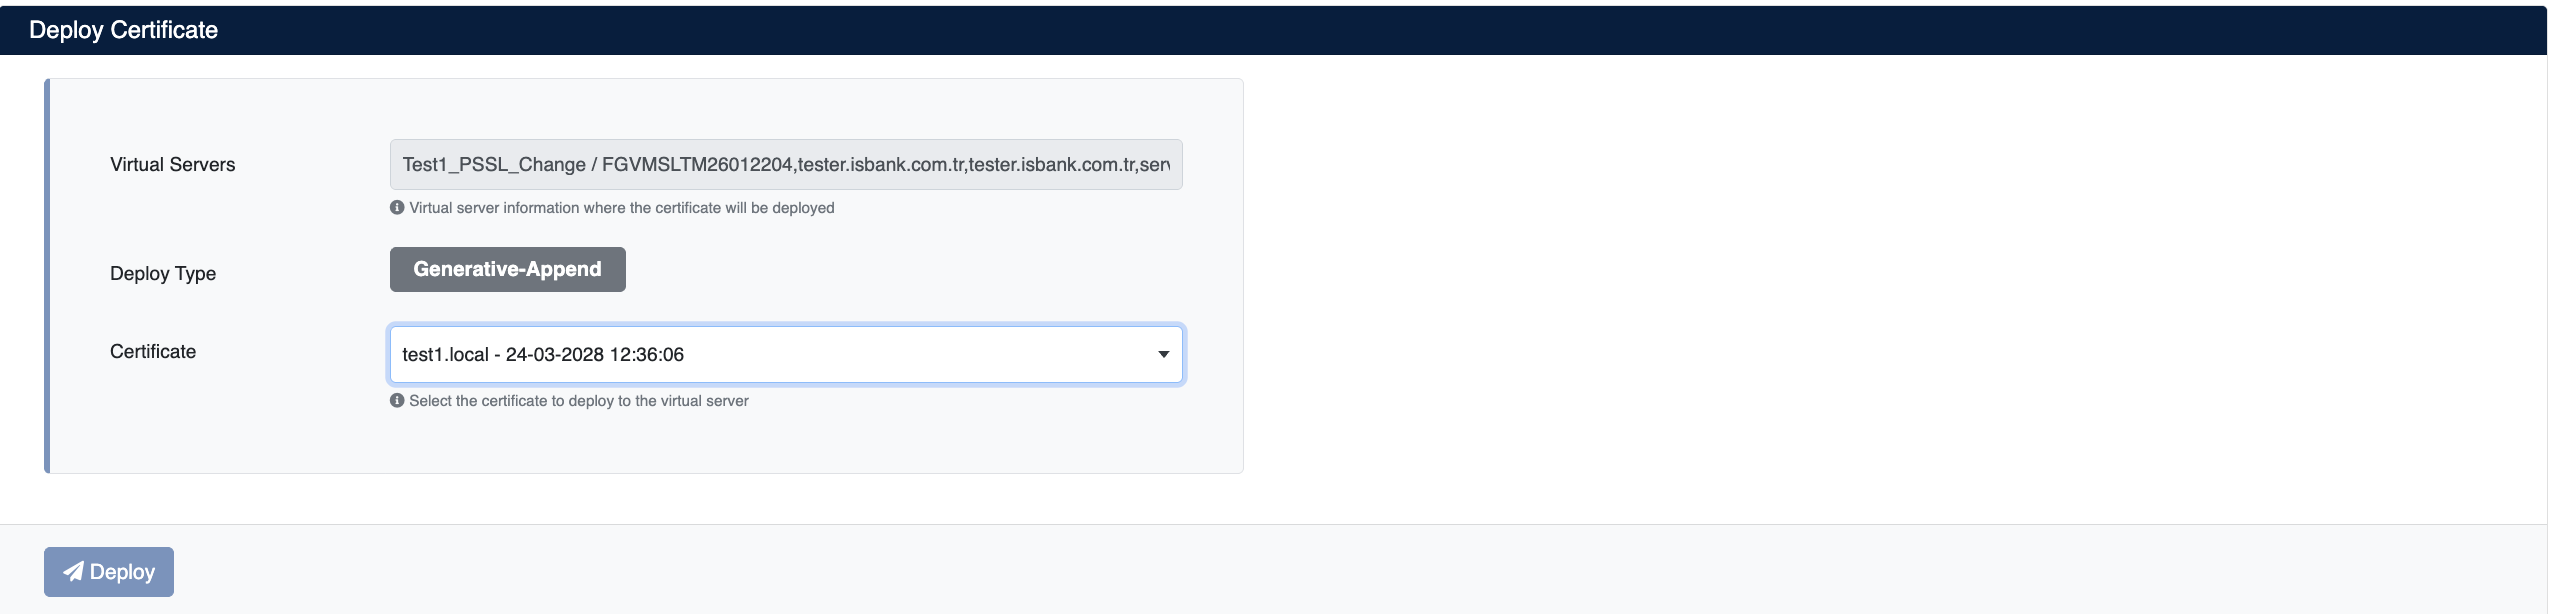
Step 2: Starting the Deployment Process
Click the Deploy button to start the certificate deployment process.
Step 3: Process Tracking
The deployment process can be tracked from Automation > Processes:
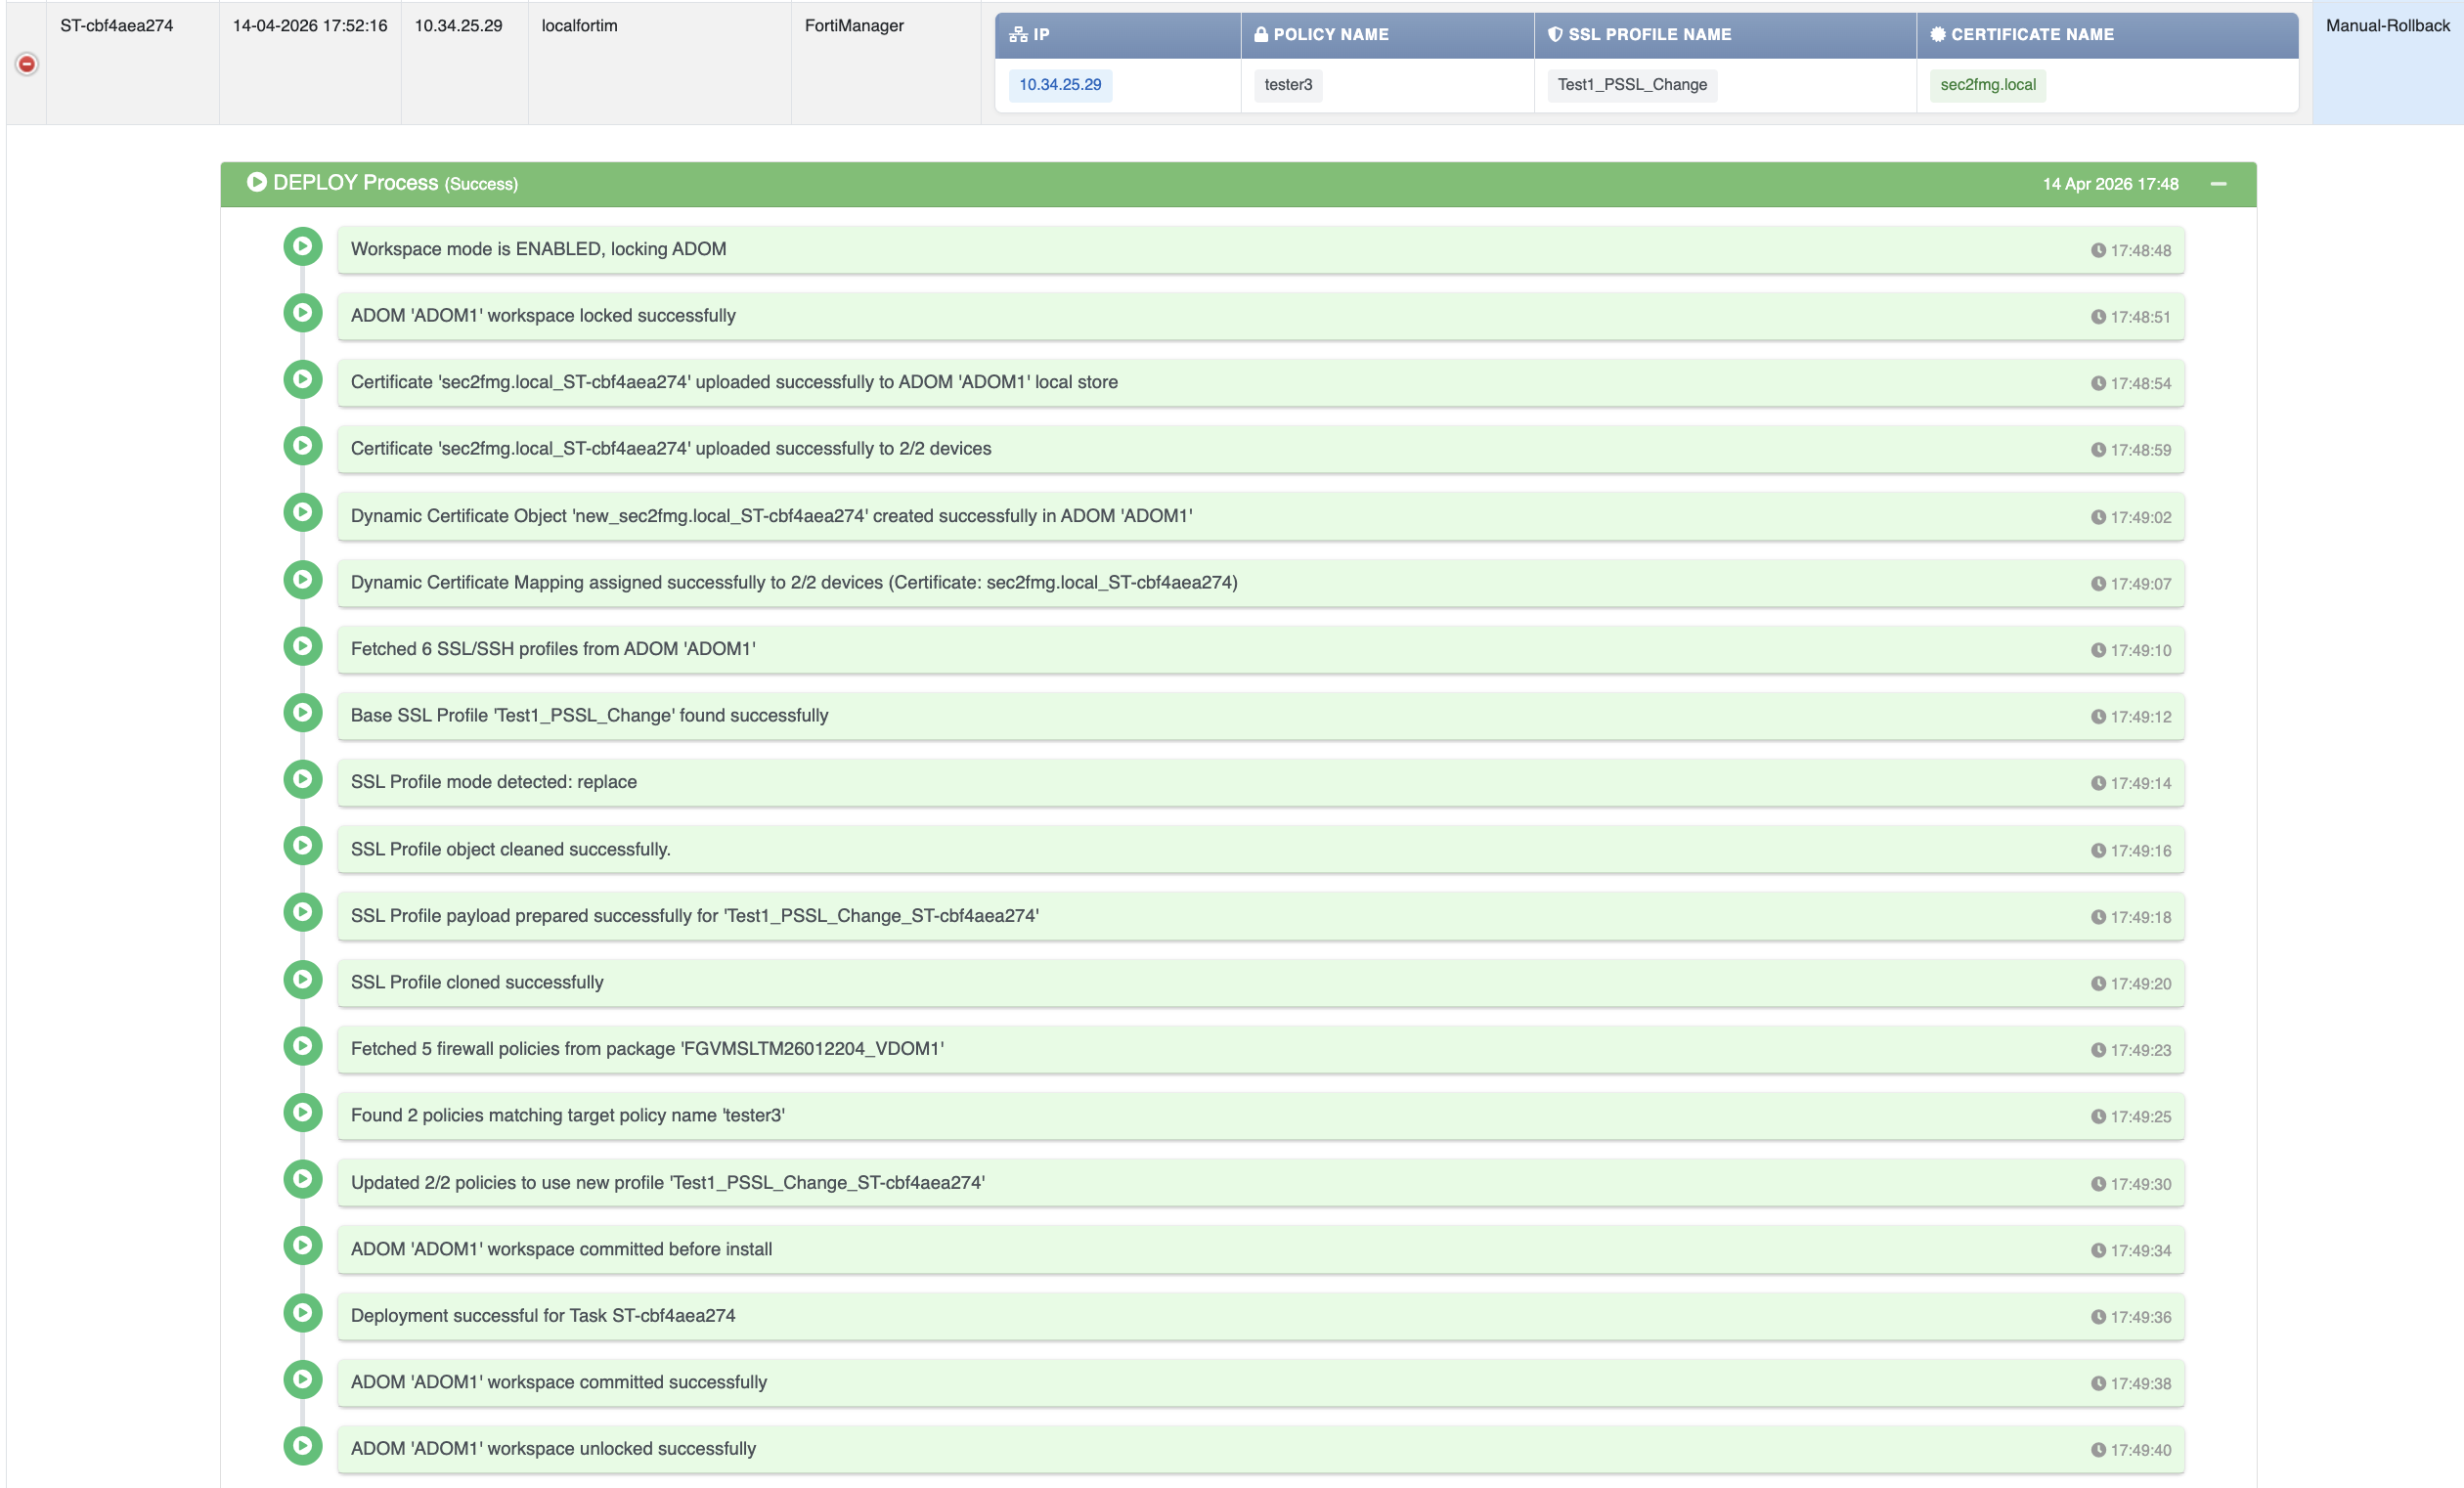
Operation Details
The following steps are performed during deployment:
| Step | Operation Description |
|---|---|
| 1 | Workspace mode is enabled, ADOM is locked |
| 2 | Certificate uploaded to ADOM local store |
| 3 | Certificate distributed to managed devices |
| 4 | Dynamic Certificate Object created in ADOM |
| 5 | Dynamic Certificate Mapping assigned to devices |
| 6 | SSL profile fetched and cloned |
| 7 | SSL Profile payload prepared and applied |
| 8 | Firewall policies updated to use new profile |
| 9 | ADOM workspace committed and policy installed |
| 10 | ADOM workspace unlocked successfully |
SecTrail CM locks the ADOM workspace before deployment, commits all changes after the operation is complete, and unlocks the workspace. If Install Policy is enabled, the updated policy is also pushed to the target FortiGate devices.
Rollback Operation
The Manual Rollback feature can be used in case of issues after certificate deployment.
If an error occurs at any step during the deployment process, the system automatically performs a rollback and all changes are reverted.
Rollback Steps
- Navigate to Automation > Processes
- Find the operation you want to rollback
- Use the Manual-Rollback option in the Status column
- Confirm
Operations During Rollback
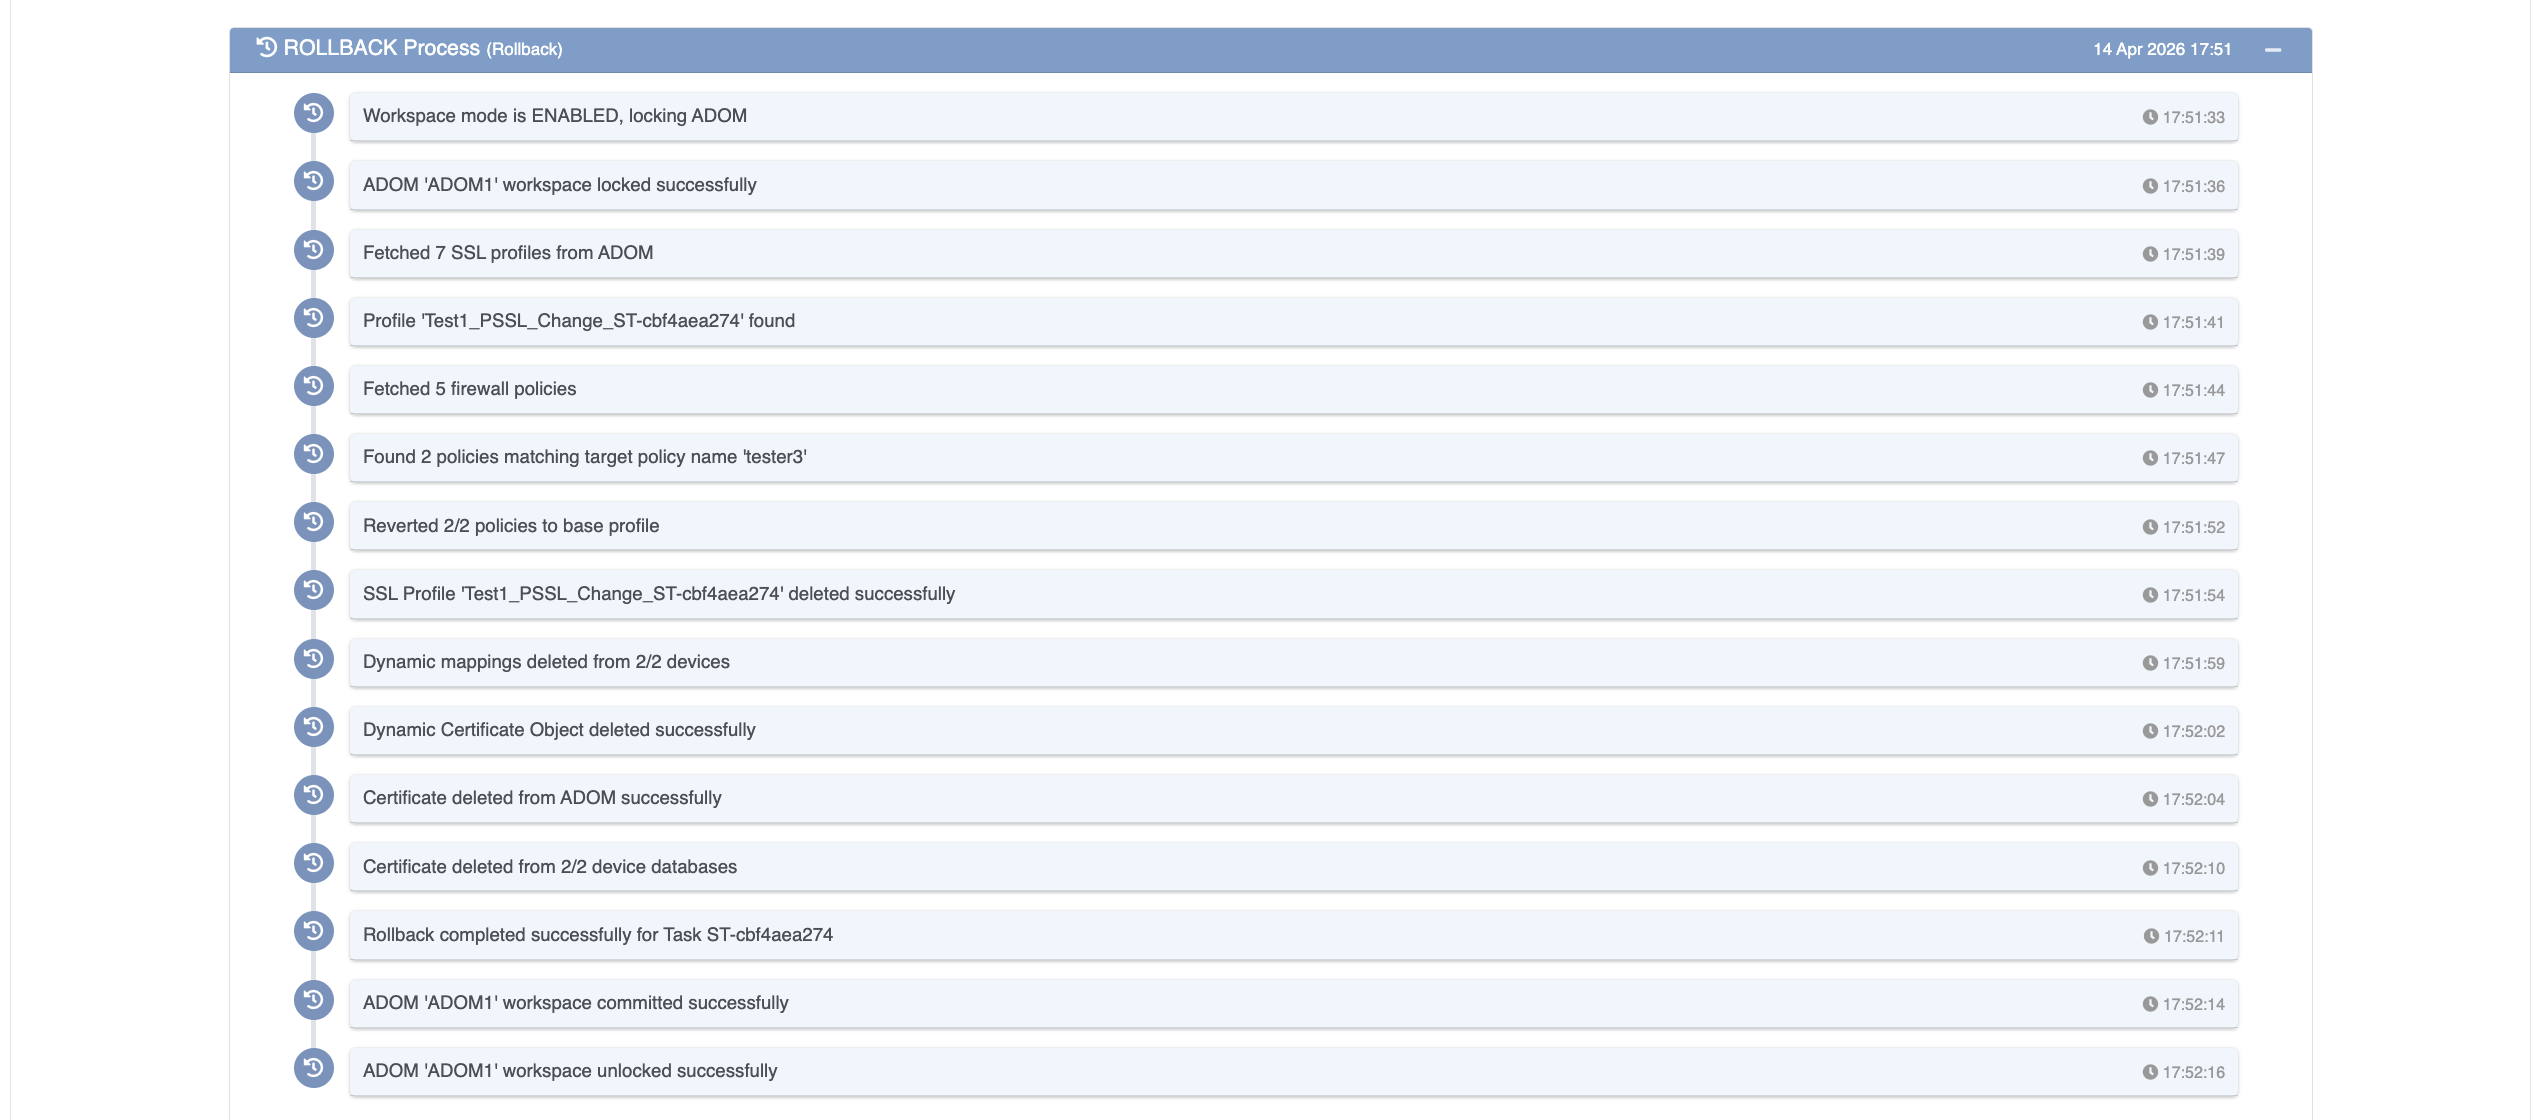
| Step | Operation |
|---|---|
| 1 | Workspace mode is enabled, ADOM is locked |
| 2 | SSL profiles fetched from ADOM |
| 3 | Firewall policies reverted to base profile |
| 4 | SSL Profile deleted successfully |
| 5 | Dynamic mappings deleted from managed devices |
| 6 | Dynamic Certificate Object deleted |
| 7 | Certificate deleted from ADOM and device databases |
| 8 | ADOM workspace committed successfully |
| 9 | ADOM workspace unlocked successfully |