FortiWeb
SecTrail CM enables automatic deployment and renewal of SSL certificates by establishing agentless connections to Fortinet FortiWeb Web Application Firewall (WAF) devices.
Connection Requirements
| Requirement | Detail | Description |
|---|---|---|
| Protocol | REST API (HTTPS) | FortiWeb's native REST API is used |
| Port | 443 | Standard HTTPS port or custom management port |
| Authentication | Basic Authentication | Authentication via Username and Password |
| User Permission | Administrator or Certificate Manager | Certificate upload and configuration permission |
Automated Operations
SecTrail CM automatically performs the following operations on FortiWeb:
- Certificate and Key Upload: Secure transfer of SSL certificate and private key
- Certificate Chain Creation: Creating chain with Intermediate CA certificates
- Server Policy Update: Updating certificate references in server policy
- SNI Members Update: SNI-based certificate assignments
- Configuration Apply: Activating the configuration
Configuration Steps
1. Creating FortiWeb User
Navigate to Automation > Device Users and create a user for FortiWeb.
2. Adding FortiWeb Device to SecTrail CM
Click Automation > Devices > Add New Device button and enter the following information:

- Name: Provide a descriptive name for the device
- Device Users: Select the user created in Step 1
- IP: Enter the management IP address of the FortiWeb device
- Device Type: Select
FortiWebfrom the dropdown menu - Cert Upload Only: Should only certificate be uploaded? (Disabled/Enabled)
After the FortiWeb device is added to SecTrail CM, the IP addresses and ports of all Server Policies and SNIs defined on the device are automatically included in the discovery period and scanned regularly.
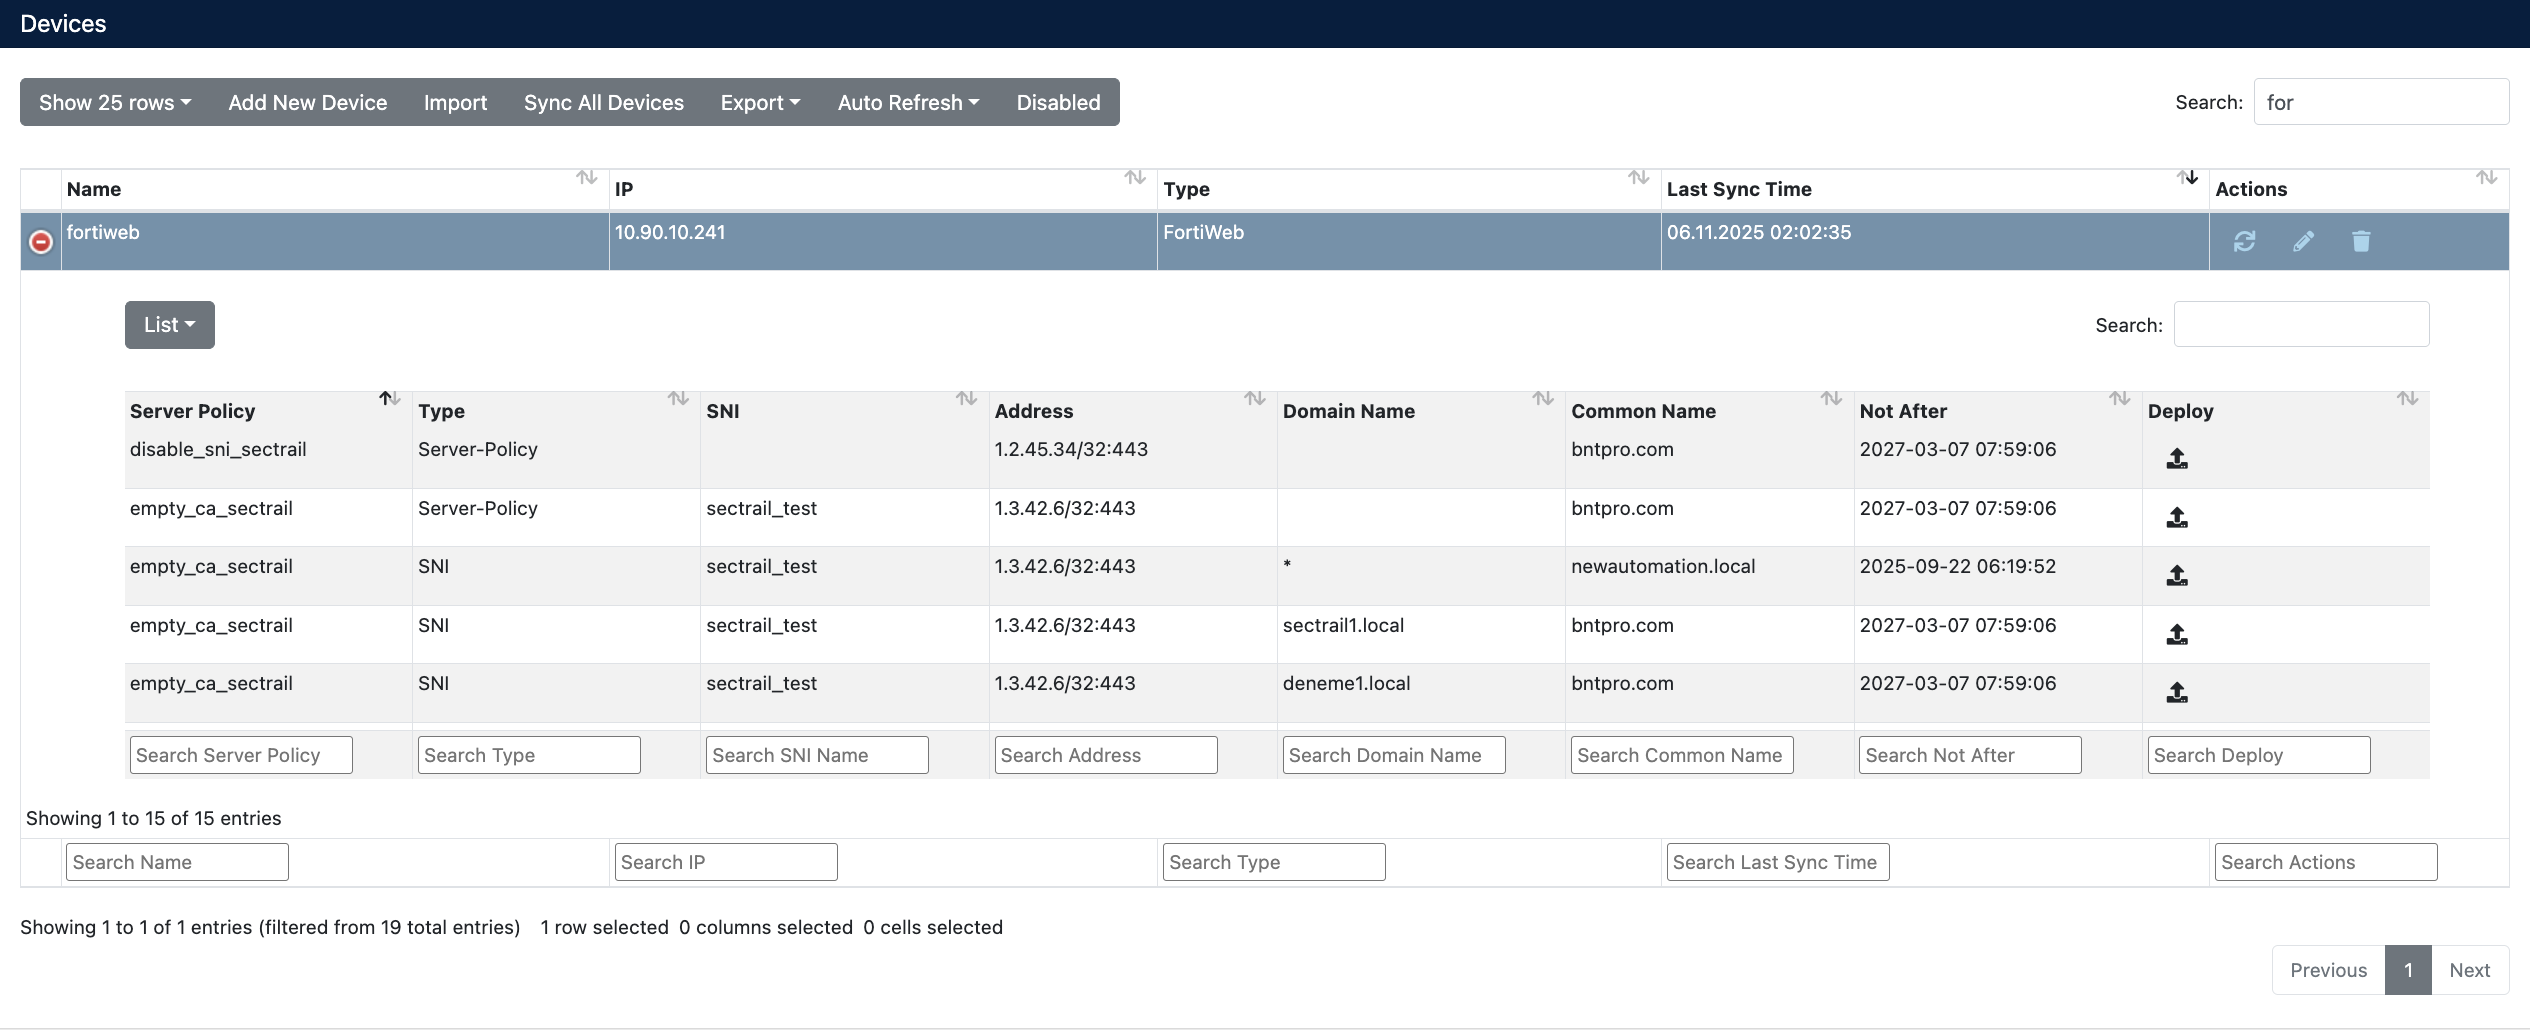
3. Viewing Device Information
After the device is added, it will be displayed in the Automation > Devices list. Click on the row to view device details:

- Server Policy: Server Policy names defined on the FortiWeb device
- Type: Shows policy type (Server-Policy or SNI)
- SNI: Server Name Indication name (for SNI types)
- Domain Name: Associated domain name of the SNI profile
- Address: IP address and port of the virtual server
- Common Name: Common Name value of the certificate
- Not After: Certificate expiration date
- Deploy: For certificate deployment
Certificate Deployment
Step 1: Server Policy and Certificate Selection
- Select your FortiWeb device from Automation > Devices
- In the device details, find the Server Policy or SNI where you want to deploy the certificate
- Click the Deploy button on the relevant row
- In the Deploy Certificate window that opens:
- Server Policy/SNI: Target policy information is displayed
- Certificate: Select the certificate you want to deploy from the dropdown menu

Step 2: Starting the Deployment Process
Click the Deploy button to start the certificate deployment process.
Step 3: Process Tracking
The deployment process can be tracked from Automation > Processes:

Operation Details
The following steps are performed during deployment:
| Step | Operation Description |
|---|---|
| 1 | Certificate file is uploaded to the device |
| 2 | Certificate chain is created |
| 3 | Intermediate CA group is created |
| 4 | Chain certificate is added to CA group |
| 5 | Server policy is updated with new certificate |
FortiWeb integration supports Server Policy-based certificate updates. During deployment, the certificate reference in the relevant server policy is automatically updated.
SNI (Server Name Indication) Management
FortiWeb supports SNI-based certificate management. SNI deployment operations:

SNI Operation Details
| Step | Operation Description |
|---|---|
| 1 | Certificate file is uploaded to the device |
| 2 | Certificate chain is created |
| 3 | Intermediate CA group is created |
| 4 | Chain certificate is added to CA group |
| 5 | SNI member certificate is updated |
In SNI member updates, existing certificate references are overridden with the new certificate. This simplifies domain-based certificate management.
Rollback Operation
The Manual Rollback feature can be used in case of issues after certificate deployment.
If an error occurs at any step during the deployment process, the system automatically performs a rollback and all changes are reverted.
Rollback Steps
- Navigate to Automation > Processes
- Find the operation you want to rollback
- Use the Manual-Rollback option in the Status column
- Confirm
Operations During Rollback
| Step | Server Policy Rollback | SNI Rollback |
|---|---|---|
| 1 | Server policy is reverted to old certificate | SNI member is reverted to old certificate |
| 2 | Chain certificate is removed from CA group | Chain certificate is removed from CA group |
| 3 | Uploaded chain certificate is deleted | Uploaded chain certificate is deleted |
| 4 | Uploaded certificate is deleted | Uploaded certificate is deleted |