Certificate Creation
This guide explains step-by-step how to create different types of certificates through SecTrail CM. SecTrail CM allows you to manage your own Certificate Authority (CA) infrastructure and sign certificates for various purposes.
With the certificate creation feature, you can perform Root CA, Intermediate CA, Self-Signed, CSR, and external CA signing operations. Each certificate type is optimized for different use cases.
Certificate Creation Screen
You can use the built-in certificate manager in SecTrail CM to create a new certificate.
To create certificates: Go to Inventory → Issue Certificate → New Certificate menu.
Certificate Creation Form - General Information
Certificate Types
SecTrail CM supports the following certificate types for different use cases:
Certificate Type Options
| Certificate Type | Description | Usage Purpose |
|---|---|---|
| Root CA | Root certificate authority | Top level of your CA infrastructure, signs all other certificates |
| Intermediate CA | Intermediate certificate authority | Signed by Root CA, signs end-user certificates |
| Self-Signed | Self-signed certificate | For test environments, internal applications, development |
| Sign With Local CA | Signing with local CA | Sign new certificates with existing CA in SecTrail CM |
| CSR | Certificate Signing Request | Create certificate request to be signed by external CAs |
| External CA | Signing with external CA | Signing with integrated CAs like ADCS, GlobalSign, DigiCert, Hashicorp Vault |
Certificate Parameters
The certificate creation form is presented in three tabs.
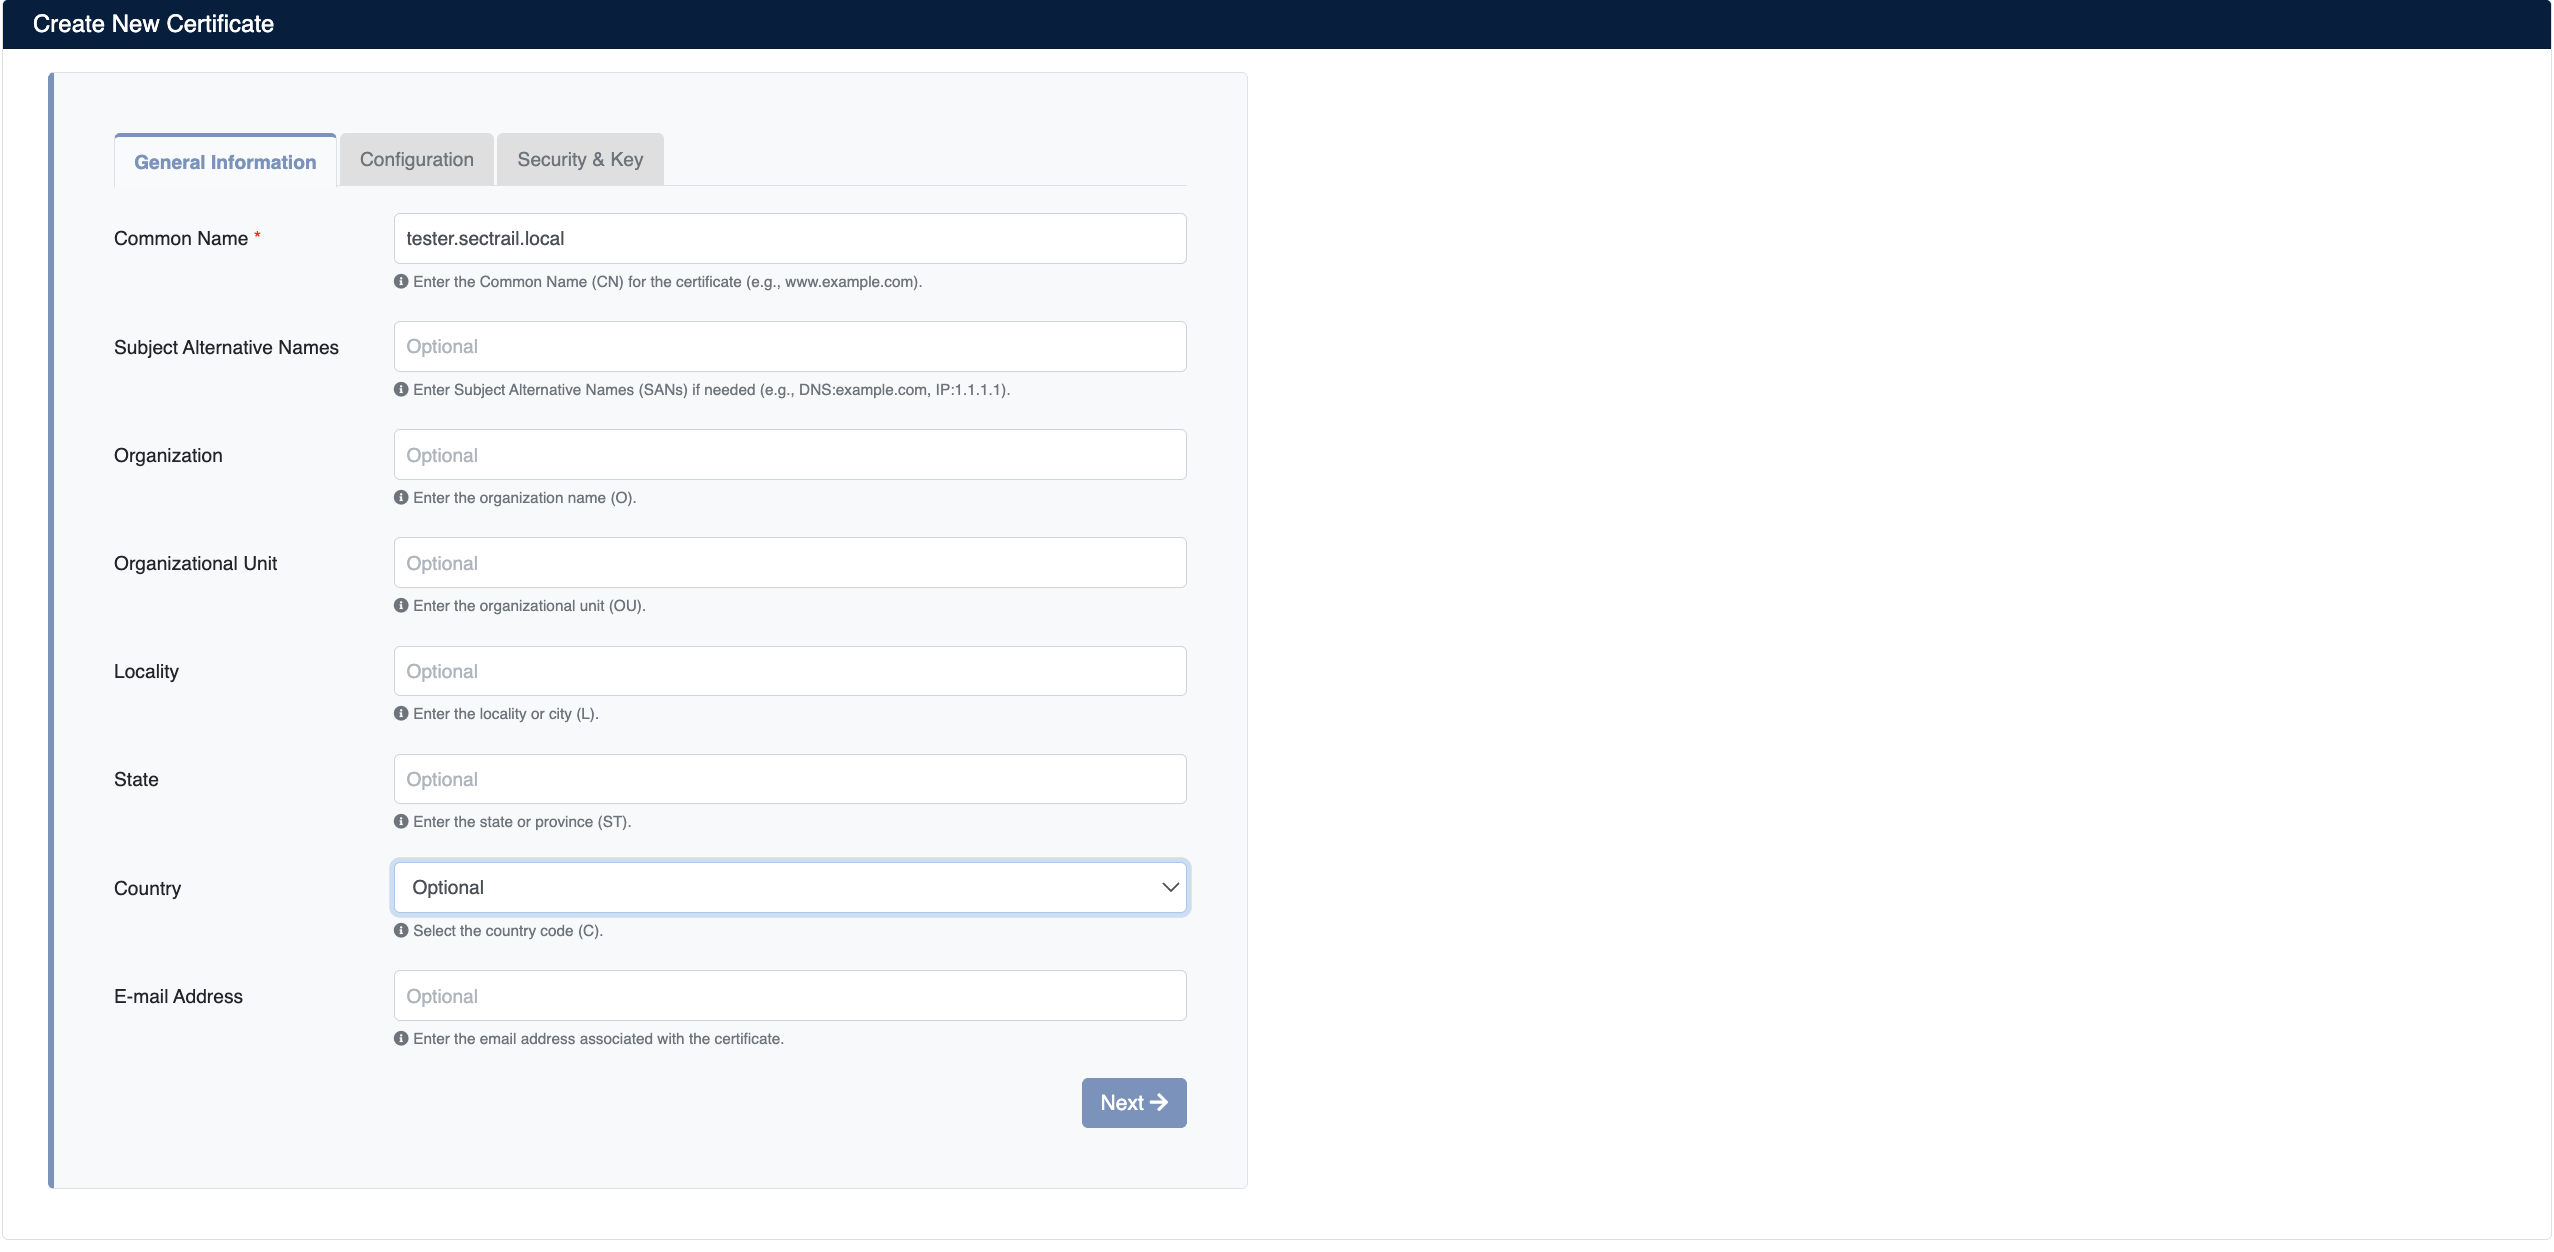
Tab 1: General Information
- Common Name: Main domain name (FQDN) of the certificate — required (e.g.
example.com,*.example.com) - Subject Alternative Names: Additional domain names and IP addresses (e.g.
DNS:example.com,IP:1.1.1.1) - Organization: Organization name (O)
- Organizational Unit: Department or unit (OU)
- Locality: City (L)
- State: State or province (ST)
- Country: Country code — select from dropdown (C)
- E-mail Address: Contact email address
Separate multiple values with commas: DNS:example.com,DNS:www.example.com,IP:1.1.1.1
Tab 2: Configuration
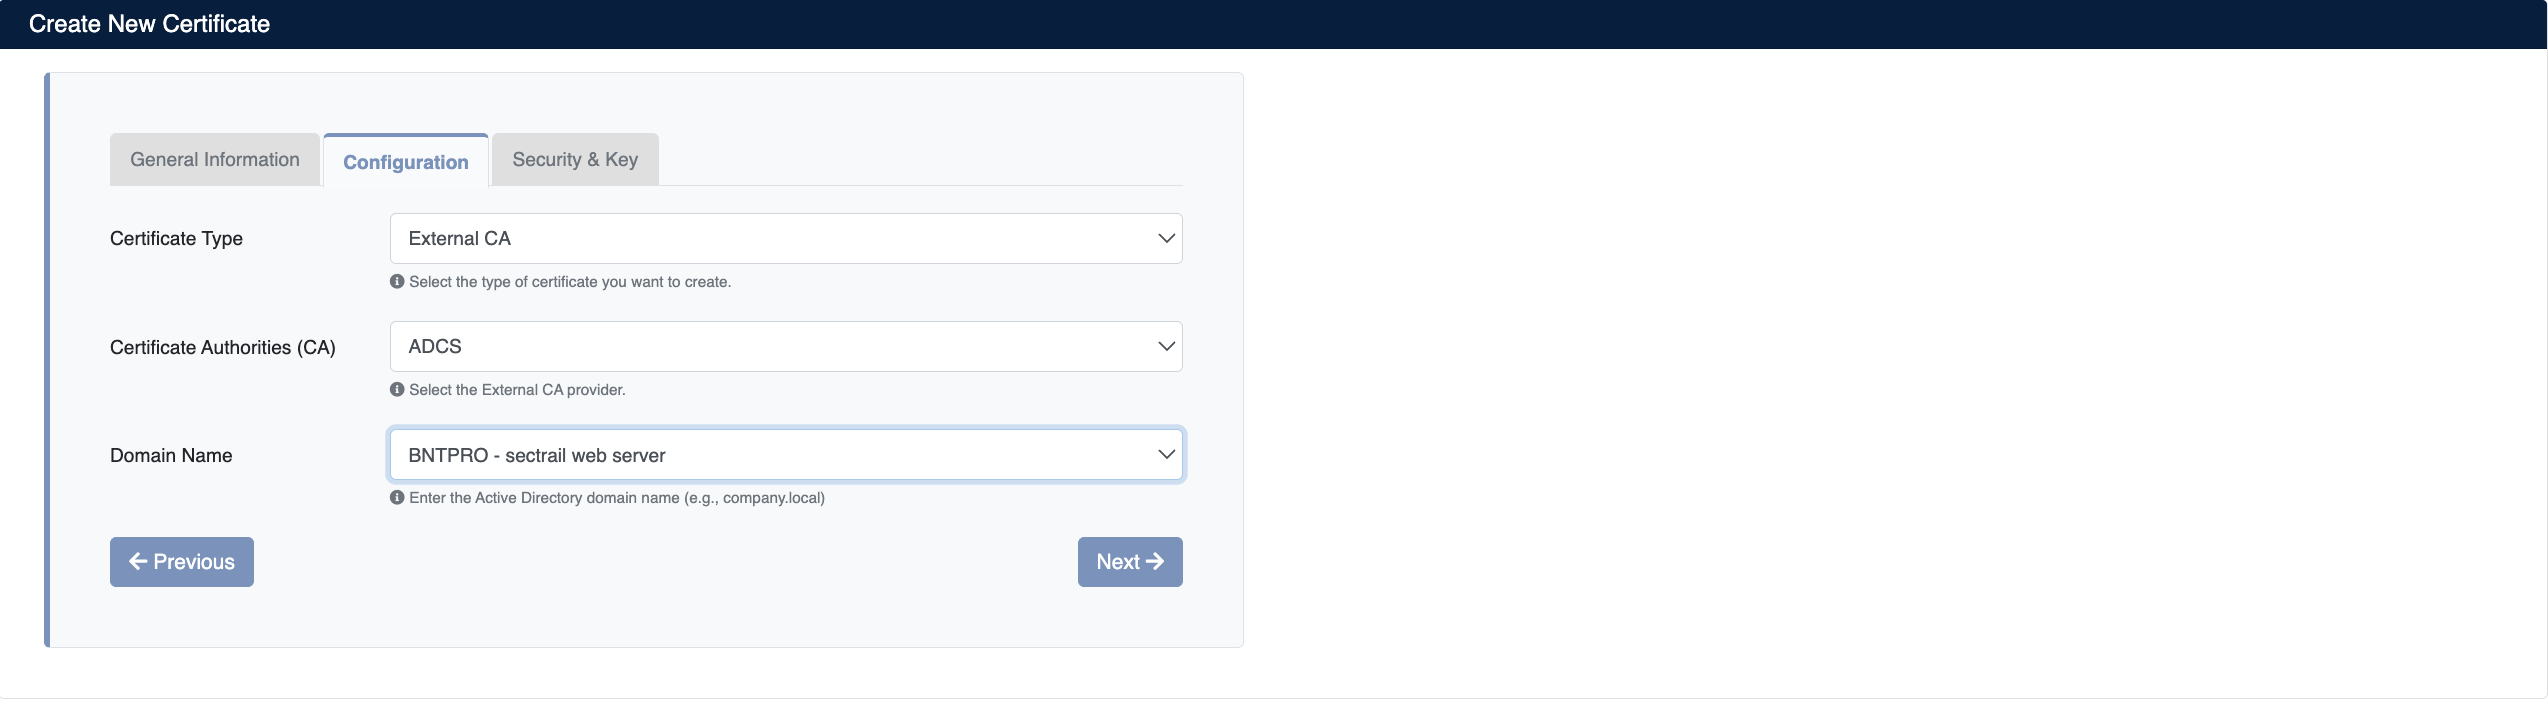
- Certificate Type: Certificate type (External CA, Local CA, Self-Signed, CSR, etc.)
- Certificate Authorities (CA): External CA provider to use (e.g.
ADCS,GlobalSign,DigiCert) - Domain Name: Active Directory domain name (for External CA)
Tab 3: Security & Key
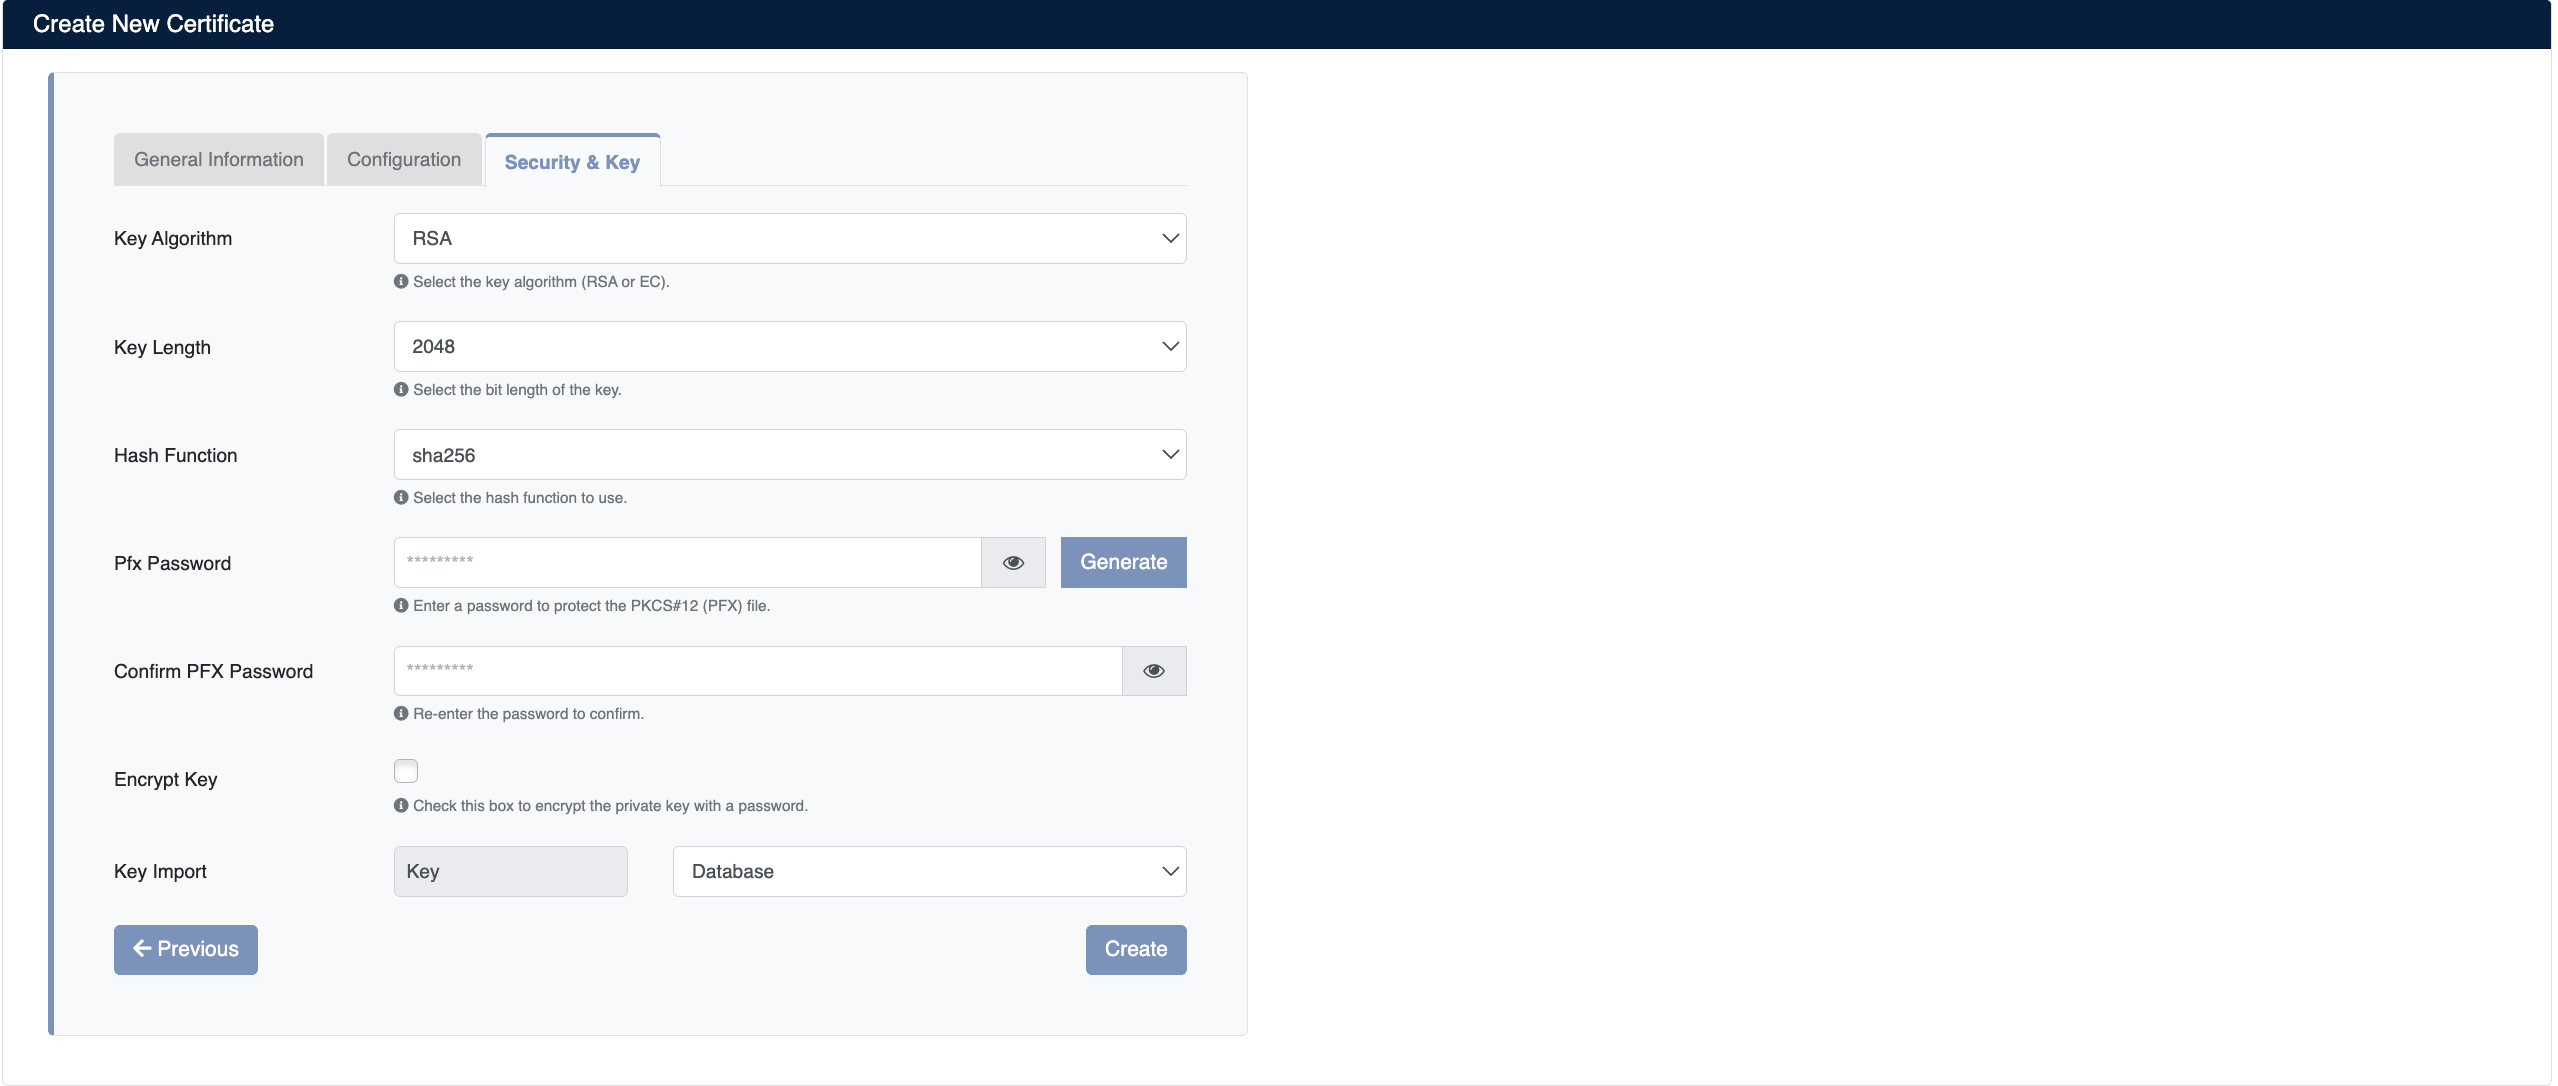
- Key Algorithm: Key algorithm (
RSAorEC) - Key Length: Key bit length (e.g.
2048,4096) - Hash Function: Hash algorithm (e.g.
sha256) - Pfx Password: Private key protection password; can be auto-generated with Generate
- Confirm PFX Password: Password verification
- Encrypt Key: Should private key be stored encrypted?
- Key Import: Where the key will be stored (
Key,Database,HSM,BeyondTrust)
SecTrail CM offers multiple options for securely storing private keys:
- Key: Private key is stored together with certificate (default)
- Database: Stored encrypted in SecTrail CM database
- HSM (Hardware Security Module): Stored in hardware security module (most secure, recommended for enterprise environments)
- BeyondTrust Password Safe: Stored in central password vault with BeyondTrust integration
For configuring HSM and BeyondTrust integrations, review the Integrations page.
Extended Key Usage (EKU) Values
Determines the purposes for which the certificate can be used:
| EKU Value | Description | Use Case |
|---|---|---|
| serverAuth | Server authentication | Web servers (HTTPS), TLS/SSL |
| clientAuth | Client authentication | VPN, mutual TLS, user certificates |
| codeSigning | Code signing | Software, application signing |
| emailProtection | Email protection | S/MIME, email encryption |
| timeStamping | Time stamping | Document and transaction timestamps |
| ocspSigning | OCSP response signing | OCSP responder certificates |
Certificate Types and Creation Steps
1. Creating Root CA
Root CA forms the foundation of your own PKI infrastructure. It is used to sign all other certificates.
- When setting up a new PKI infrastructure
- When creating your own internal certificate authority
- When you want to centrally manage all organization certificates
Steps
- Select
Root CAfrom Certificate Type field - Fill in basic information:
- Common Name: CA name (e.g.,
MyCompany Root CA) - Organization: Company name
- Country: Country code
- Common Name: CA name (e.g.,
- Set security parameters:
- Lifetime: 3650 days (10 years - Root CAs are long-lived)
- Key Length: 4096 bit (maximum security)
- Hash Function: sha256 or sha384
- Set and confirm Pfx Password
- Leave Extended Key Usage field empty (Root CA is used for all purposes)
- Click Submit button
The Root CA private key is extremely critical. If you lose or have this key stolen, your entire PKI infrastructure is compromised. You must:
- Use a strong password
- Take encrypted backup
- Keep access limited
2. Creating Intermediate CA
Intermediate CA acts as a bridge between Root CA and end-user certificates.
- To protect Root CA (Root CA can be kept offline)
- When creating separate CAs for different departments or regions
- As a good security practice (recommended)
Steps
- Select
Intermediate CAfrom Certificate Type field - Fill in basic information:
- Common Name:
MyCompany Intermediate CA - Fill in fields like Organization, Country
- Common Name:
- Set security parameters:
- Lifetime: 1825 days (5 years)
- Key Length: 2048 or 4096 bit
- Hash Function: sha256
- Signing with Root CA: The existing Root CA in the system will automatically sign this Intermediate CA
- Set Pfx Password
- Click Submit button
Use Intermediate CA for daily certificate signing operations, keep Root CA offline and in a secure location.
3. Creating Self-Signed Certificate
Self-signed certificates are ideal for quick test and development environments.
- For development and test environments
- For internal network applications
- For proof-of-concept work
- For quick prototyping
Steps
- Select
Self-Signedfrom Certificate Type field - Fill in basic information:
- Common Name:
dev.example.comor*.dev.example.com(wildcard) - Subject Alternative Names:
DNS:dev.example.com,DNS:*.dev.example.com
- Common Name:
- Set security parameters:
- Lifetime: 365 days
- Key Length: 2048 bit (sufficient for testing)
- Hash Function: sha256
- Extended Key Usage:
serverAuth(for web servers) - Set Pfx Password
- Click Submit button
Self-signed certificates are marked as untrusted by browsers. Do not use in production environments.
4. Sign With Local CA (Signing with Local CA)
Create new certificates using your existing CAs in SecTrail CM.
- When creating certificates for production servers
- When signing certificates with your trusted CA
- When producing certificates compliant with corporate standards
Steps
- Select
Sign With Local CAfrom Certificate Type field - Select CA to sign: Choose one of the registered CAs in the system
- Fill in basic information:
- Common Name:
web.example.com - Subject Alternative Names: Add all needed domains
- Common Name:
- Set security parameters:
- Lifetime: 365 or 825 days (according to public trust requirements)
- Key Length: 2048 bit
- Hash Function: sha256
- Extended Key Usage:
- For web servers:
serverAuth - For VPN:
serverAuth,clientAuth
- For web servers:
- Set Pfx Password
- Click Submit button
5. Creating CSR (Certificate Signing Request)
Create CSR to obtain certificate from an external CA (Let's Encrypt, DigiCert, GlobalSign, etc.).
- When purchasing public certificates
- When using third-party CA services
- If your organization has external CA agreements
Steps
- Select
CSRfrom Certificate Type field - Carefully fill in basic information:
- Common Name: Domain for which you'll request certificate
- Organization: Company name to be verified by CA
- Organizational Unit, Locality, State, Country: Required for verification
- E-mail Address: Contact email
- Set security parameters:
- Key Length: 2048 bit (accepted by most CAs)
- Hash Function: sha256
- Set Pfx Password (for private key protection)
- Click Submit button
- Download the created CSR and send to CA
- Download CSR from SecTrail CM
- Go to your CA provider's website
- Upload or paste CSR
- Complete domain verification process
- Receive signed certificate from CA
- Import certificate to SecTrail CM (Import)
6. External CA (Signing with External CA)
Sign certificates directly with external CA systems integrated with SecTrail CM.
- If you have Microsoft ADCS (Active Directory Certificate Services) integration
- If you have enterprise CA agreements like GlobalSign, DigiCert
- If you're using Hashicorp Vault PKI
- If you want automatic certificate management
Supported External CAs
SecTrail CM supports the following external CA integrations:
| CA Provider | Description | Usage |
|---|---|---|
| ADCS | Microsoft Active Directory Certificate Services | Windows environments, enterprise PKI |
| GlobalSign | GlobalSign HVCA (Managed PKI) | Enterprise, high-volume certificate management |
| DigiCert | DigiCert CertCentral API | Public SSL/TLS certificates |
| Hashicorp Vault | Vault PKI Secrets Engine | Cloud-native, dynamic certificate management |
You must configure the relevant CA integration before signing certificates with external CA.
For Integration Setup:
- Go to Settings → Integrations → CA Integrations section
- Select the CA you want to use (ADCS, GlobalSign, DigiCert, Hashicorp Vault)
- Configure API information and connection settings
- Test the connection
For detailed setup instructions, review the Integrations page.
ADCS Signing Steps
- Certificate Type: Select
External CA - From External CA Dropdown: Select
ADCS - ADCS Configuration:
- CA Server: ADCS server address
- Certificate Template: Template name to use
- Credentials: Authorization information
- Fill in certificate information (Common Name, SAN, etc.)
- Click Submit button
GlobalSign Signing Steps
- Certificate Type: Select
External CA - From External CA Dropdown: Select
GlobalSign - GlobalSign Configuration:
- API Key: GlobalSign HVCA API key
- API Secret: API secret key
- Profile: Certificate profile
- Fill in certificate information
- Click Submit button
DigiCert Signing Steps
- Certificate Type: Select
External CA - From External CA Dropdown: Select
DigiCert - DigiCert Configuration:
- API Key: DigiCert CertCentral API key
- Organization ID: Org ID in DigiCert
- Certificate Type: OV, EV, DV selection
- Fill in certificate information
- Click Submit button
Hashicorp Vault Signing Steps
- Certificate Type: Select
External CA - From External CA Dropdown: Select
Hashicorp Vault - Vault Configuration:
- Vault Address: Vault server address
- PKI Path: PKI secrets engine path
- Token: Vault authentication token
- Role: Vault PKI role name
- Fill in certificate information
- Click Submit button
Post-Certificate Creation Operations
After a certificate is successfully created, it is automatically added to inventory and you can perform various operations.
Every certificate you create is automatically added to the inventory list on the Inventory → Certificate Store → Certificates & Keys page. From here you can view, manage, and track all your certificates. For detailed information about the inventory list, review the Inventory Management page.
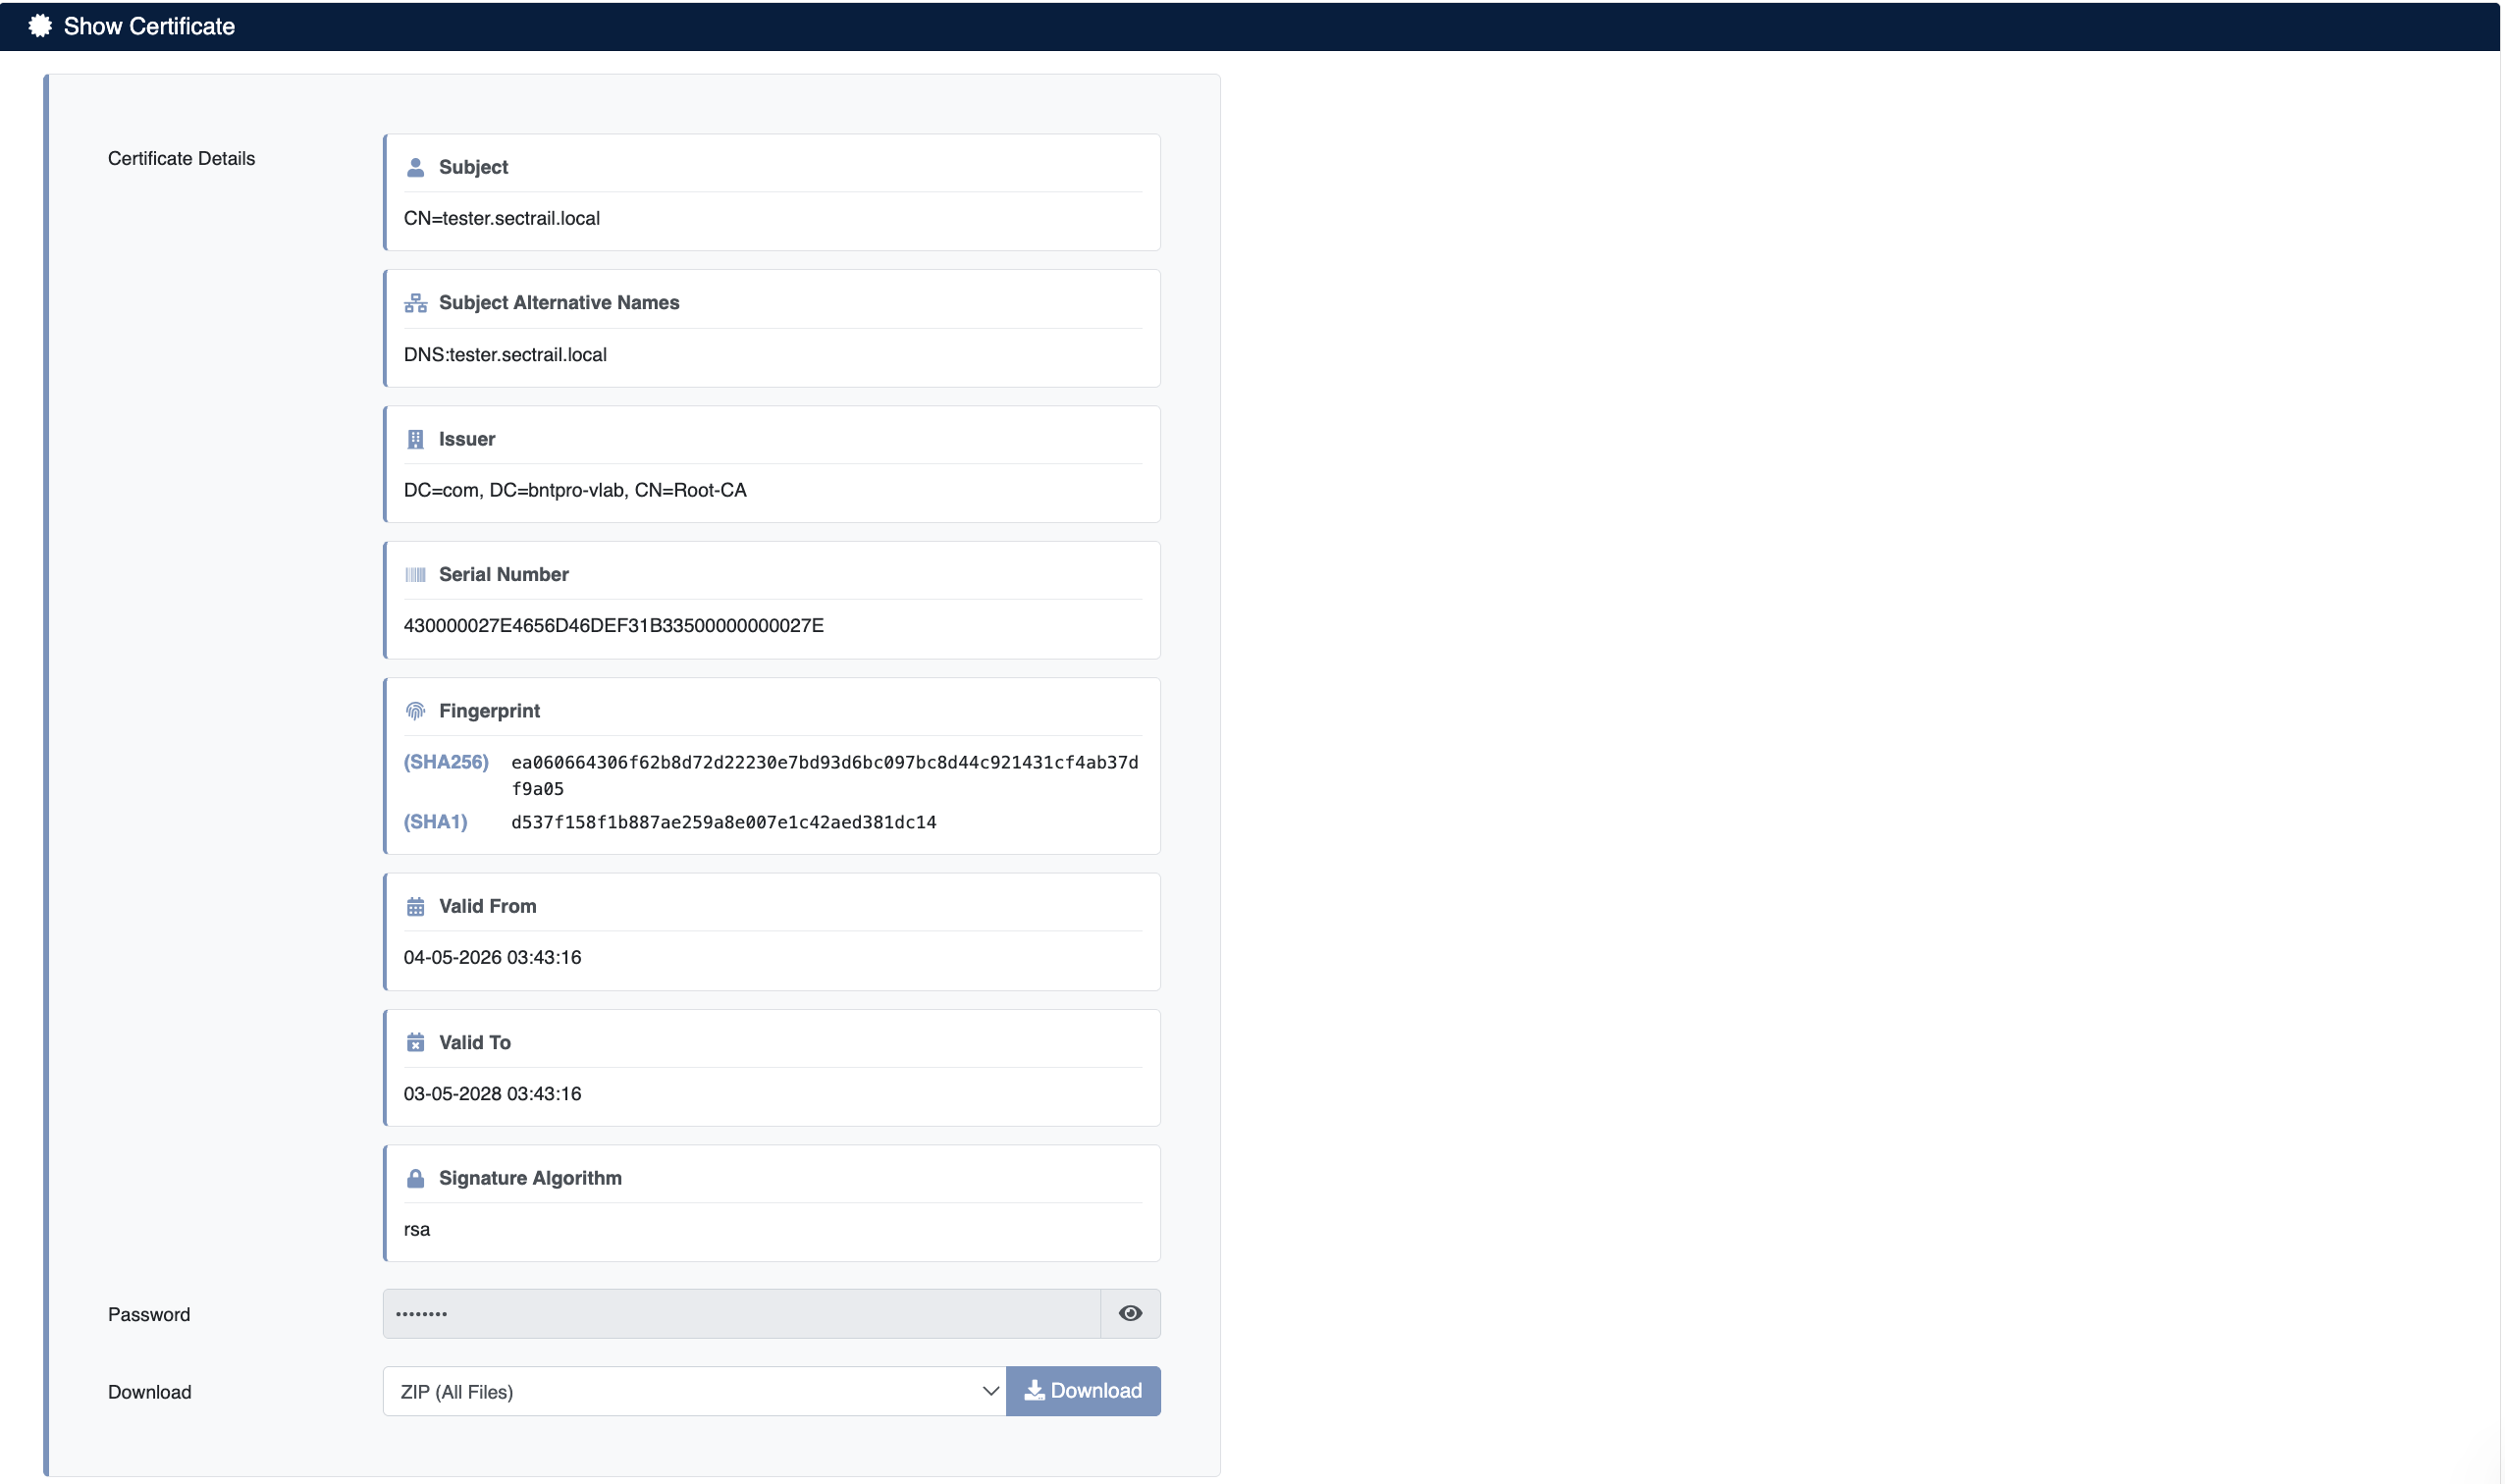
Viewing and Downloading Certificate
Immediately after certificate creation, the Show Certificate screen opens and you can view certificate information:
Certificate Details and Download Options
Displayed Information
| Field | Description |
|---|---|
| Name | Certificate's Common Name (CN) value (e.g., sectrail.local) |
| Certificate | Complete certificate content in PEM format (starts with -----BEGIN CERTIFICATE-----) |
| Password | Certificate private key password (shown hidden for security, can be viewed by clicking eye icon) |
Downloading Certificate
After certificate creation, you can download in different formats using download buttons on the screen:
- Download Zip - Archive containing all files (cert, key, chain, pfx, der, jks, bundle)
- Download Pfx - PFX/P12 format for Windows IIS and Exchange
- Download Jks - Java KeyStore format for Java/Tomcat
- Download Crt - Certificate file only (public key)
- Download Chain - CA chain files
- Download Bundle - Complete certificate chain (cert + intermediate + root)
- Download Key - Private key only
You will need the Pfx Password value you set to use downloaded certificates.
Access from Inventory List
After certificate creation, you can also access and manage from the Inventory → Certificate Store → Certificates & Keys page. You can view, filter, and perform various operations on your certificates in the list.