Discovery Configuration
This guide explains step-by-step how to discover, manage, and monitor certificates in SecTrail CM.
To learn what the Certificate Discovery feature is, how it works, and its advantages, first review the Features: Certificate Discovery page.
Certificate Discovery
Accessing Discovery Configurations
To manage discovery operations, go to: Discovery → Automated Discovery in the application panel.
Discovery Configurations List
You can view all discovery periods and configurations defined in SecTrail CM in a centralized list.
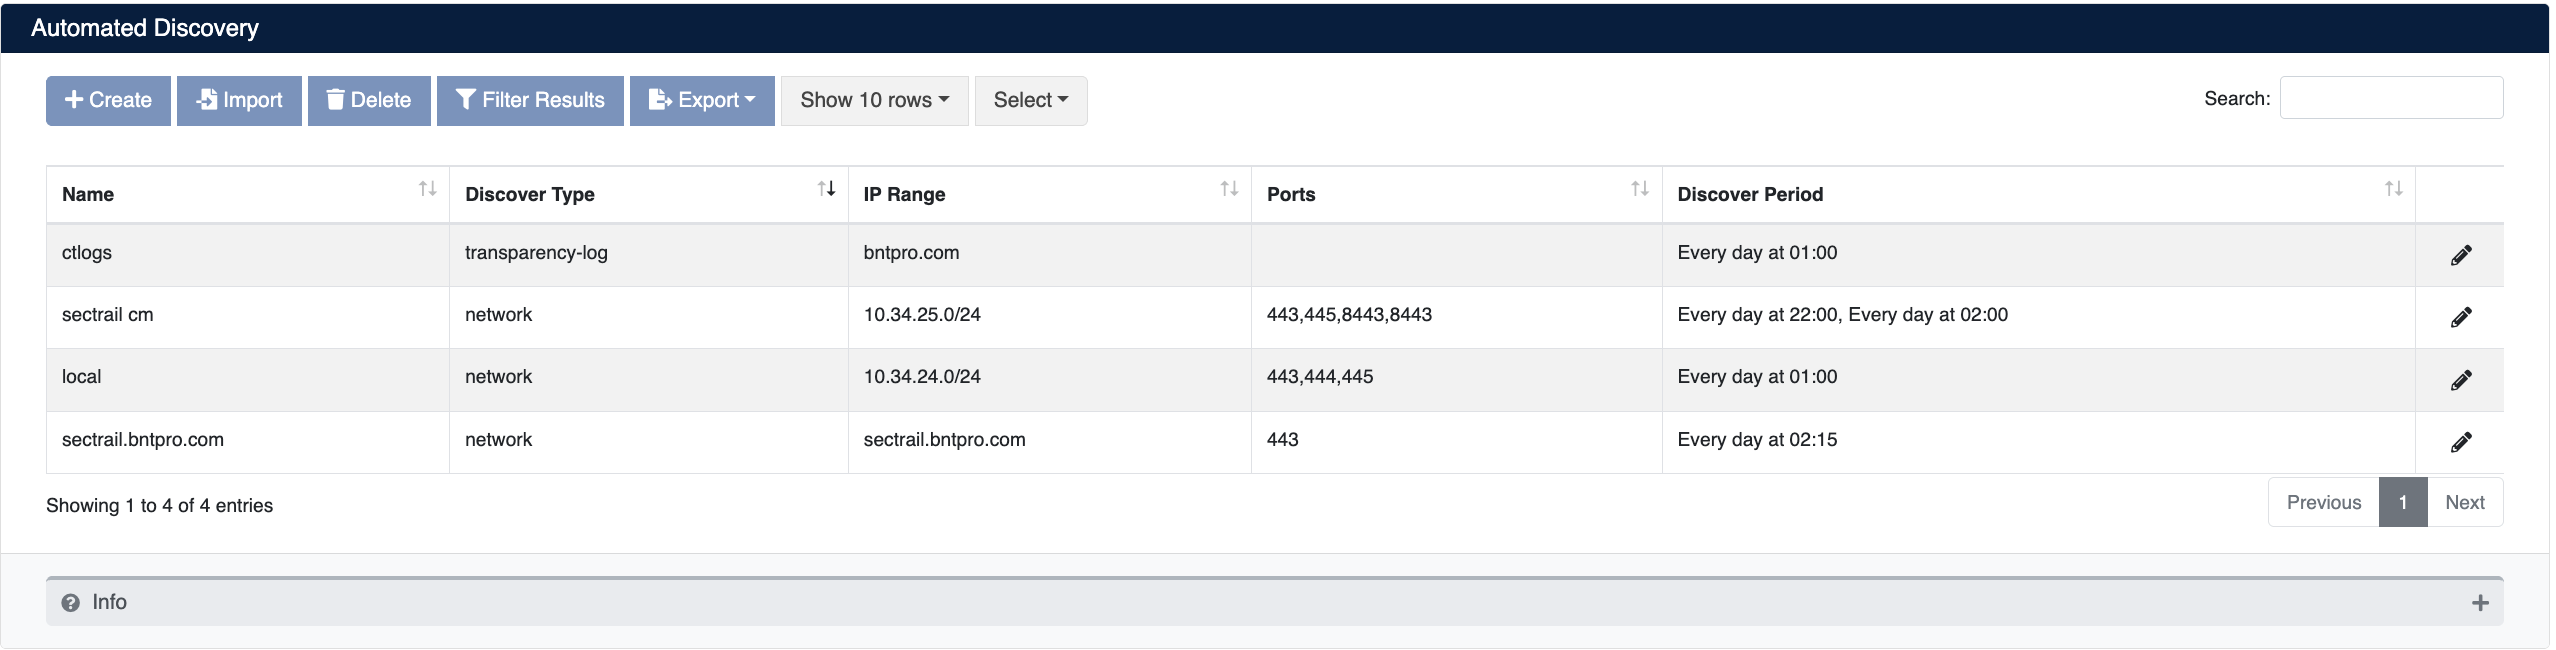
Discovery Configurations List - All Defined Discovery Tasks
List Information
The following information is displayed for each row in the discovery configurations list:
- Name - Descriptive name you gave to the discovery task
- Discover Type - Which discovery method is used (
Network ScanorCT Logs) - IP Range - IP range or domain name to be scanned
- Ports - Which ports are scanned (e.g.,
443, 444, 8443) - Discover Period - How frequently discovery runs
Available Operations
You can perform the following operations from the list:
- ✏️ View and Filter - Review discovery configurations
- 🔧 Edit - Update existing configurations
- 🗑️ Delete - Remove unnecessary configurations
- ➕ Create New - Add new discovery configuration
Network Scan Configuration
With Network Scan, you can discover SSL/TLS certificates in your internal network.
Creating New Network Scan
As shown in the image below, you can create a Network Scan configuration:
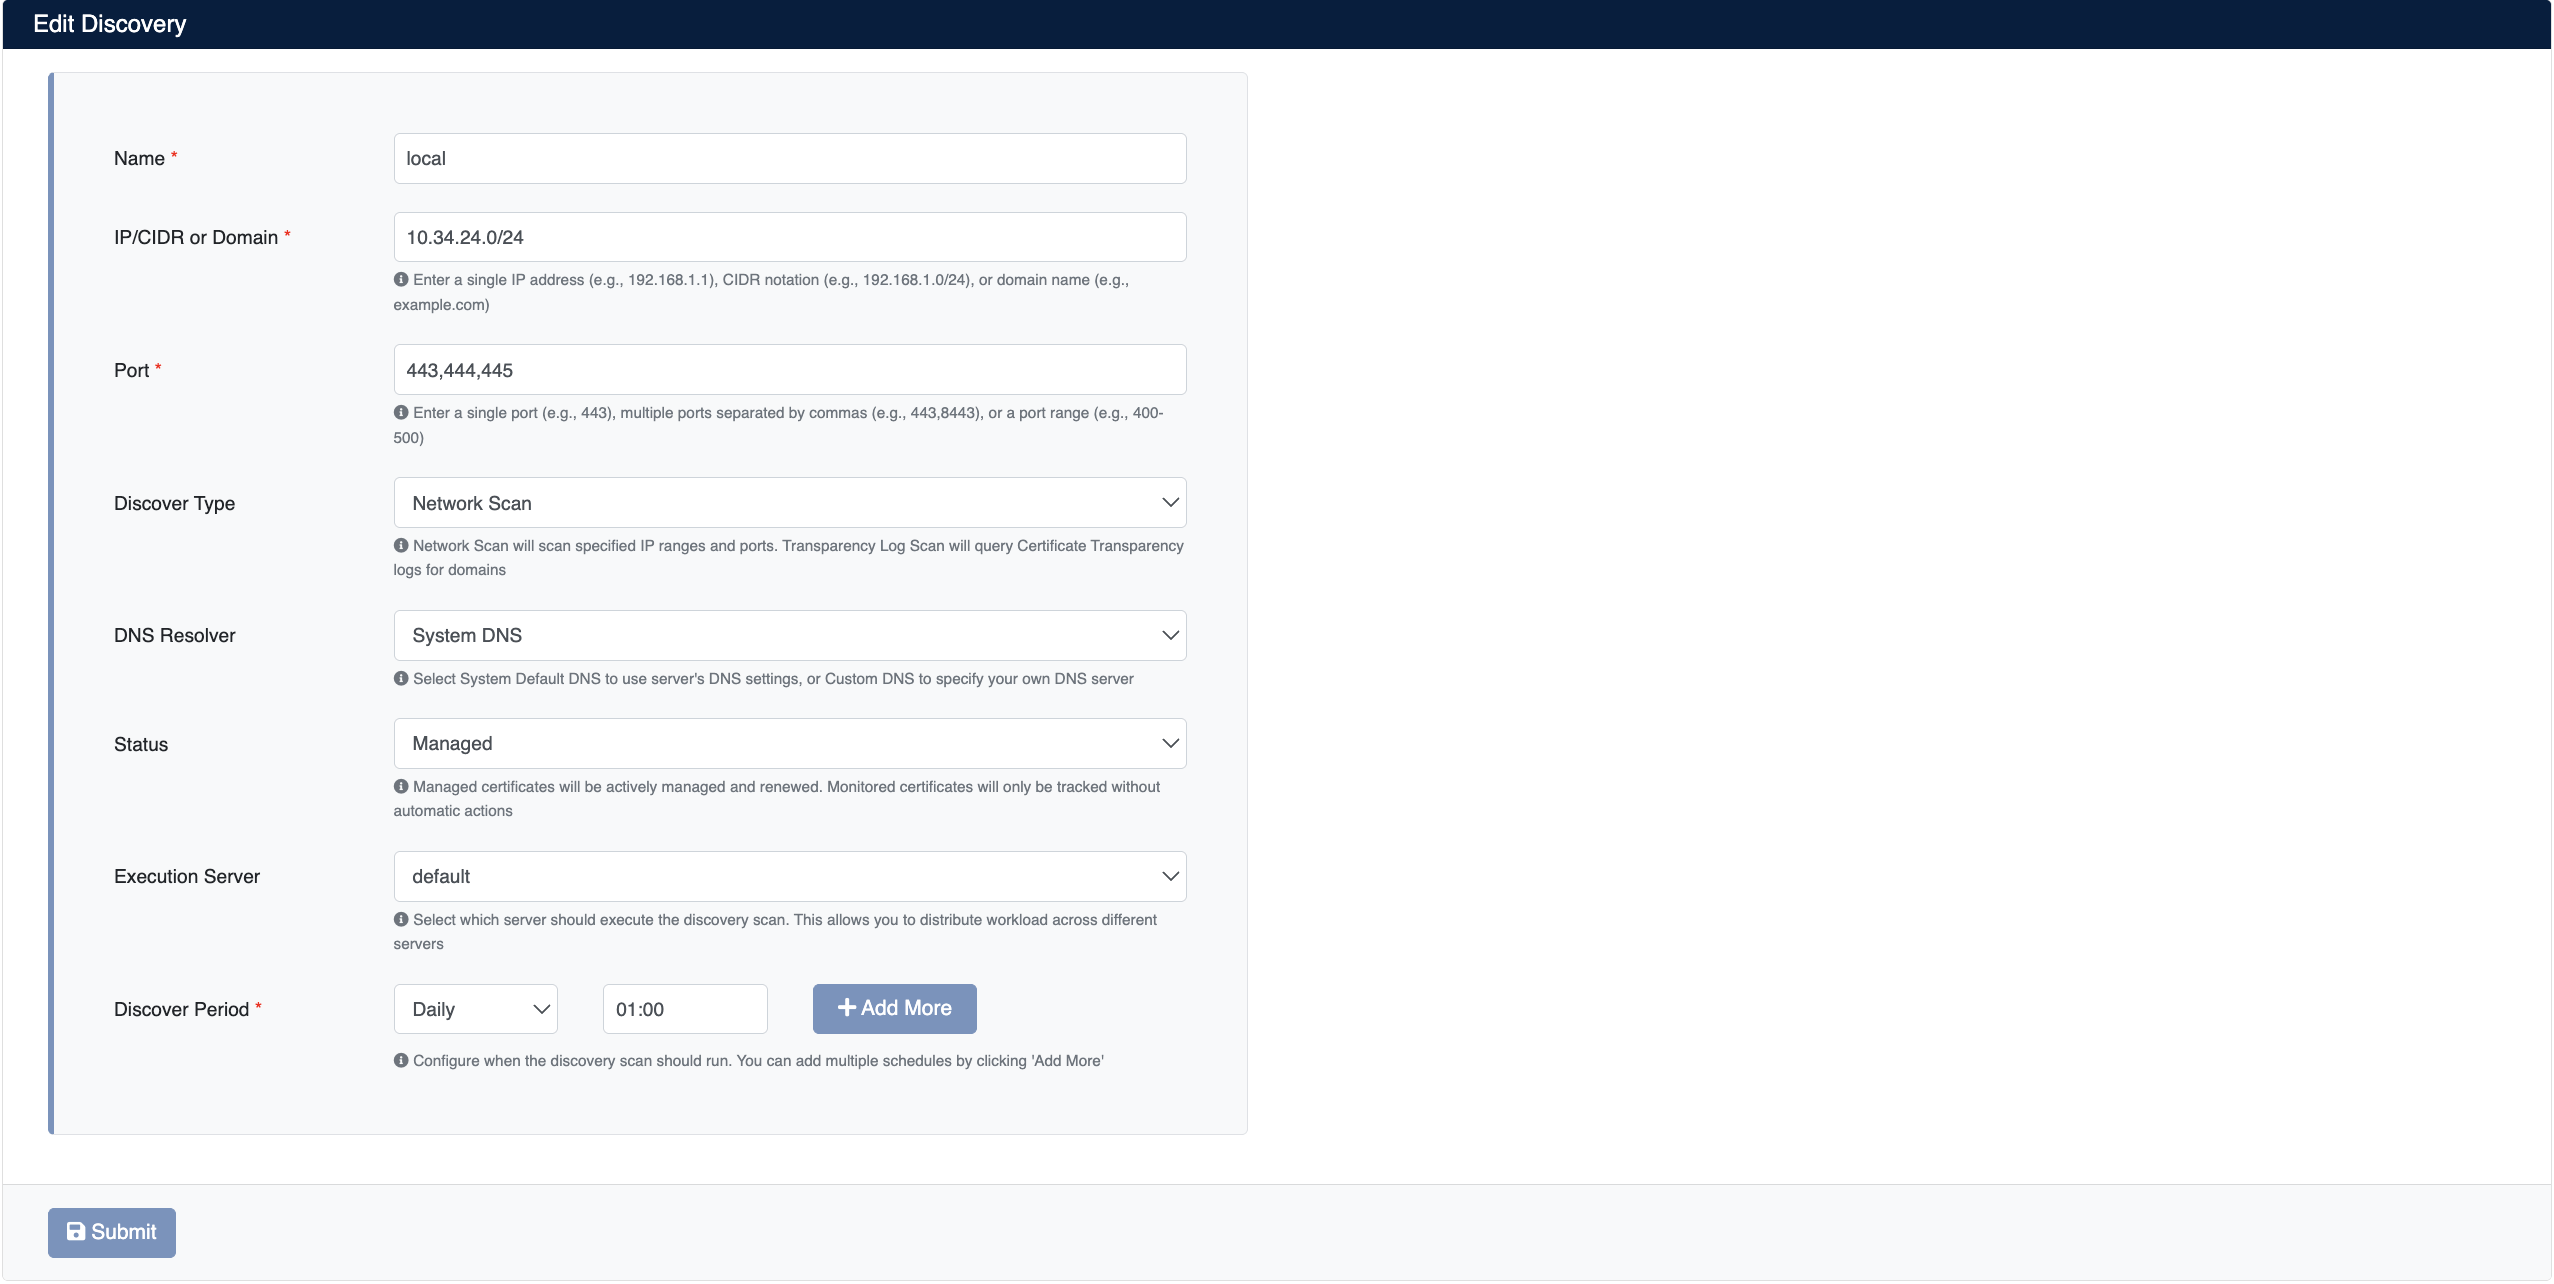
Network Scan Configuration Form
Configuration Parameters
| Parameter | Description | Options |
|---|---|---|
| Name | Provide a descriptive name for the discovery task | Use IP range or target system name |
| IP or CIDR | Enter the IP address, CIDR notation, or domain name you want to scan | • Single IP: 192.168.1.100• IP range: 10.34.24.0/24• Subnet: 172.16.0.0/16• Domain: example.com |
| Port | Enter ports to scan, separated by commas | • Single port: 443• Multiple: 443,444,8443 |
| Discover Type | Select discovery method | Select Network Scan |
| Status | Determine status of discovered certificates | • Managed: Managed certificates • Monitored: Only monitored certificates |
| Discover Period | Set how frequently the scan runs | • Period type: Daily or Weekly • Time: HH:MM format • Add More to add multiple times |
- Scanning outside business hours reduces network traffic
- Use Add More button to scan at different times each day
After entering the form information, click the Submit button to save the configuration.
CT Logs Configuration
With CT Logs, you can discover your publicly published domain certificates.
Creating New CT Log Scan
As shown in the image below, you can create a CT Logs configuration:
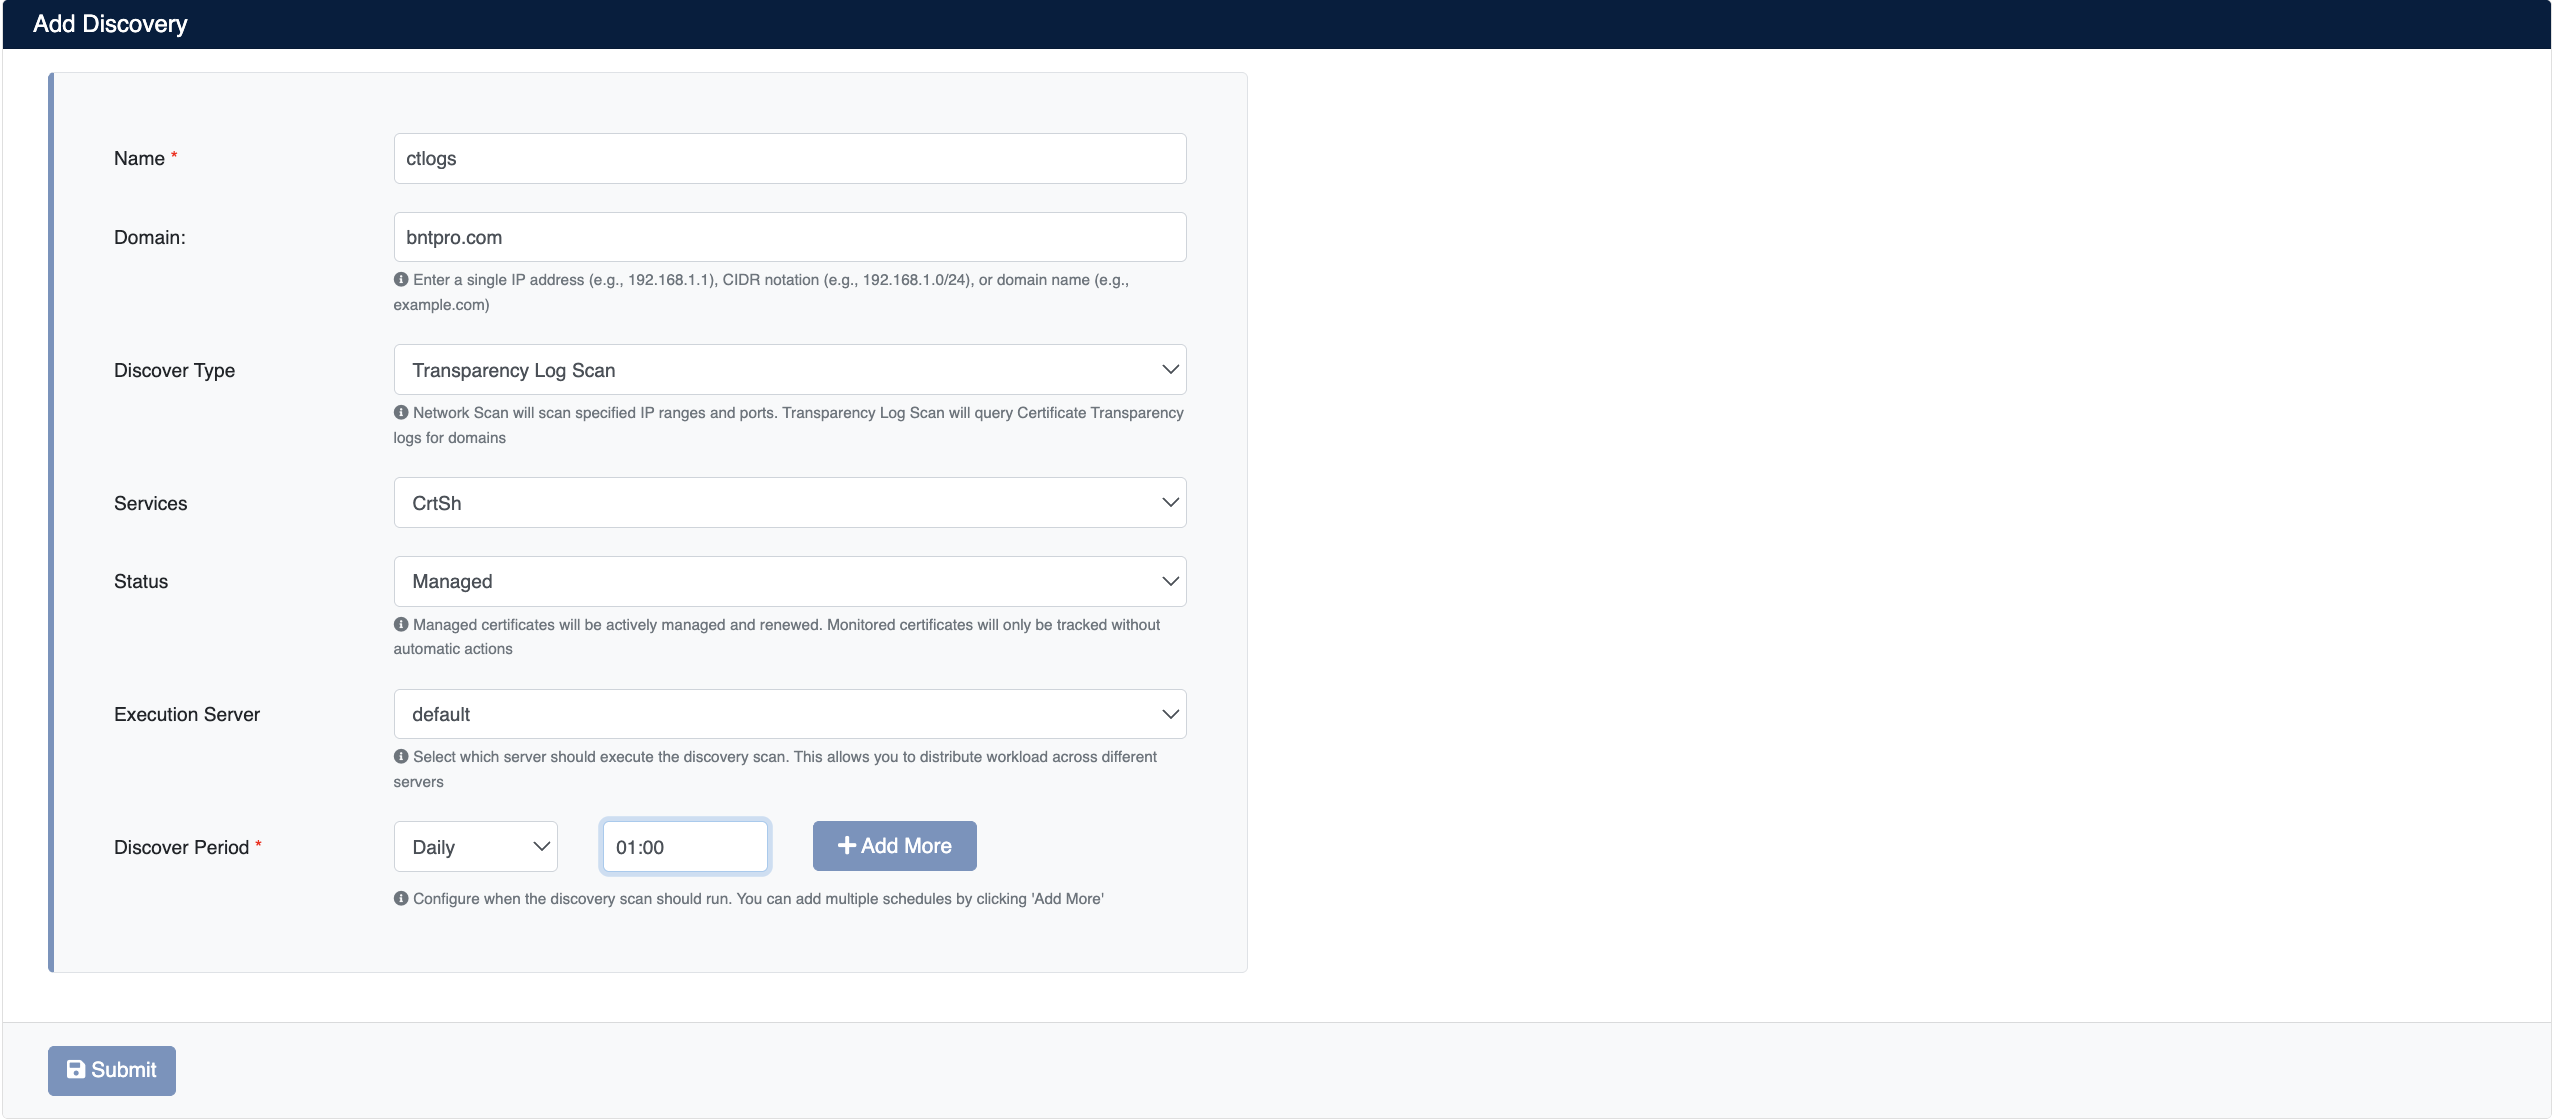
CT Logs Configuration Form
Configuration Parameters
| Parameter | Description | Options |
|---|---|---|
| Name | Provide a descriptive name for the discovery task | Example: Example.com CT Scan, Company Domains |
| Domain | Enter the domain name you want to scan | • Example: example.com• Subdomains are automatically included • No need to use wildcard ( *.example.com) |
| Discover Type | Select discovery method | Select CT Logs |
| Status | Determine status of discovered certificates | • Managed: Managed certificates • Monitored: Only monitored certificates |
| Discover Period | Set how frequently the scan runs | • Period type: Daily or Weekly • Time: HH:MM format |
When you enter example.com, all subdomain certificates for this domain are also automatically found: www.example.com, api.example.com, mail.example.com, and others.
- Daily scanning is recommended for CT Logs (to catch new certificates)
- Be sure to perform daily scanning for Shadow IT detection
- New certificates may take a few hours to be recorded in CT logs
After entering the form information, click the Submit button to save the configuration.
Manual Discovery
You can navigate to Discovery > Manual Discovery to perform quick and instant scans without creating scheduled discovery tasks.
- Quick check when adding a new server
- Emergency certificate check
- Test scans
- One-time inventory updates
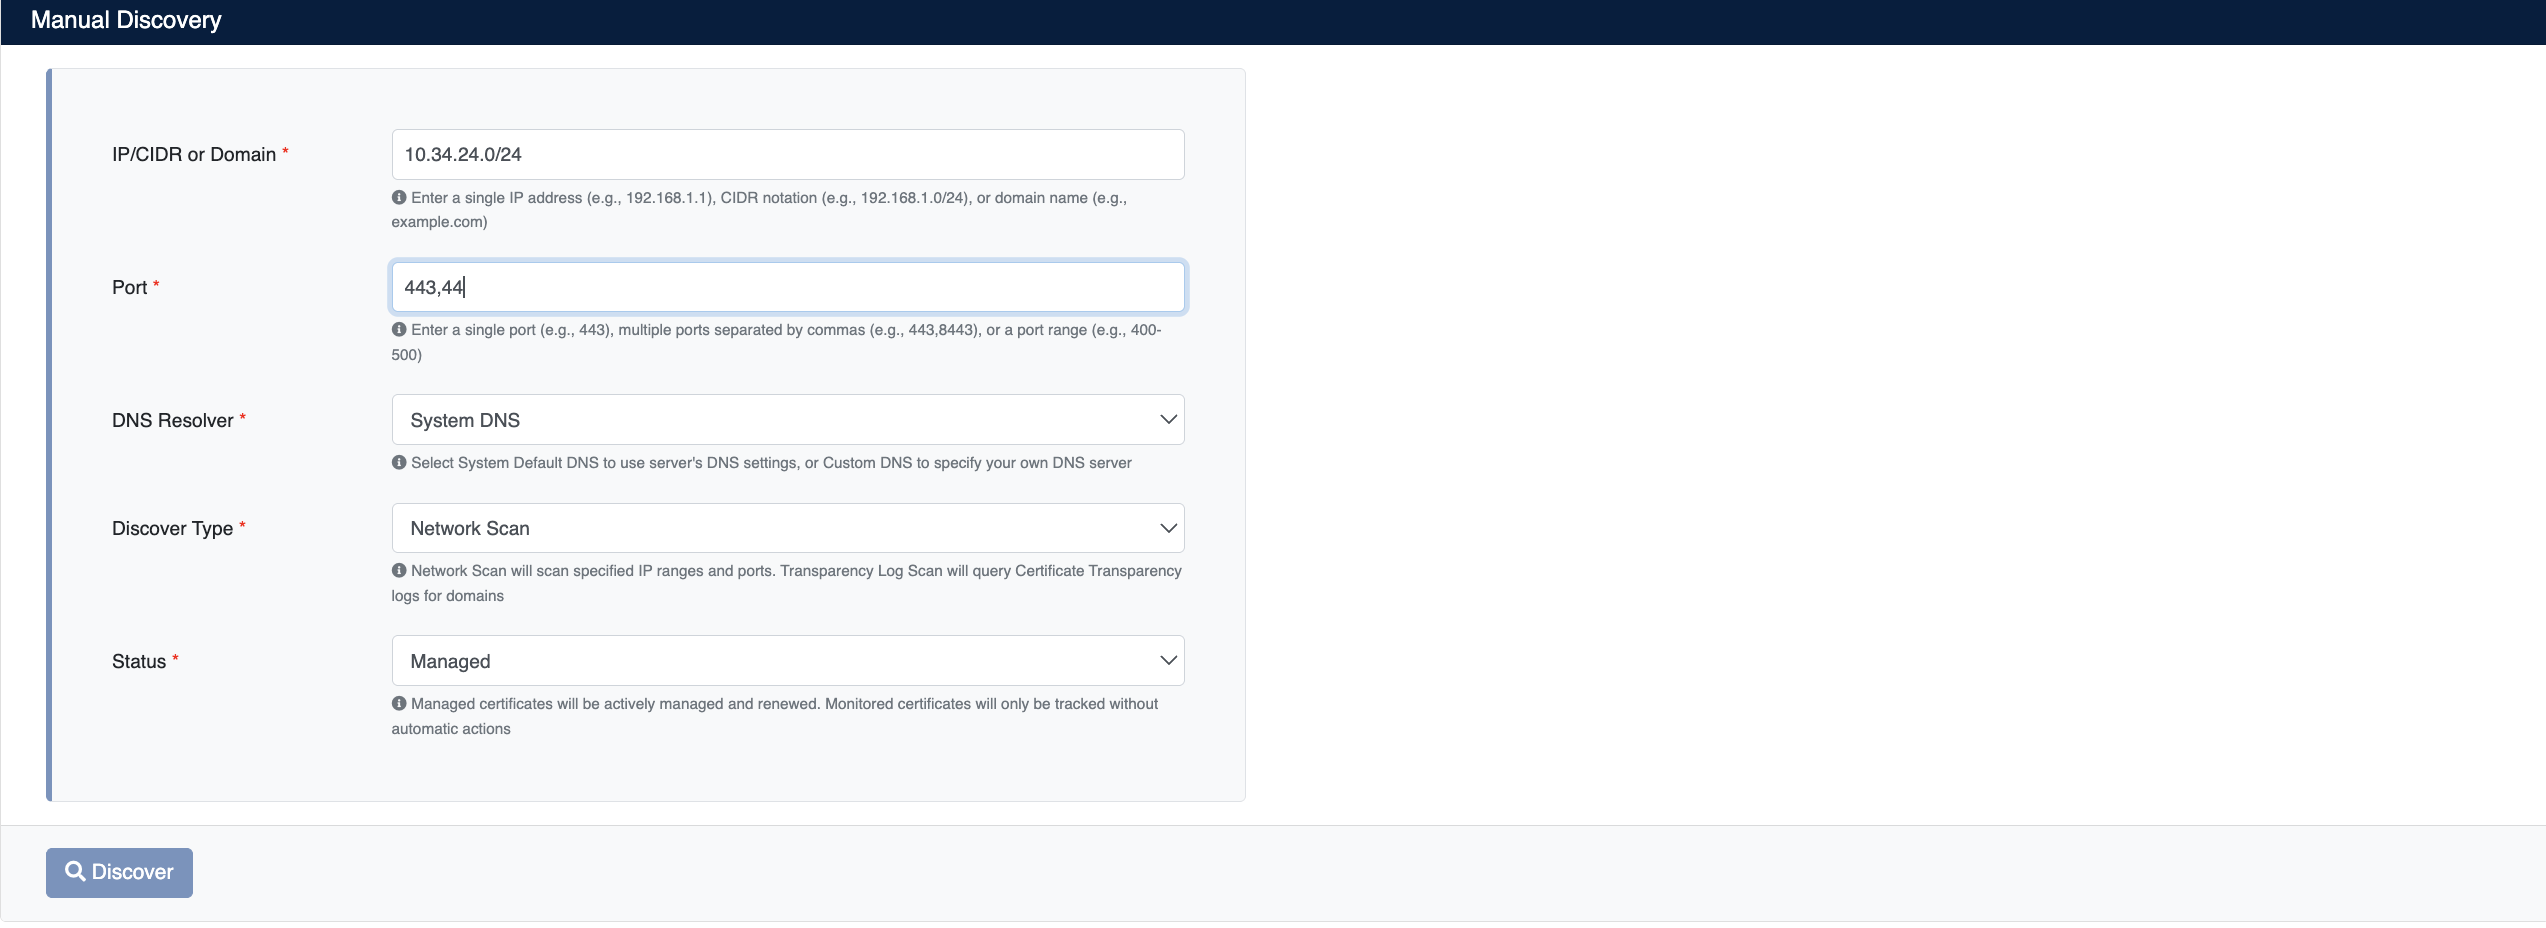
Manual Discovery Form - Quick Scan
Manual Discovery Parameters
| Parameter | Description | Options |
|---|---|---|
| IP or CIDR | Enter IP, CIDR, or domain to scan | • Single IP: 1.1.1.1• IP range: 1.1.1.0/24• Domain: example.com |
| Port | Specify ports to scan | • Single port: 443• Multiple ports: 443,844,444 |
| Discover Type | Select discovery method | • Network Scan: For IP/Port scanning • CT Logs: For domain scanning |
| Status | Determine certificate status | • Managed: Managed • Monitored: Monitored |
After filling out the form, click the Discover button to start scanning immediately.
- Manual discovery results are automatically added to inventory
- However, it does not create periodic scanning
- For regular scanning, you must create a scheduled discovery configuration
Bulk Discovery Configuration
You can perform bulk import via Excel (XLSX) file to create multiple discovery configurations at once.
- When you want to add many IP ranges or domains at once
- When you want to create discovery configurations from an existing inventory list
- When you want to bulk import network lists from different departments
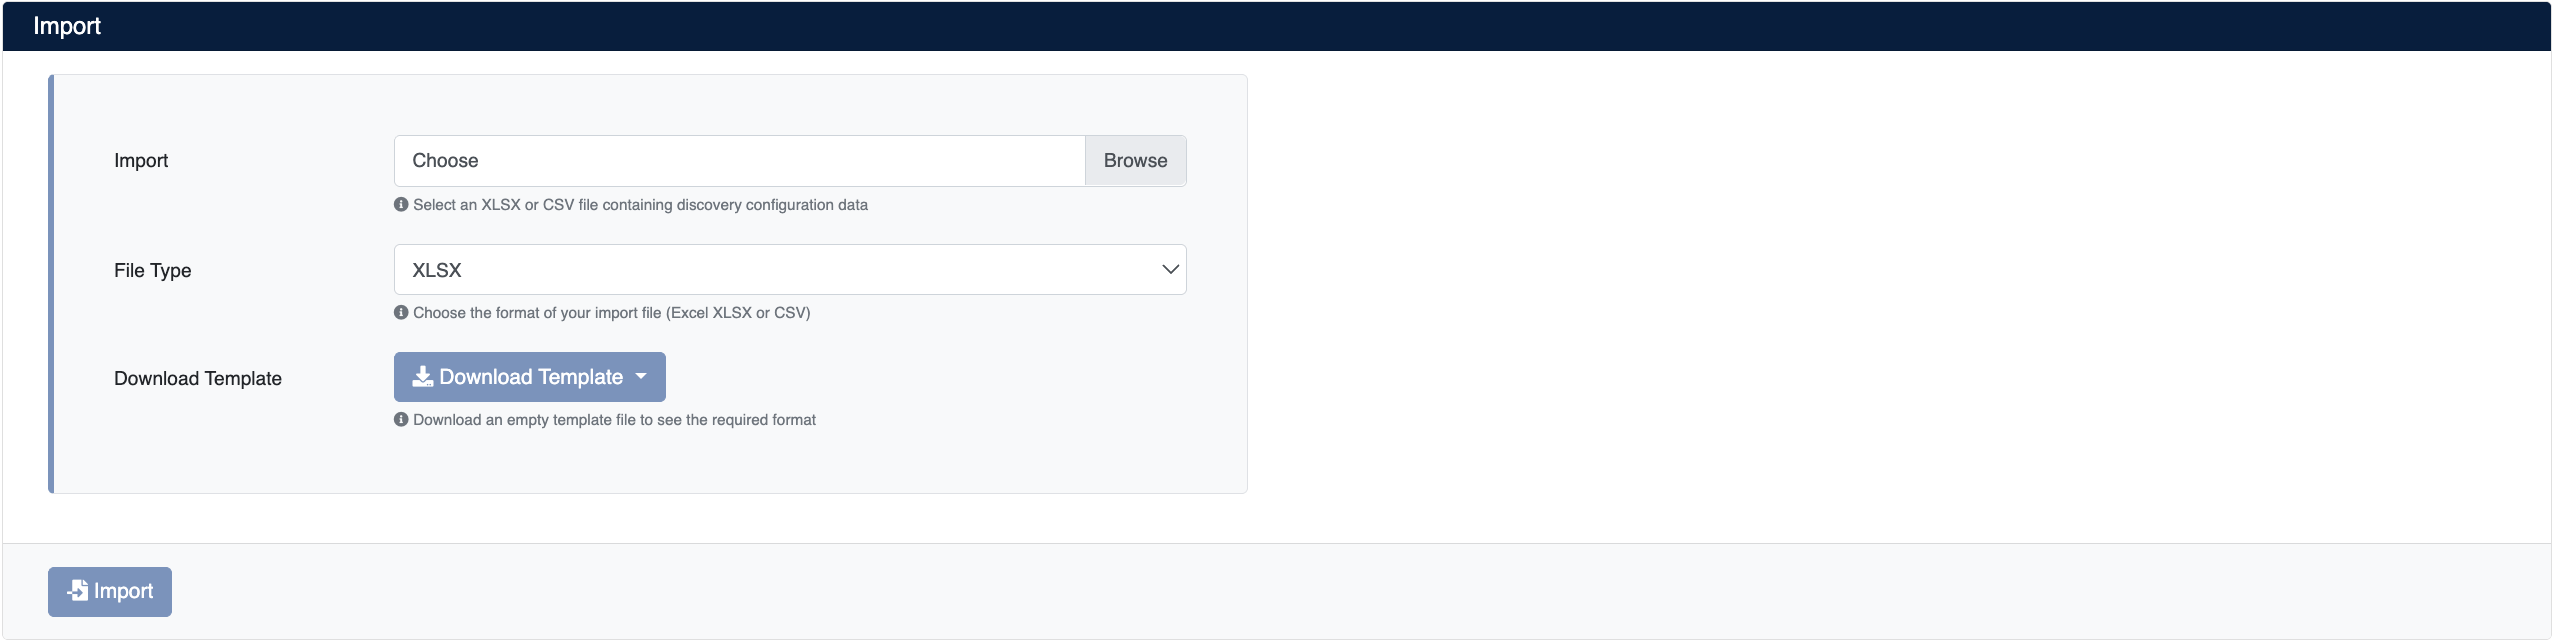
File Import Screen - Bulk Discovery Configuration
How to Perform File Import?
Access the bulk import page from Discovery → Automated Discovery → File Import menu.
1. Download and Fill Template
Click the Download Template button to download the Excel (XLSX) template file. Fill in the following columns in the template:
- Each row in Excel represents a discovery configuration
- Don't fill empty rows, Excel will automatically skip them
- For multiple ports in the Port column, separate with commas:
443,8443,636 - Use IP/CIDR for Network Scan, use domain for CT Logs
2. Upload File
- Click the Choose File or Browse button
- Select the filled Excel file
- Ensure
XLSXis selected in the File Type field - Click the Import button
3. Check Results
- ✅ Successfully imported configurations are shown with green checkmarks
- ❌ Rows with errors are marked in red and error message is displayed
- 📋 Check all added records from the discovery configurations list
How to Configure Discovery Filters?
If you want certain IP addresses, ranges, or domains to never be discovered during any discovery operation, you can use the Discovery Filter feature. Targets defined with a filtering rule are automatically excluded from all discovery processes.
Go to Discovery → Automated Discovery → Filter menu.
- If there are specific IP addresses or ranges you do not want discovered
- If certain systems must be excluded from the inventory
- For network segments that should be kept out of scanning
Filter List
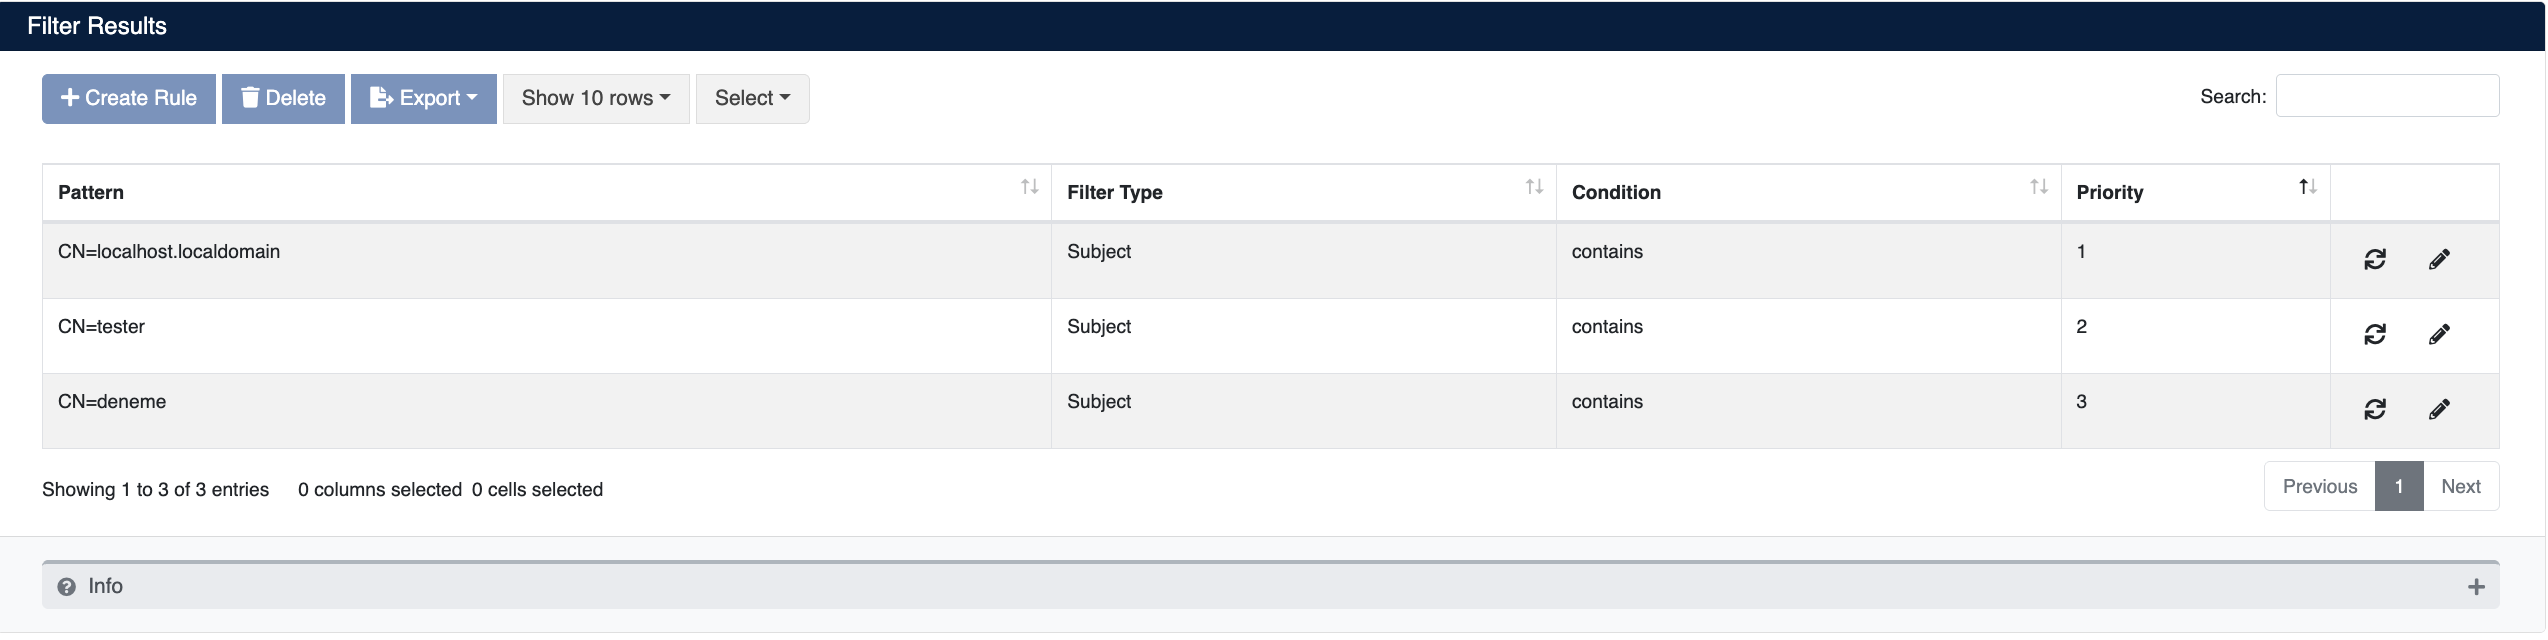
Defined Discovery Filters List
Creating a New Filter
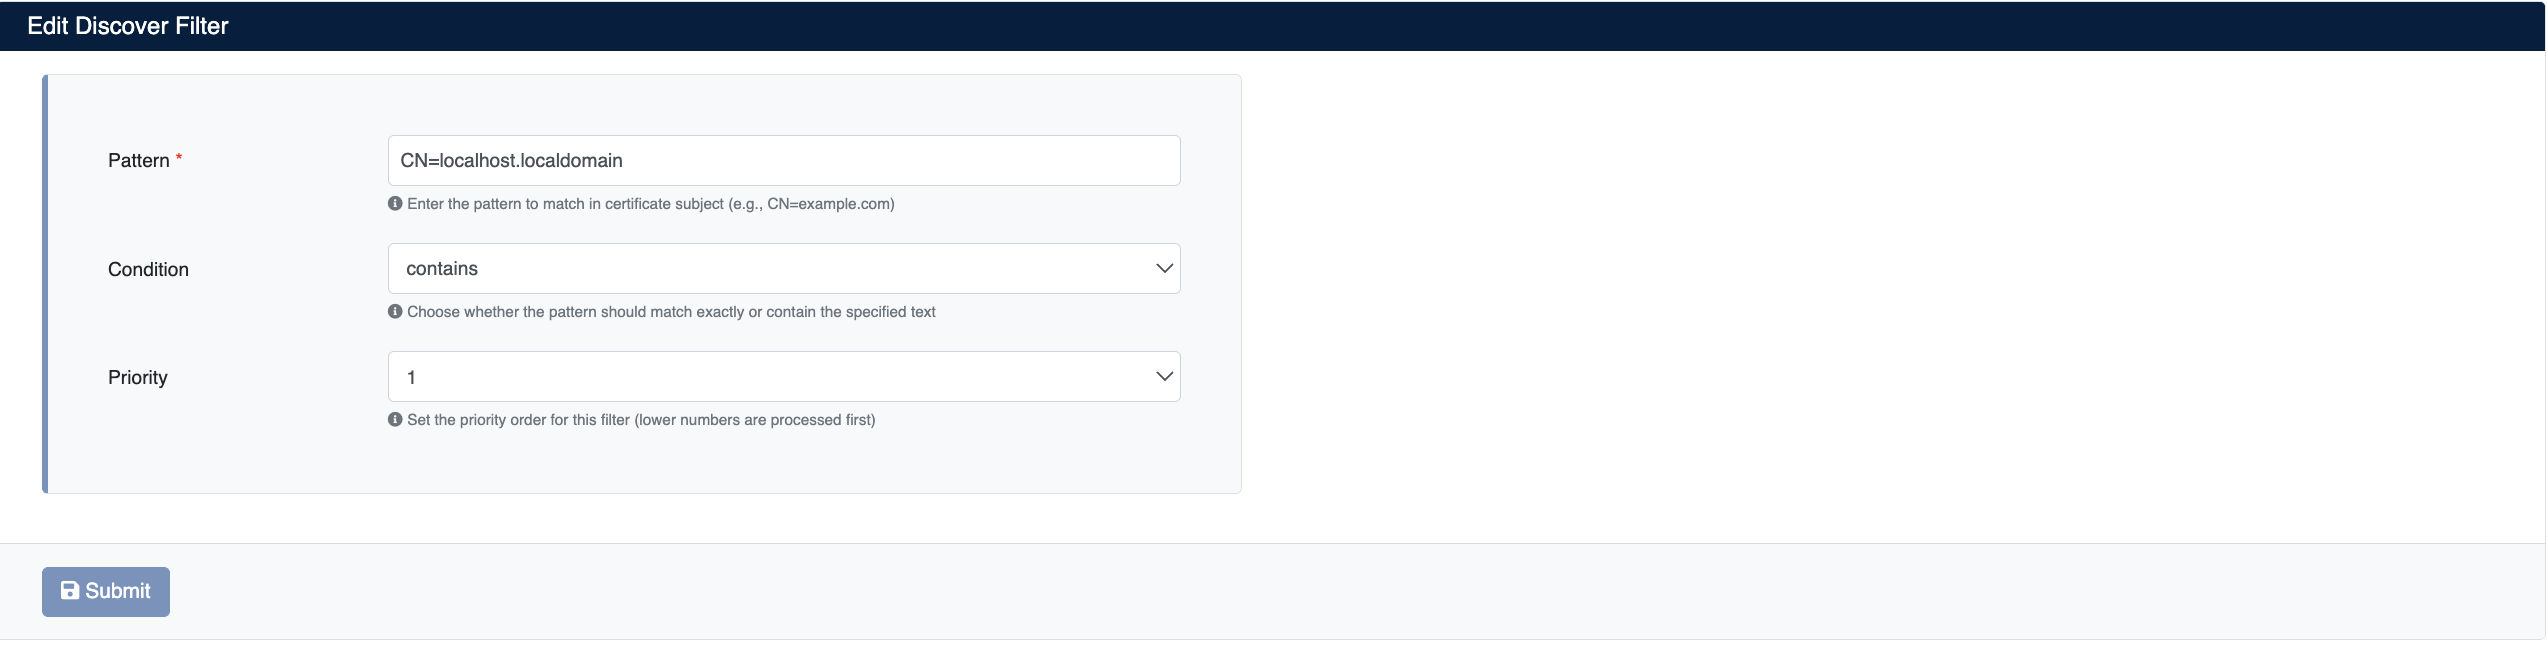
Discovery Filter Creation Form
| Parameter | Description | Example |
|---|---|---|
| IP or CIDR | IP address or range to exclude from discovery | 192.168.1.50, 10.0.0.0/8 |
| Port | Port to exclude from discovery (optional) | 443, 8443 |
After filling in the form and clicking the Submit button, the rule becomes active and these targets will be skipped in the next discovery operation.
Monitoring Discovery Results
You can track the results of all discovery operations from the Discovery → Processes menu.
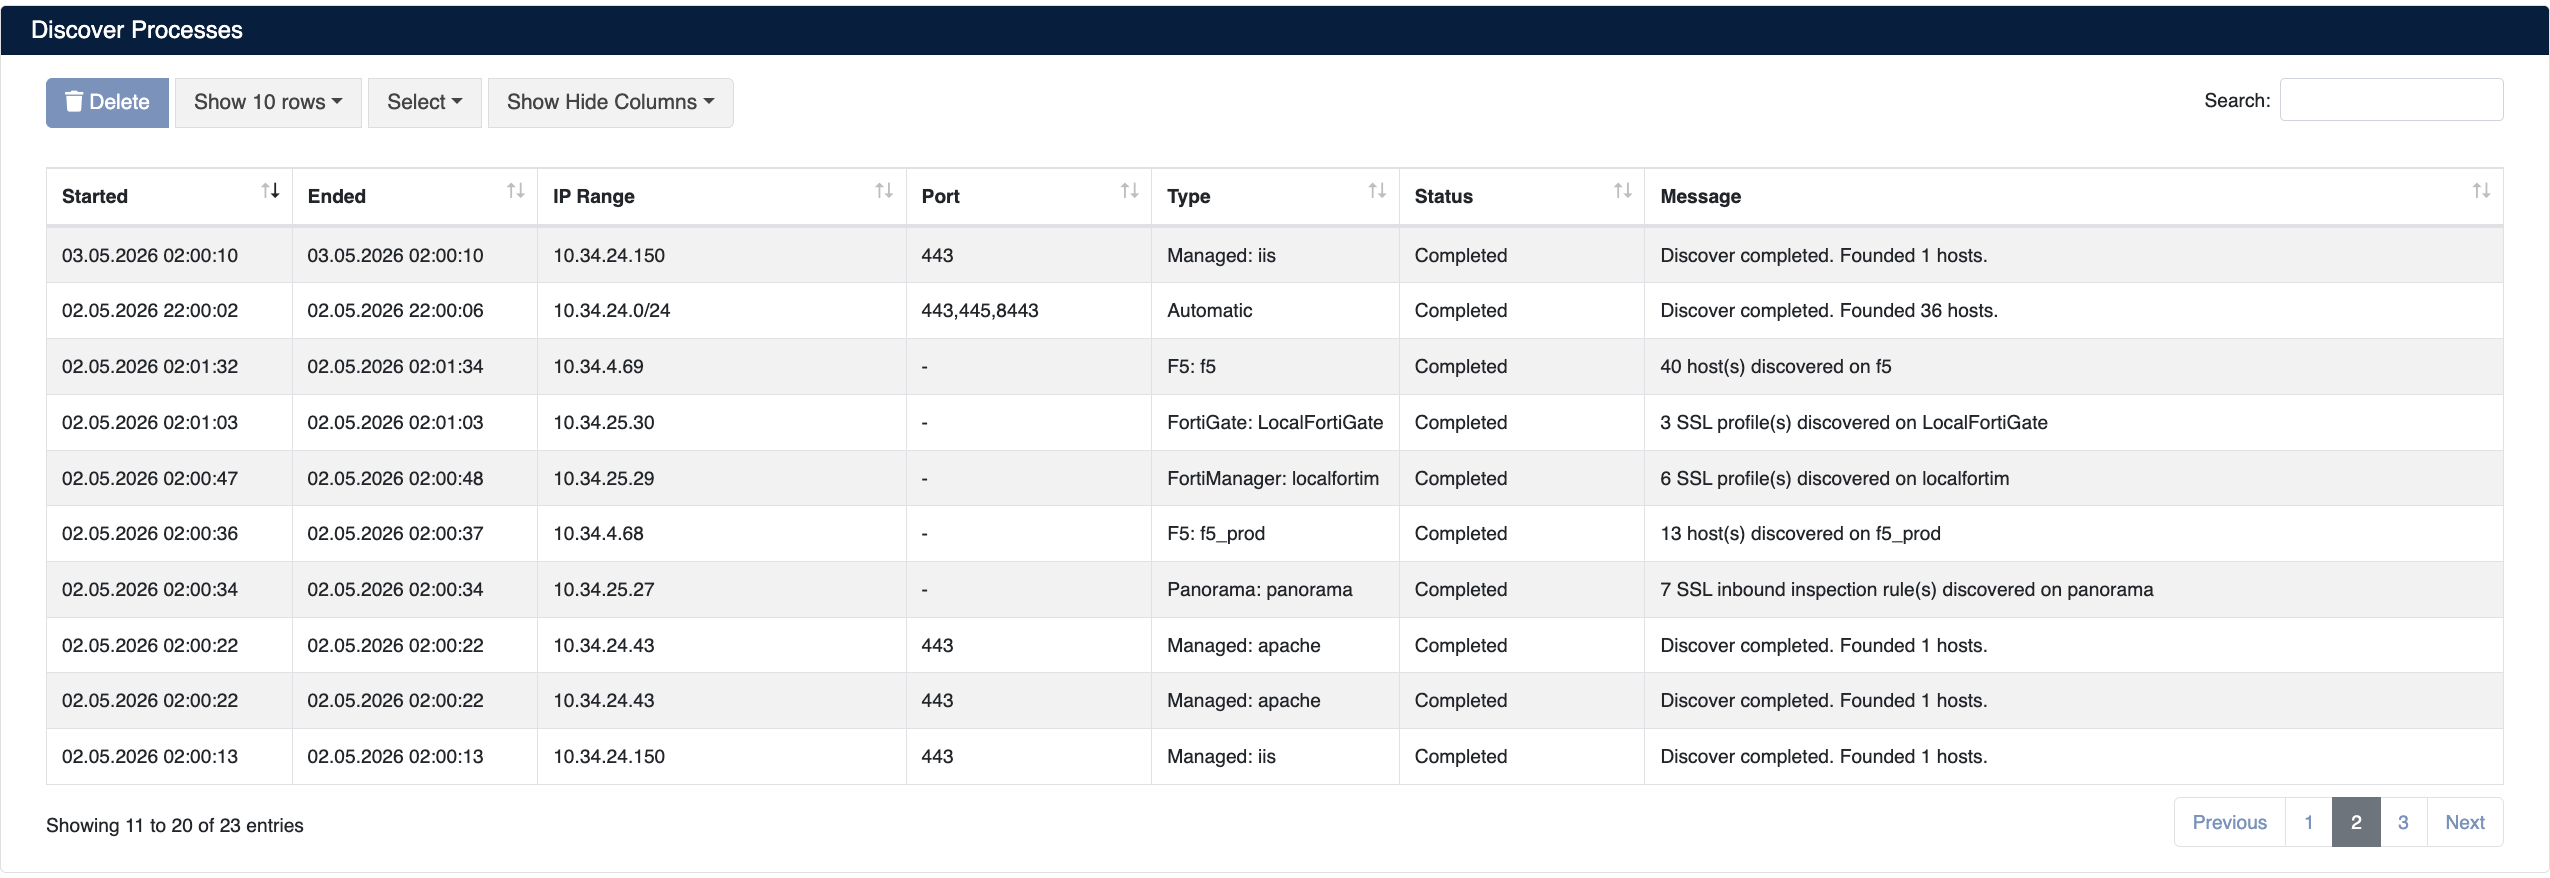
Discovery Results Page - Scan Statuses and Statistics
Displayed Information
On this page, you can see the following details for each discovery operation:
Scan Status : Ongoing, completed, or failed scans
Discovery Type : Network Scan or CT Logs
Target Information : Scanned IP range or domain name
Start Time : Date and time the scan started
End Time : Date and time the scan completed
Duration : Total scan duration
Certificates Found : Number of certificates found in the scan
Scan Details : Detailed log records of each scan
Scan Statuses
Discovery operations can be in the following states:
| Status | Icon | Description | Action Required |
|---|---|---|---|
| In Progress | 🔄 | Scan is currently ongoing | Wait for completion |
| Completed | ✅ | Scan completed successfully | Review results |
| Failed | ❌ | Scan ended with error | Check error logs |
From this page, you can view the results of both scheduled discovery tasks and manual discovery operations. Past scan records are also saved, allowing you to analyze your discovery performance.