CSR Signing
This guide explains step-by-step how to sign CSR (Certificate Signing Request) through SecTrail CM. You can sign CSRs with local CA or external CA integrations.
The CSR signing feature allows you to obtain certificates without sharing the private key. You can perform the signing process by uploading a CSR created in your own application to SecTrail CM or by creating a CSR through SecTrail CM.
CSR Signing Scenarios
SecTrail CM supports two different CSR signing scenarios:
1. External CSR Signing (Recommended)
Used when you don't want to share the private key:
- Create CSR on your own server/application (private key stays on your server)
- Import CSR to SecTrail CM
- Sign CSR through SecTrail CM
- Download signed certificate and install on your server
With this method, the private key is never shared and only stays on your own server. It is the most secure method.
2. Creating CSR on SecTrail CM
Used for centralized management:
- Create CSR through SecTrail CM
- Sign the created CSR immediately
- Download certificate and private key together
CSR Signing Screen
There is a special interface in SecTrail CM for CSR signing operations.
To sign CSR: Go to Inventory → Issue Certificate → Sign CSR menu.
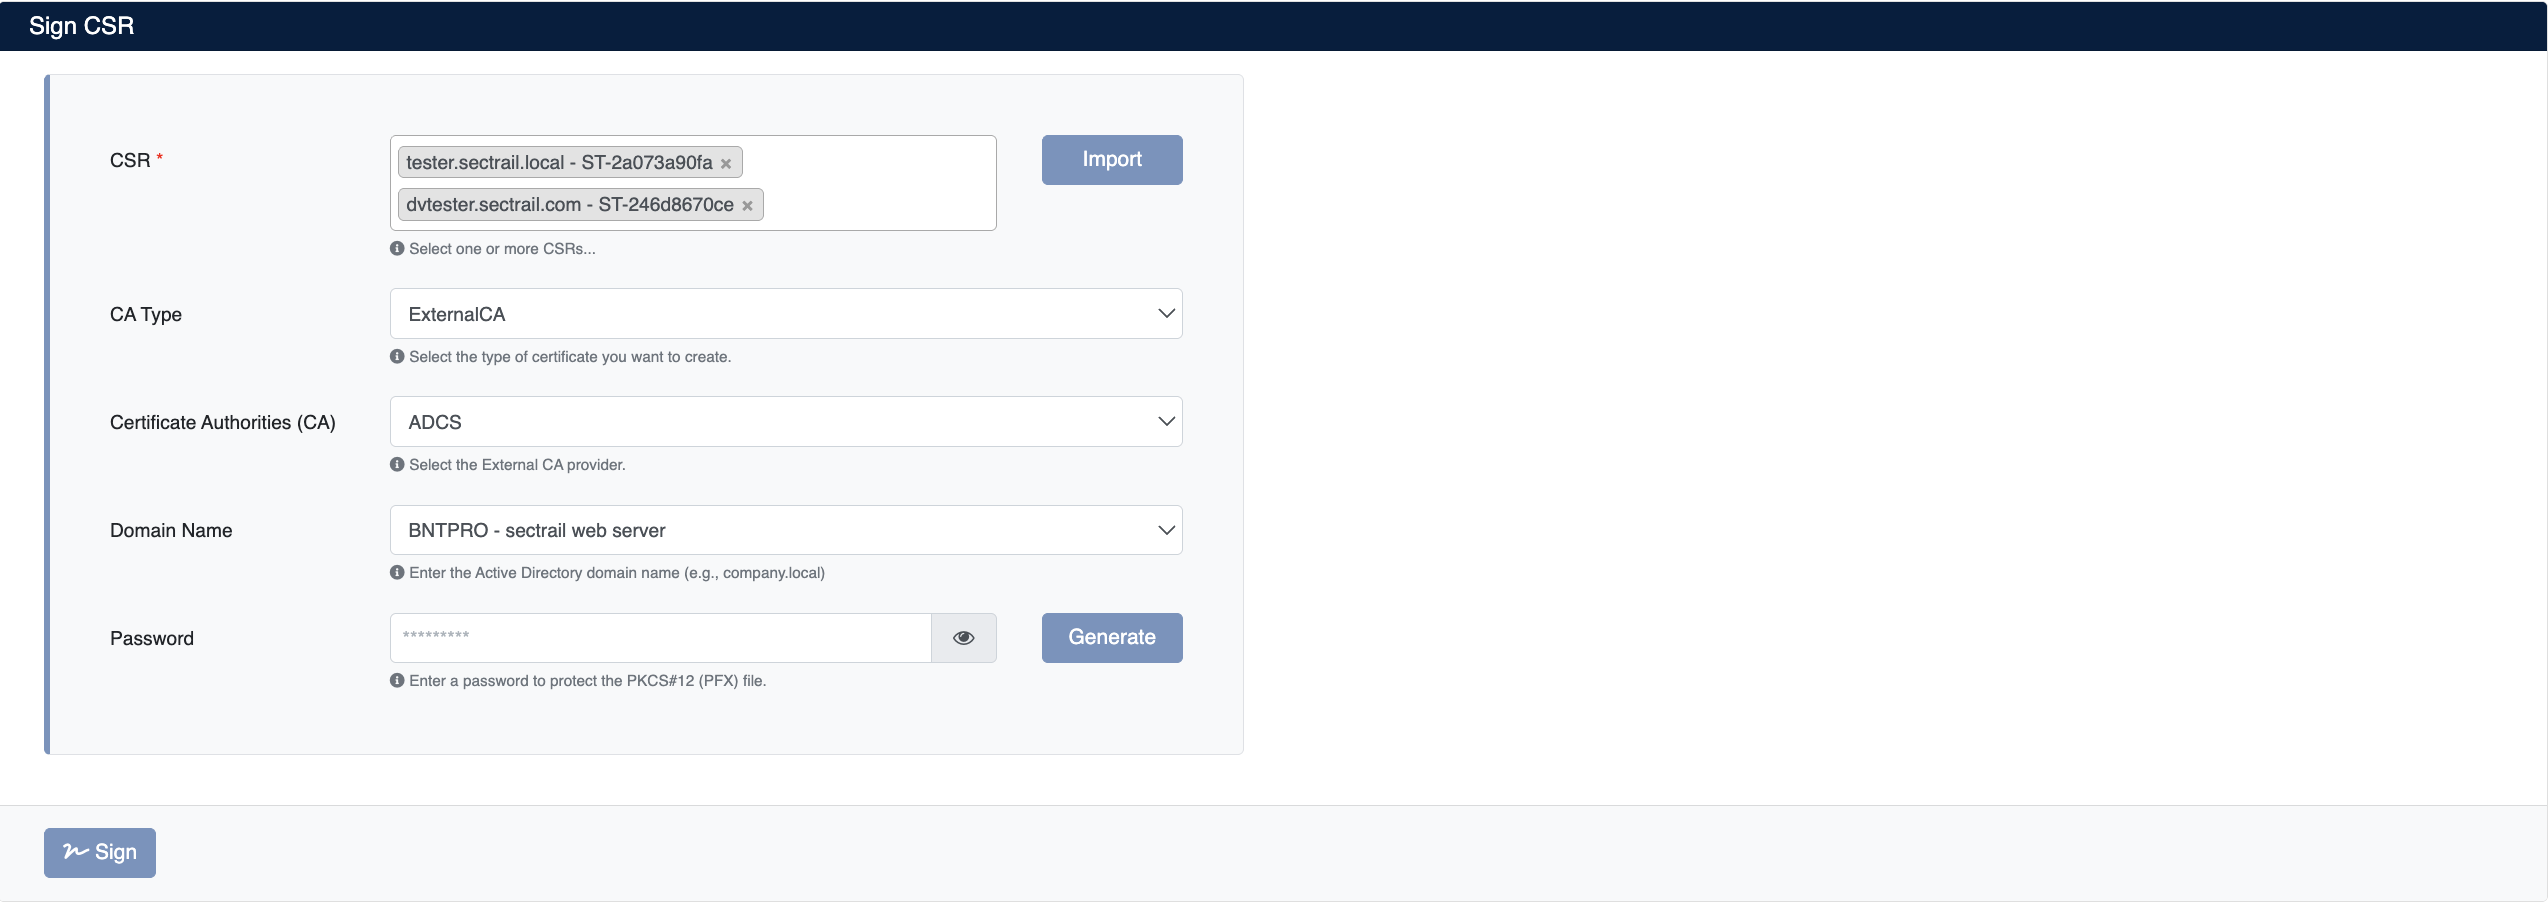
CSR Signing Form
CSR Signing Parameters
Basic Information
| Field | Description | Example |
|---|---|---|
| CSR | CSR selection to be signed | Select existing CSR from dropdown |
| CA Type | Signing type | Local CA, External CA |
| External CA | External CA selection (if CA Type: External CA) | ADCS, GlobalSign, DigiCert, Hashicorp Vault |
| Domain Name | Certificate domain name (optional) | Descriptive name |
| Password | Certificate private key password | Strong password |
All CSRs in SecTrail CM inventory are listed in the CSR dropdown. Format: [Organization] - [Identifier] (e.g., bntpro.com - ST-5cc54e0593)
CA Type Options
1. Local CA (Local CA)
Signing CSR with your existing CAs in SecTrail CM:
Usage Scenarios:
- For internal/corporate certificates
- For test and development environments
- For certificates managed with your own PKI infrastructure
Advantages:
- Fast signing
- Full control
- No additional cost
- Can work offline
2. External CA (External CA)
Signing with integrated CAs like ADCS, GlobalSign, DigiCert, Hashicorp Vault:
Usage Scenarios:
- For public certificates
- For certificates requiring browser trust
- For compliance requirements
- For enterprise CA integrations
Supported External CAs:
| CA Provider | Description | Usage |
|---|---|---|
| ADCS | Microsoft Active Directory Certificate Services | Windows environments, enterprise PKI |
| GlobalSign | GlobalSign HVCA (Managed PKI) | Enterprise, high-volume certificate management |
| DigiCert | DigiCert CertCentral API | Public SSL/TLS certificates |
| Hashicorp Vault | Vault PKI Secrets Engine | Cloud-native, dynamic certificate management |
You must configure the relevant CA integration before using External CA.
For detailed setup instructions, review the Integrations page.
CSR Signing Steps
Method 1: External CSR Signing (Private Key Not Shared)
This method is used to obtain certificates without sharing the private key.
Step 1: Creating CSR on Your Own Server
First create CSR and private key on your own server/application:
Creating CSR with Windows/IIS:
- IIS Manager → Server Certificates
- Create Certificate Request
- Fill in Distinguished Name information
- Cryptographic Service Provider: Microsoft RSA SChannel, 2048 bit
- Save CSR file
Step 2: Importing CSR to SecTrail CM
- Go to Inventory → Import Certificate menu
- Select
CSRas Certificate Type - Upload your CSR file or paste its content
- Click Import button
After CSR is successfully imported, it is added to inventory and assigned an identifier (e.g., ST-5cc54e0593).
Step 3: Signing CSR
- Go to Inventory → Issue Certificate → Sign CSR menu
- CSR Selection:
- Select the CSR you imported from dropdown
- Format:
[Organization] - [Identifier]
- CA Type Selection:
- Local CA: Signing with CA in SecTrail CM
- External CA: Signing with External CA
- External CA Selection (if External CA is selected):
- ADCS, GlobalSign, DigiCert, or Hashicorp Vault
- Domain Name (Optional):
- Enter a descriptive name (e.g.,
bntpro.local - copy of sectrail webserver)
- Enter a descriptive name (e.g.,
- Password:
- Set a strong password for the certificate
- You can generate an automatic password with the Generate button
- Click Sign button
Step 4: Downloading Signed Certificate
After signing is completed, the Show Key screen opens:
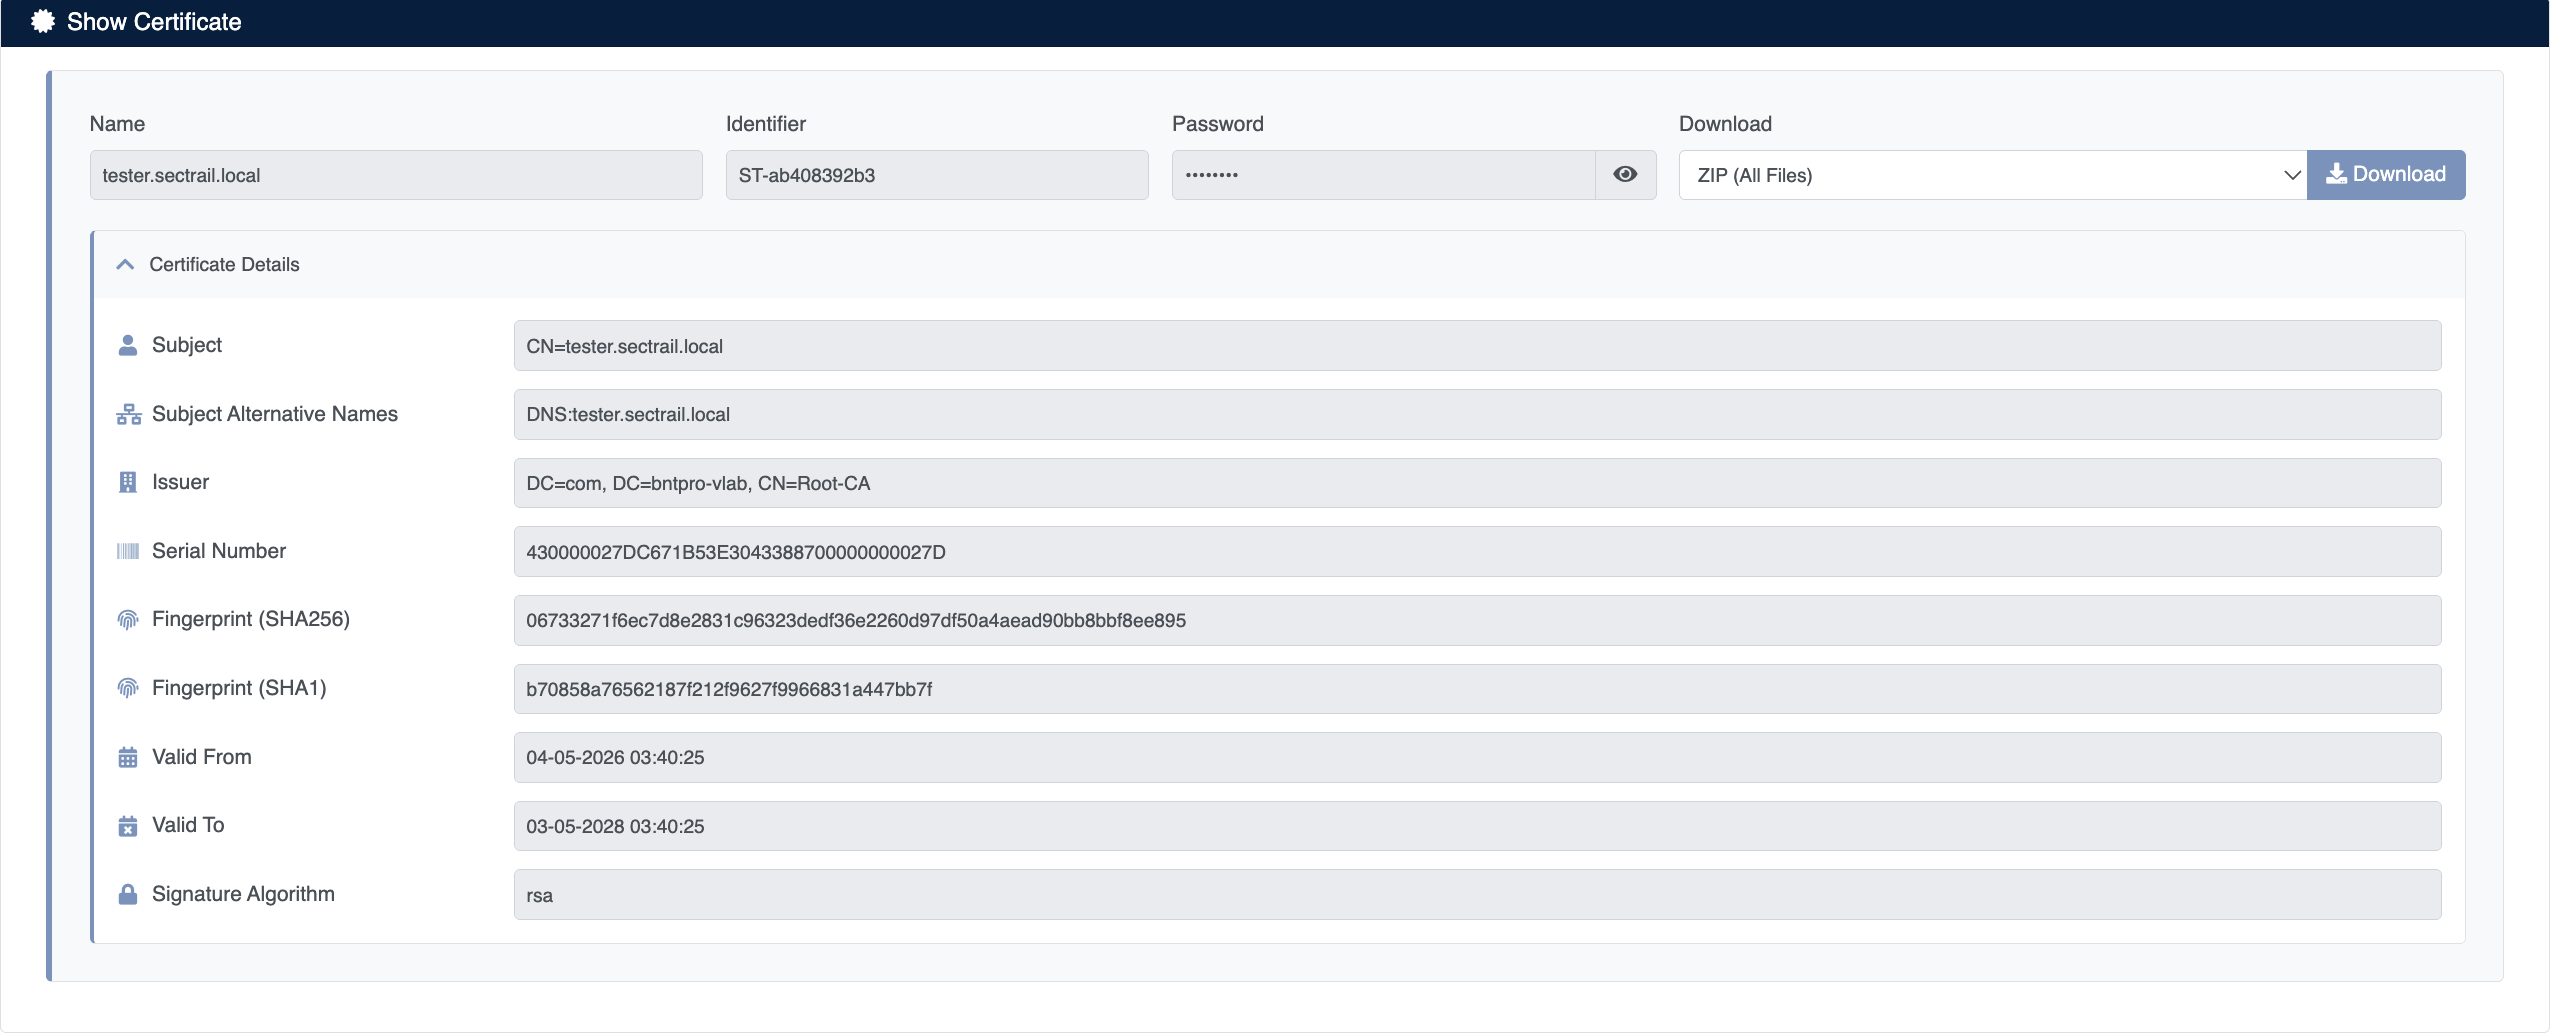
Signed Certificate and Download Options
Download Buttons:
- Download Zip - All files (cert, chain, bundle)
- Download Jks - Java KeyStore format
- Download Crt - Certificate file only
- Download Chain - CA chain
- Download Bundle - Complete certificate chain
- Download Key - Private key (only for CSRs created in SecTrail CM)
The Download Key button does not work for external CSRs because the private key is not in SecTrail CM but on your own server. This is a security feature.
Method 2: Creating CSR on SecTrail CM
This method is suitable for centralized management but the private key is also created in SecTrail CM.
Step 1: Creating CSR
- Go to Inventory → Create Certificate menu
- Select
CSRas Certificate Type - Fill in certificate information:
- Common Name, Organization, Country, etc.
- Key Length: 2048 or 4096 bit
- Set Pfx Password
- Click Submit button
CSR and private key are created and added to inventory.
Step 2: Signing CSR
Follow the steps in Step 3: Signing CSR section above.
Step 3: Downloading Certificate and Private Key
In this scenario, since the private key is also in SecTrail CM, the Download Key button works and you can download all files.
Domain Name Field
The Domain Name field is optional and used for identification purposes:
Example: bntpro.local - copy of sectrail webserver
This field:
- Helps identify the certificate in inventory
- Used to distinguish multiple similar certificates
- Appears in reports and logs
Password Generation
For the Password field:
- Manual Input: Write your own password
- Automatic Generation: Click
GENERATEbutton- Creates strong, random password
- Minimum 16 characters
- Contains uppercase/lowercase letters, numbers, and special characters
- View: You can view the password with the eye icon
Store the password in a secure password manager and use different passwords for each certificate.