SecTrail CM supports two integration methods for delivering certificate alarms and notifications via email: SMTP and Microsoft 365. In the left menu, the System > Mail section is made up of three screens:
- Configuration — where mail sending profiles (SMTP / Microsoft 365) are defined and managed.
- Delivery Alerts Settings — where capture of undeliverable (bounce/NDR) emails is configured.
- Delivery Alerts List — where detected delivery-failure reports are listed.
Configuration
Defined profiles can be viewed and managed under System > Mail > Configuration.

The list displays Name, Mail Type, From Mail, and To Mails columns. The Test Send Mail button verifies the configuration, and the Send Alarm Mail button sends an alarm email immediately.
Creating / Editing a Mail Profile
Click the pencil icon on a profile to open the form, then select the integration type from the Mail Type field.
SMTP Configuration
When SMTP is selected as the Mail Type, the following fields become active:
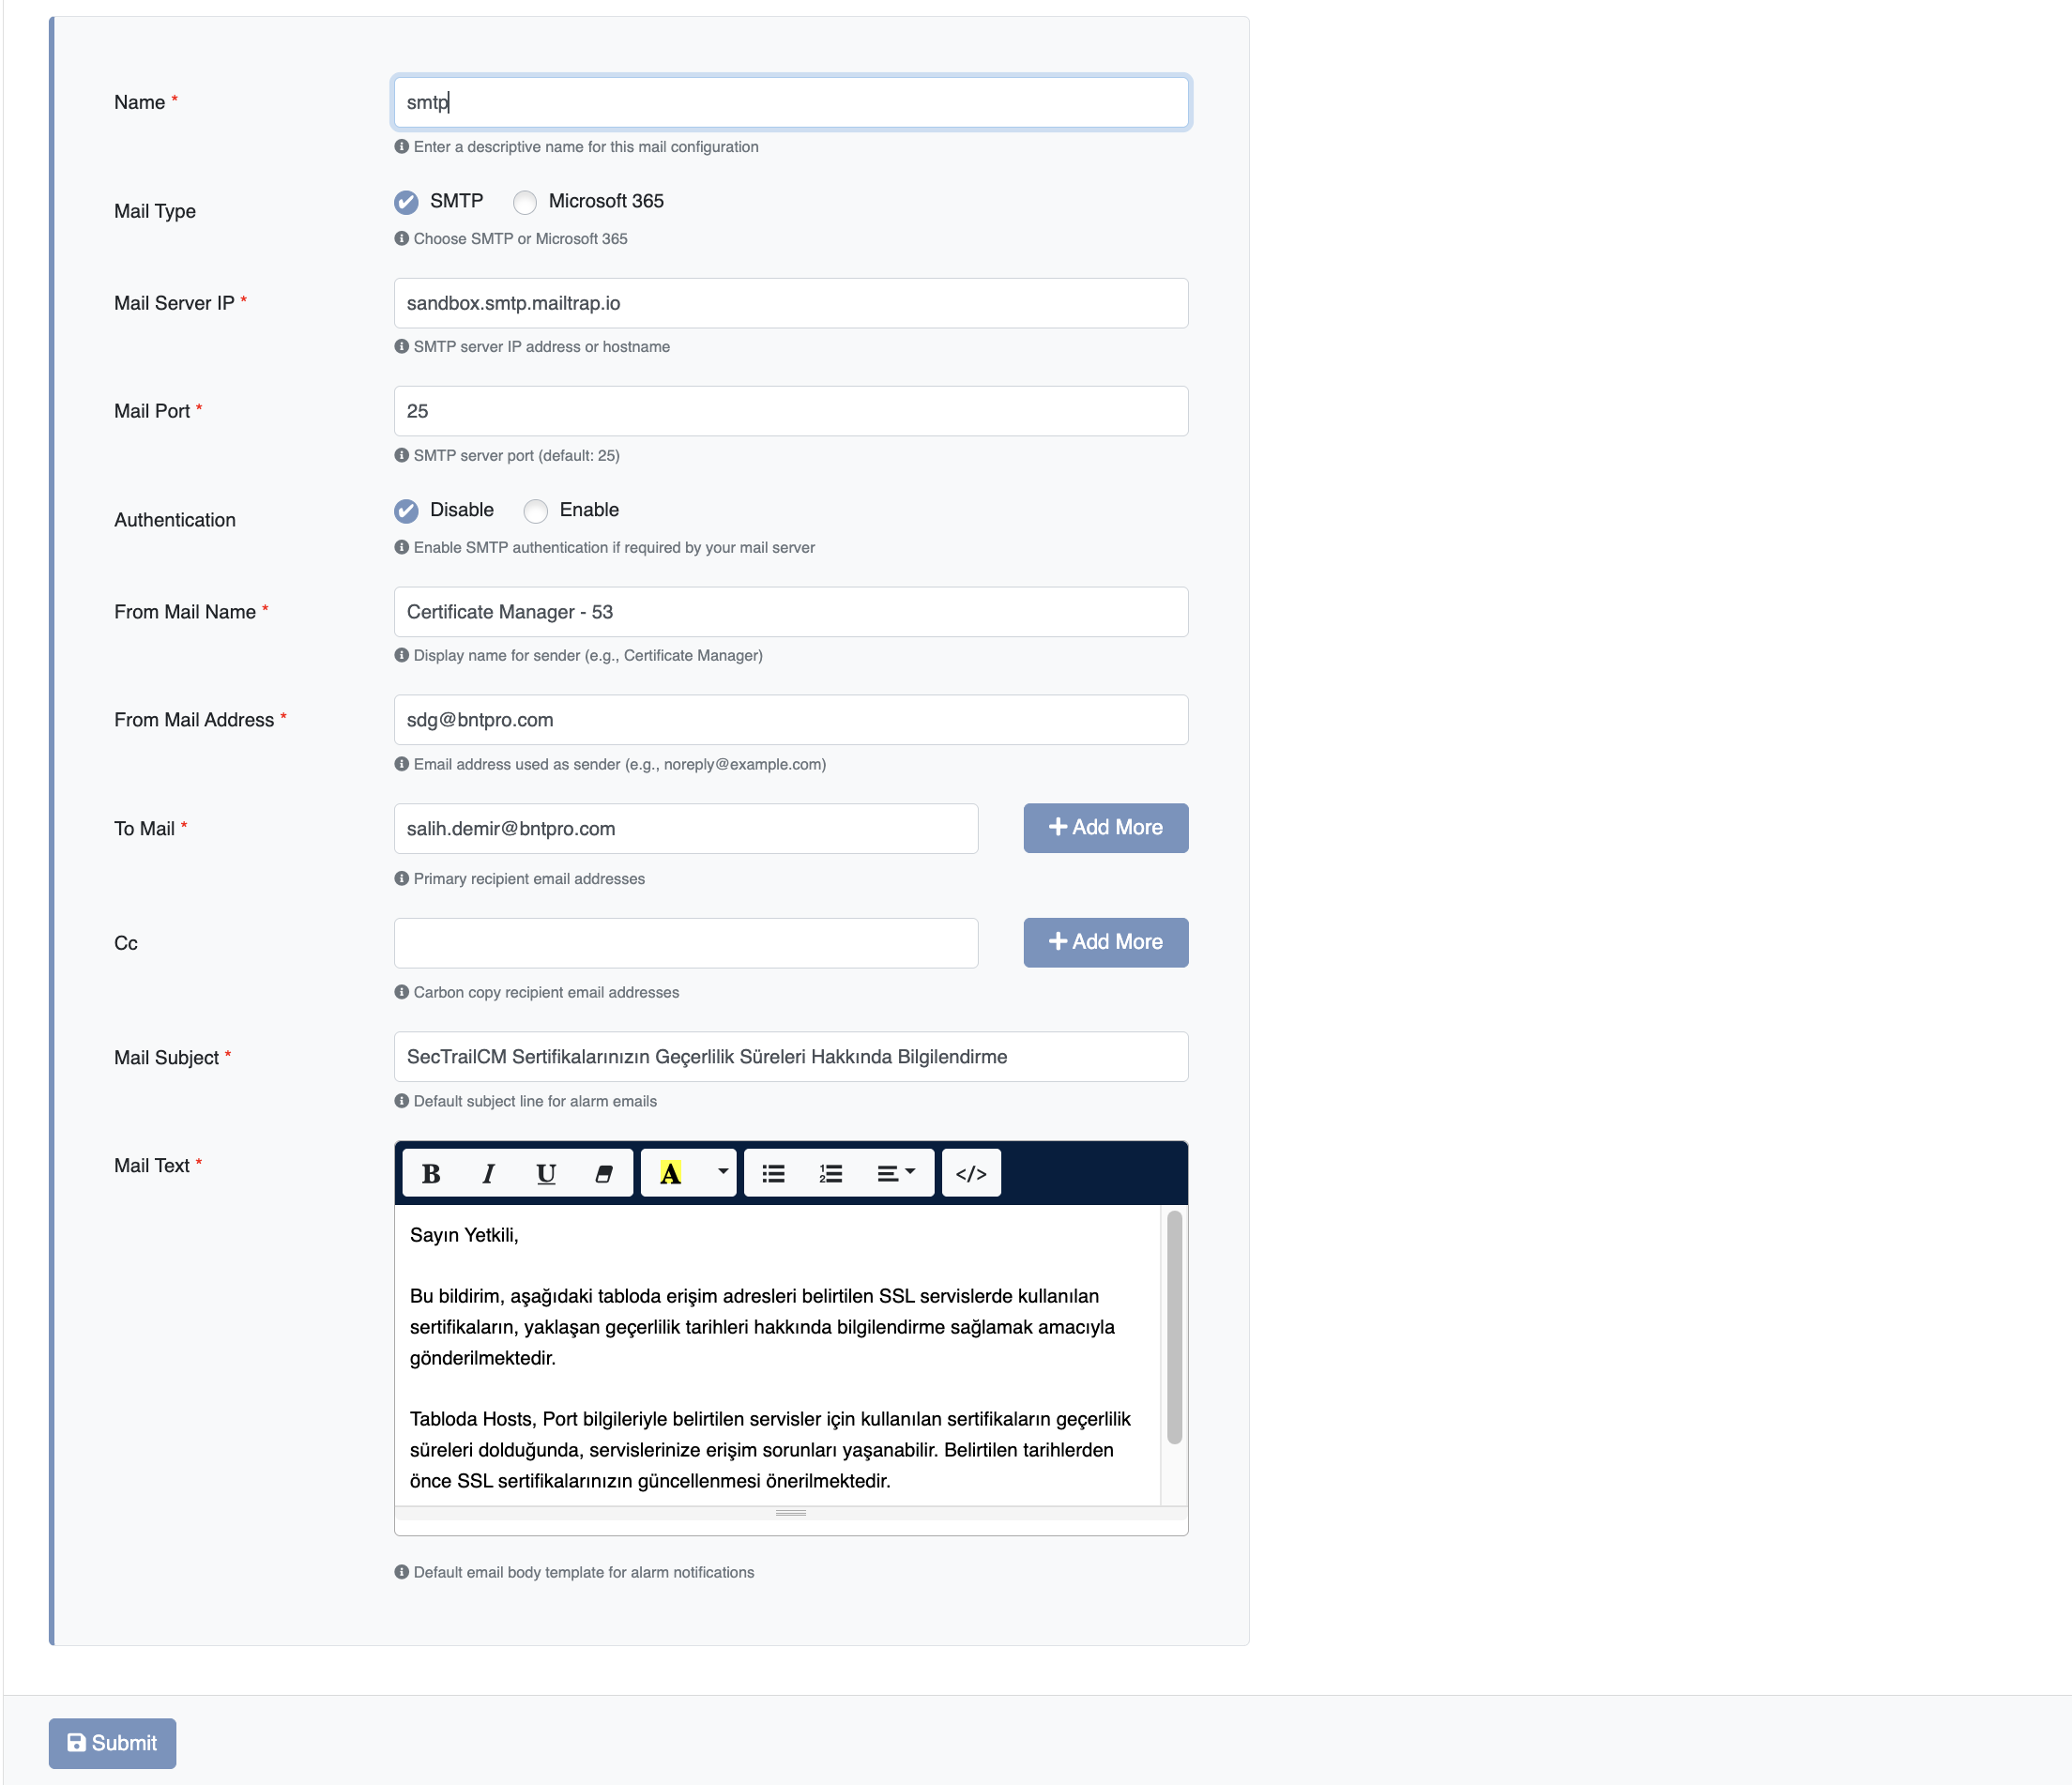
- Name: A descriptive name for the mail profile
- Mail Server IP: IP address or hostname of the SMTP server
- Mail Port: SMTP port (default:
25) - Authentication: Defaults to
Disable; selectEnableif SMTP authentication is required — Username and Password fields will appear - From Mail Name: Sender display name (e.g.
Certificate Manager - S5) - From Mail Address: Sender email address
- To Mail: Primary recipient address for notifications; click + Add More to add multiple recipients
- Cc: Carbon copy email addresses; click + Add More to add multiple addresses
- Mail Subject: Subject line for alarm emails
- Mail Text: Default body template for alarm emails (editable via rich text editor)
Microsoft 365 Configuration
When Microsoft 365 is selected as the Mail Type, the system uses the Microsoft Graph API in the background to send emails. For this integration to work, an App Registration must first be completed in Azure (Microsoft Entra ID).
Prerequisites
The following addresses must have HTTPS (Port 443) access for the system to communicate with Microsoft services:
login.microsoftonline.comgraph.microsoft.com
Azure Portal Steps
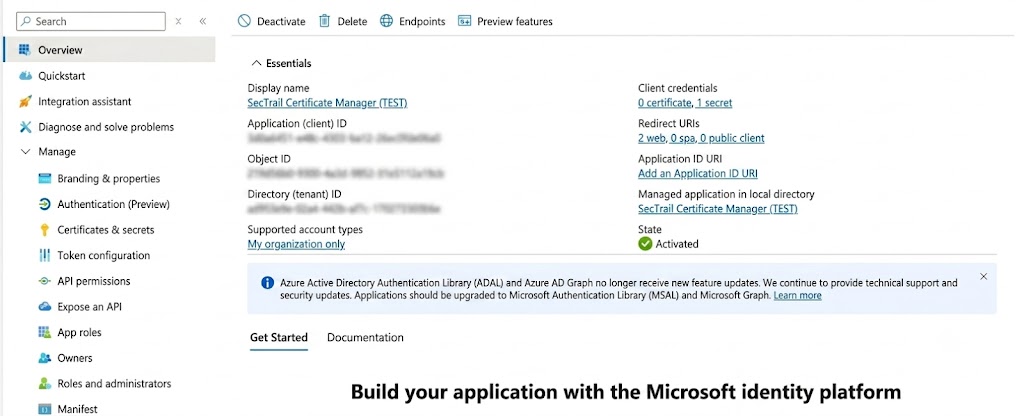
1. Create an Application: In Azure Portal, navigate to Microsoft Entra ID → App registrations → New registration and create a new application.
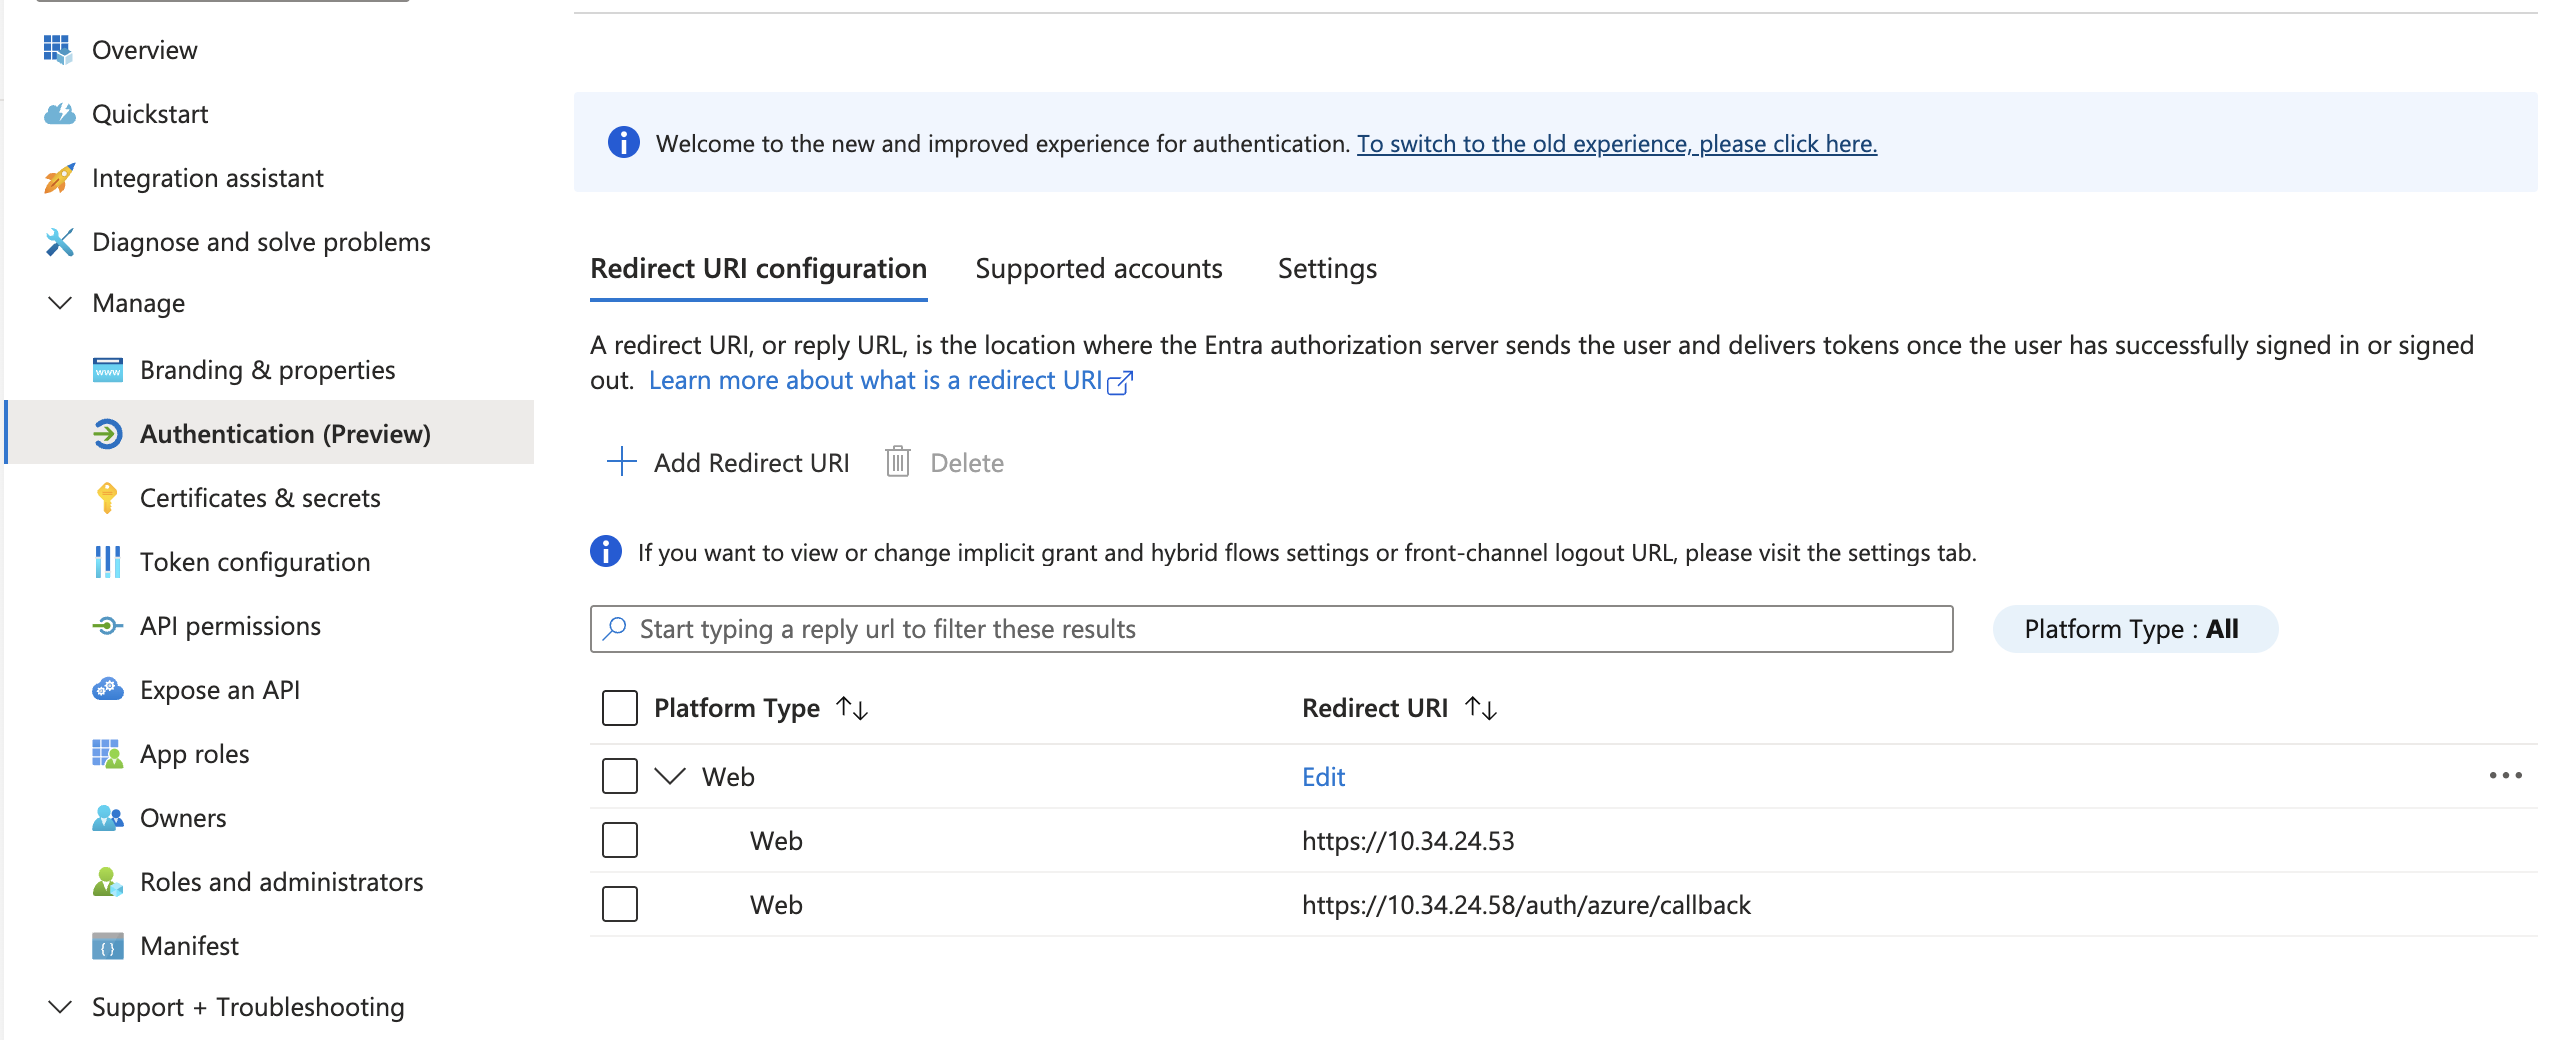
2. Configure Redirect URI: From the application's left menu, go to Authentication (Preview). Click Add Redirect URI → Web and add the Certificate Manager server address as a Redirect URI.
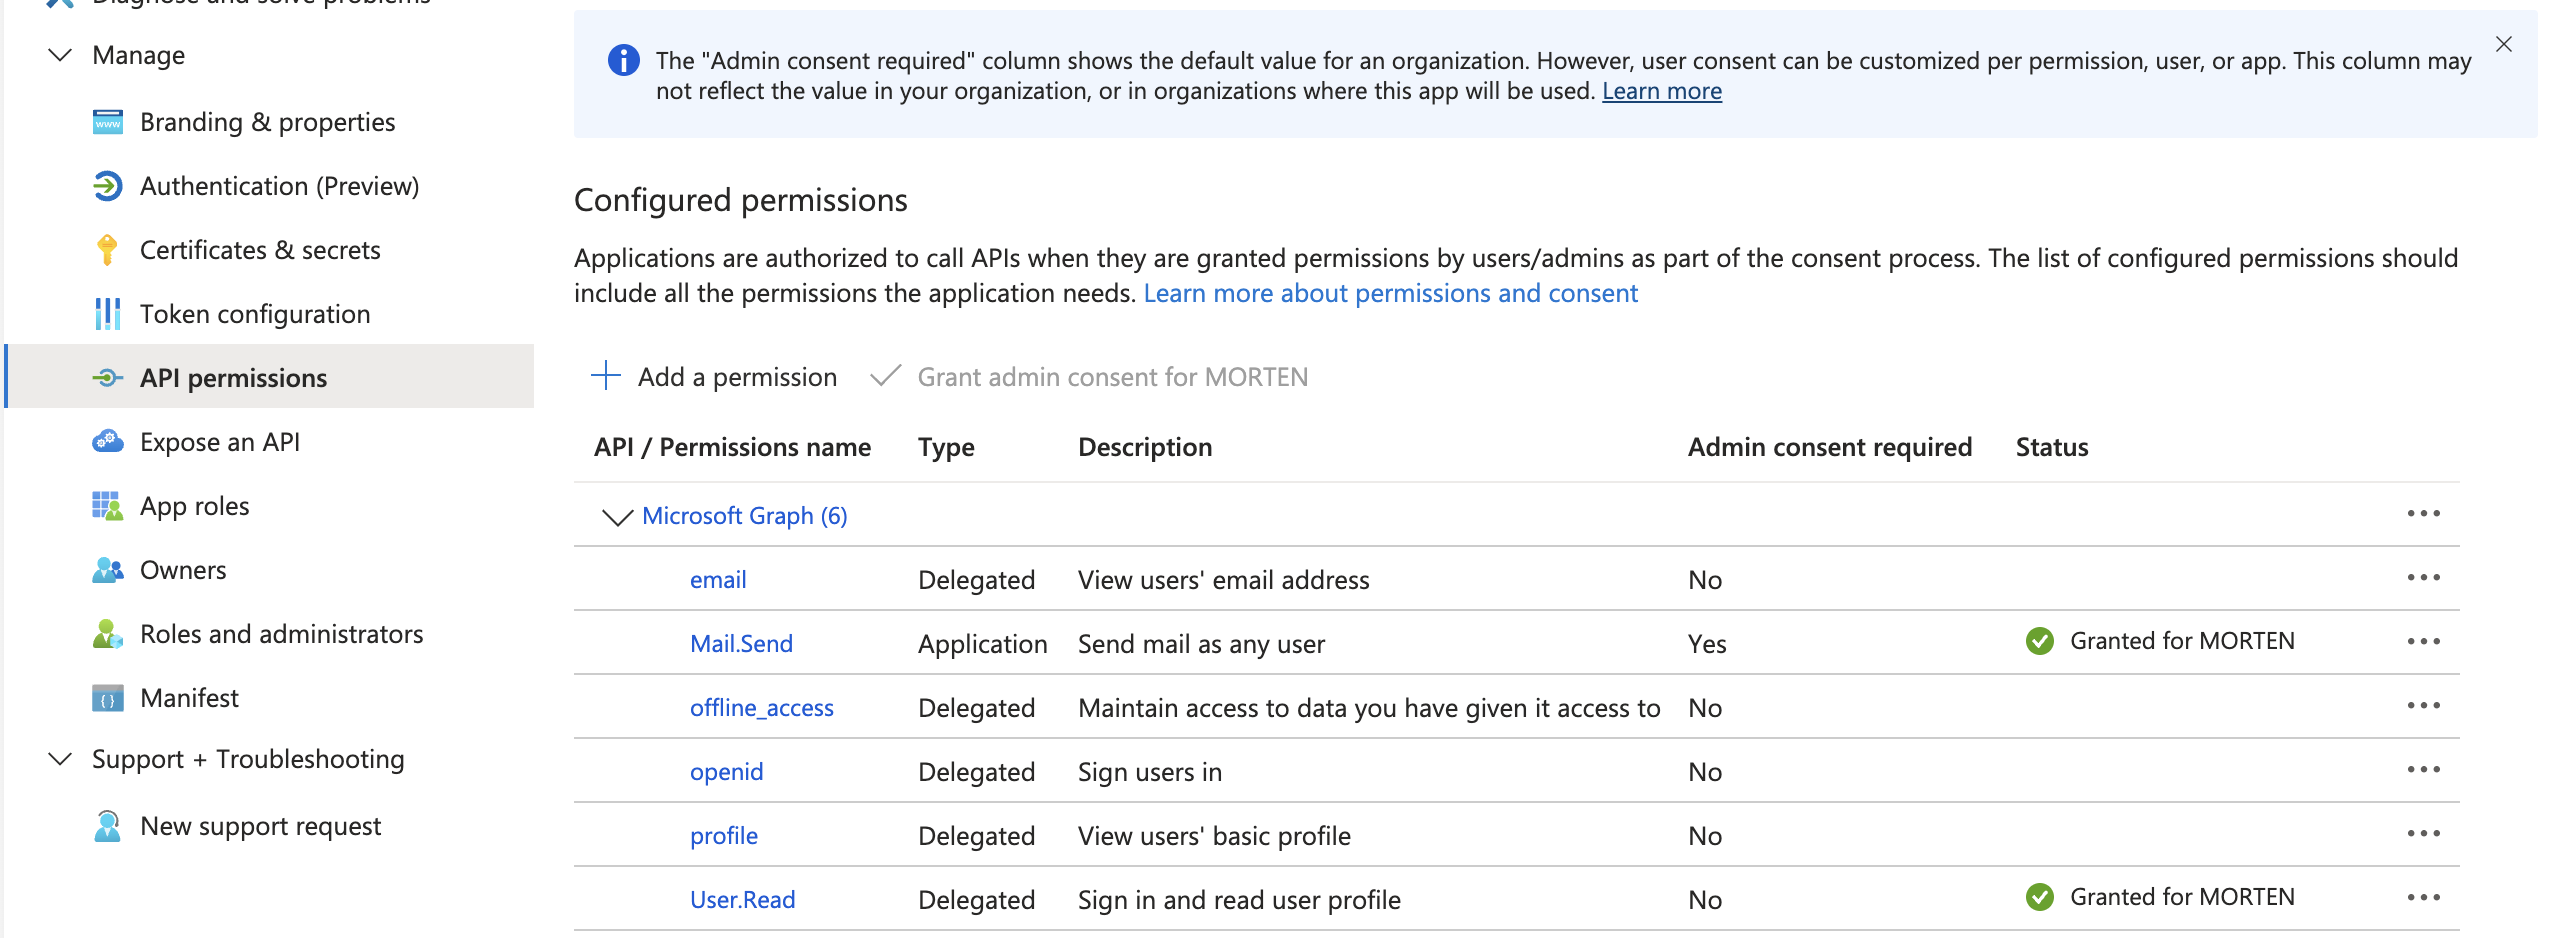
3. Define API Permissions: From the application menu, go to API permissions → Add a permission → Microsoft Graph → Application permissions and add the following permission:
Mail.Send
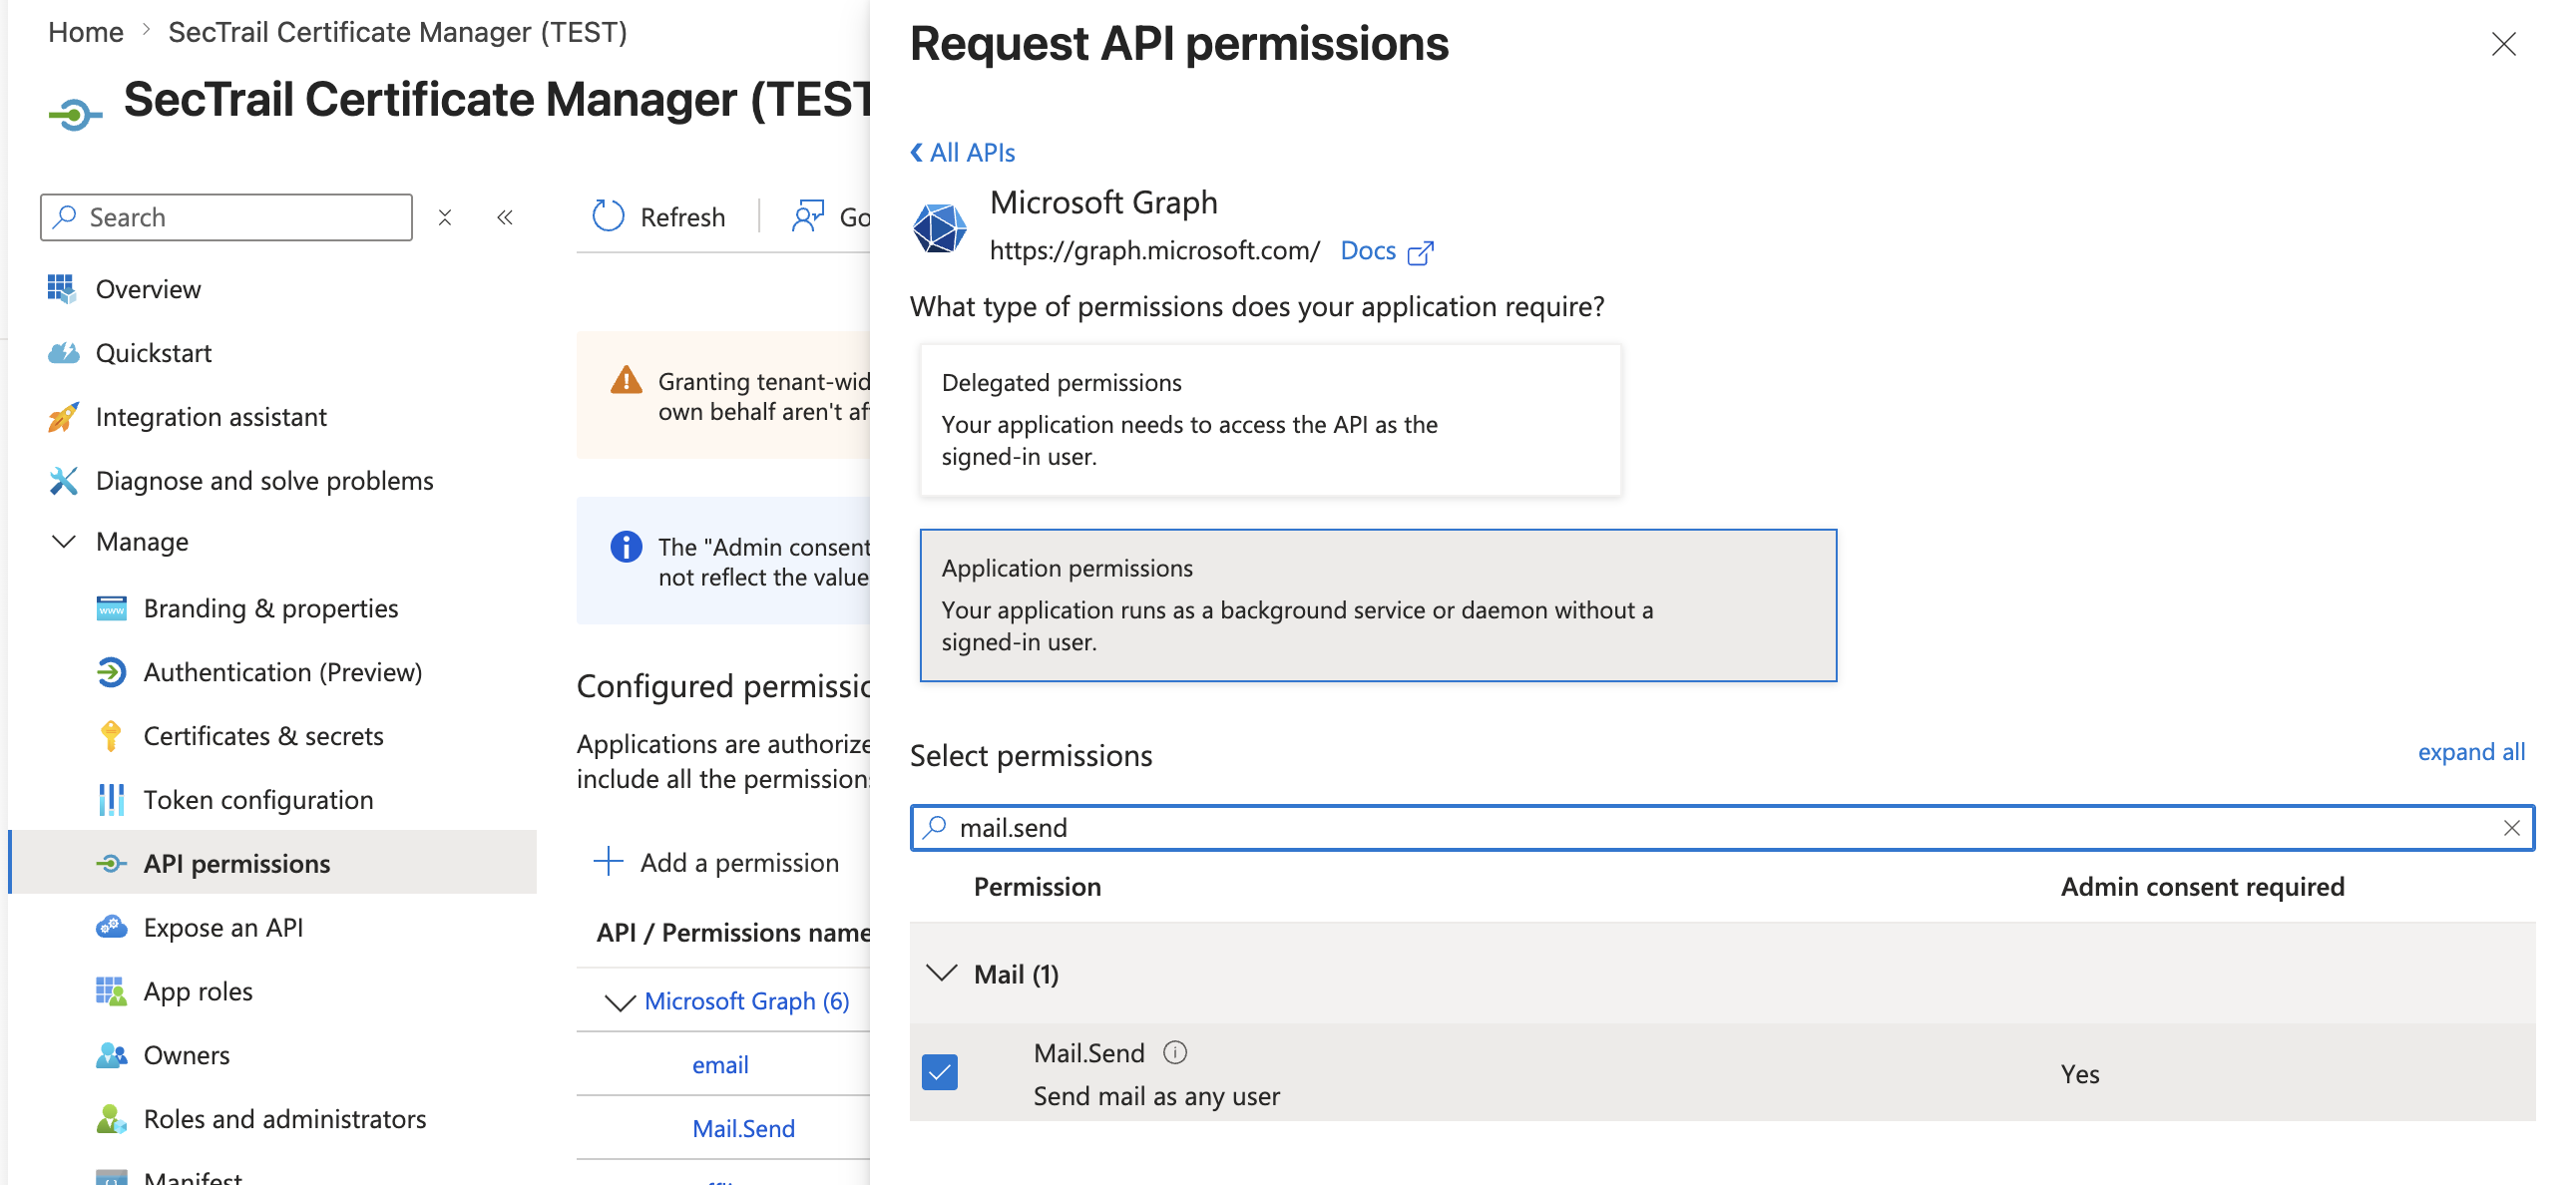
⚠️ Important: For the permission to take effect, click the "Grant admin consent for [Your Organization]" button in the top menu to provide admin consent.
4. Generate a Client Secret: Go to Certificates & secrets → New client secret to create a new client secret.
Note: Copy the "Value" immediately after creation; this value cannot be viewed again after leaving the page.
Parameters to Configure in the System
The following mandatory fields must be noted from Azure and entered into the system to complete the configuration:
- Directory (tenant) ID
- Application (client) ID
- Client Secret Value (Enter the Value, not the Secret ID)
Configuration Fields
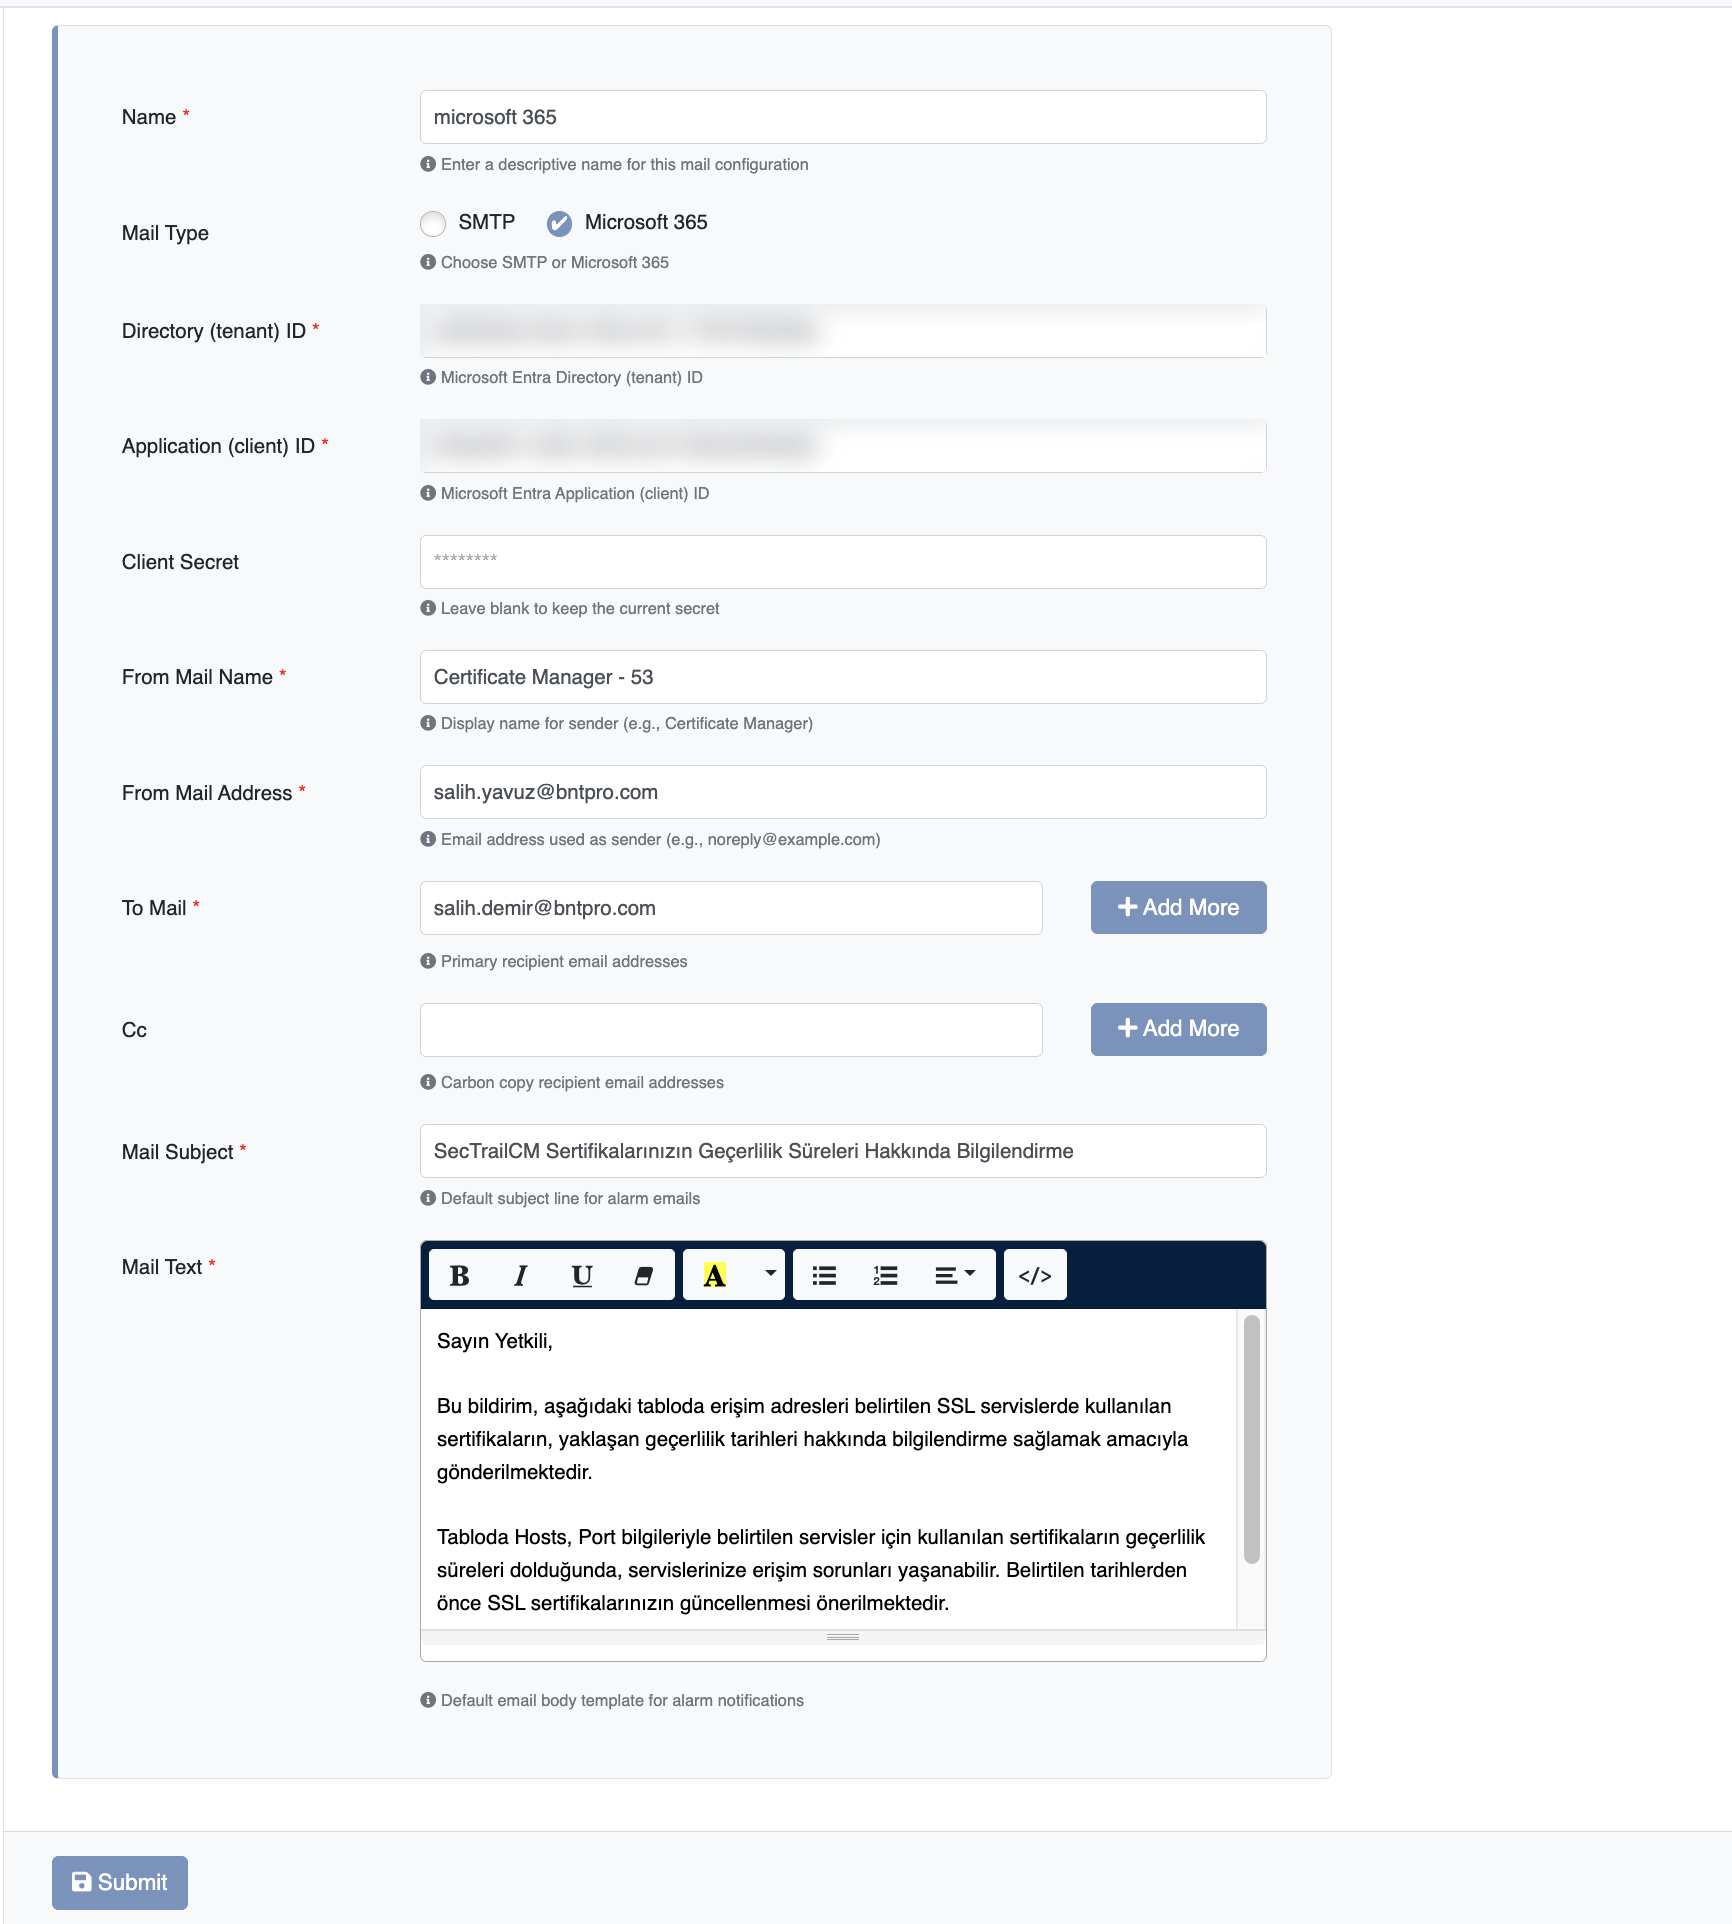
- Name: A descriptive name for the mail profile
- Directory (tenant) ID: Microsoft Entra tenant (directory) identifier
- Application (client) ID: Microsoft Entra application (client) identifier
- Client Secret: Client secret created for the application; leave blank when editing to keep the current secret
- From Mail Name: Sender display name (e.g.
Certificate Manager - S5) - From Mail Address: Sender email address
- To Mail: Primary recipient address for notifications; click + Add More to add multiple recipients
- Cc: Carbon copy email addresses; click + Add More to add multiple addresses
- Mail Subject: Subject line for alarm emails
- Mail Text: Default body template for alarm emails (editable via rich text editor)
Delivery Alerts
Email alarms do not always reach their destination — the recipient address may be wrong, the mailbox may be full, or the domain may reject the message. In these cases the sending server returns a non-delivery report (NDR / bounce). SecTrail CM provides a Delivery Alerts mechanism that captures these bounce messages and notifies administrators.
Capture works in two ways:
- Immediate (synchronous) capture: If the transport layer (SMTP / Graph) rejects the message during sending, the failure is recorded on the spot.
- Background (asynchronous) scan: The sending profile's mailbox is scanned at regular intervals; NDR messages matching the From and Subject filters are flagged as bounces and an alarm email is generated.
Note: Delivery Alerts can only be configured when a valid Mail profile exists. If no profile is defined yet, first create one from the Configuration screen.
Delivery Alerts Settings
Bounce-capture behavior is configured from System > Mail > Delivery Alerts Settings.
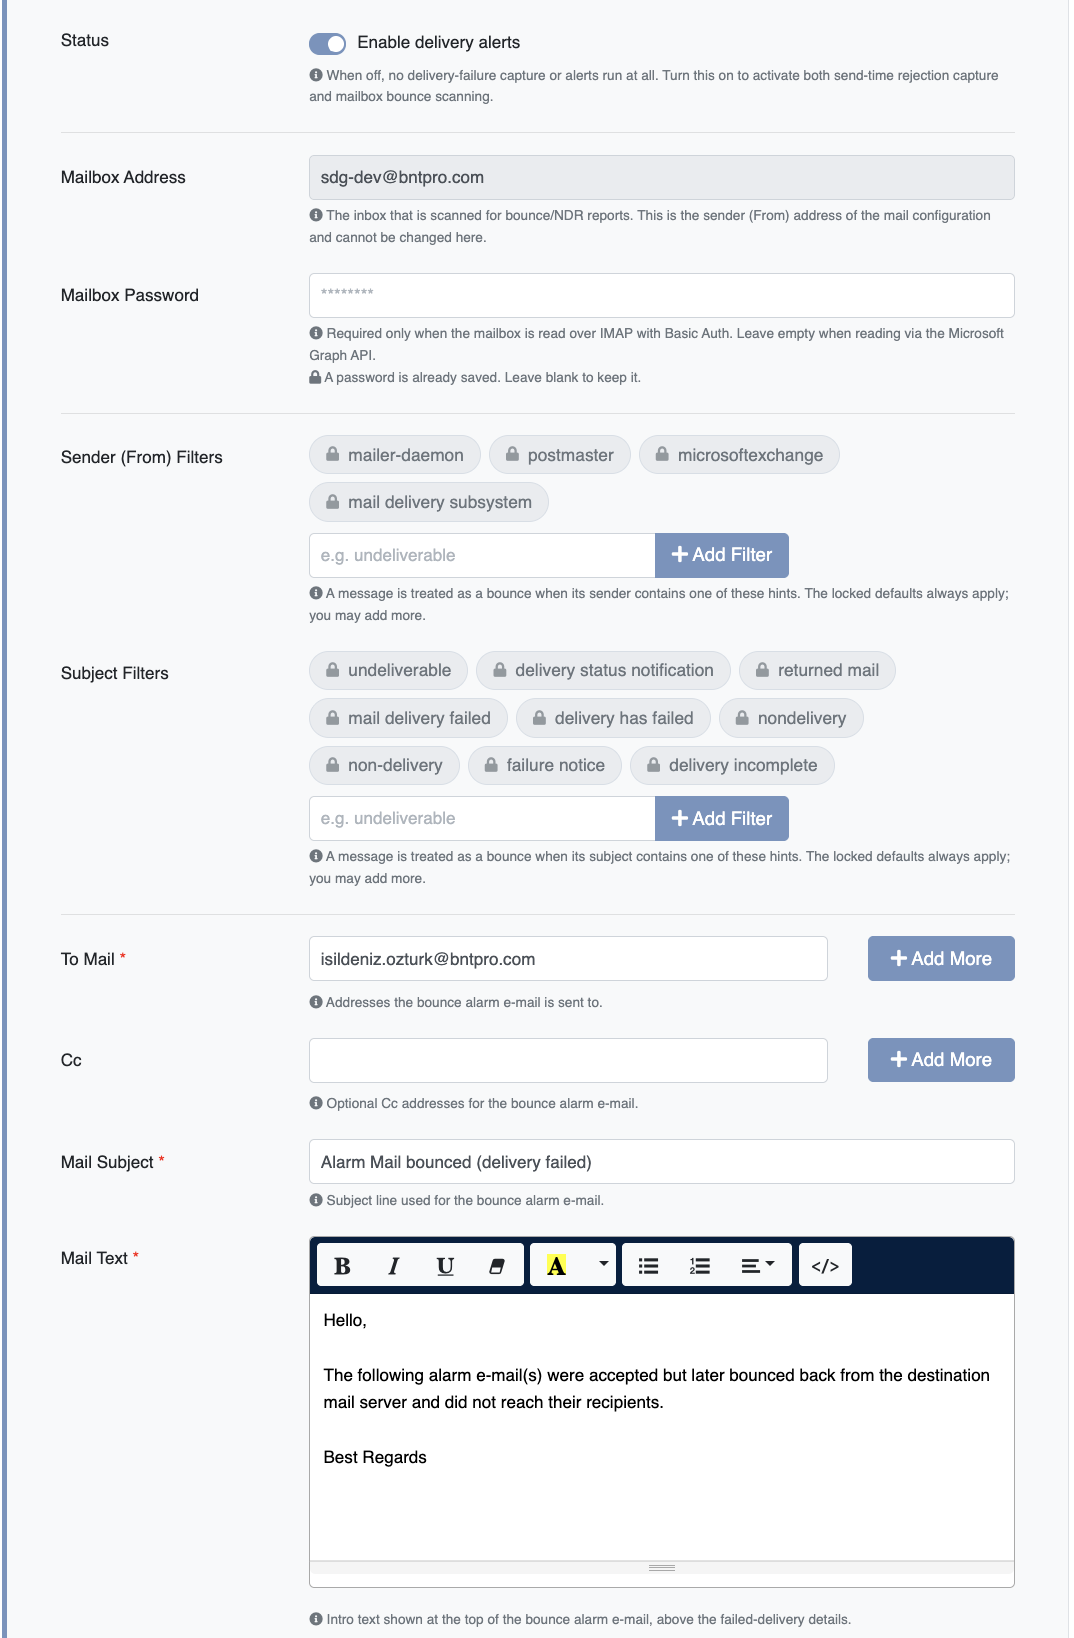
- Enable Delivery Alerts: Master switch that turns the feature on or off. While off, no bounce capture or alerts run at all; when on, both send-time rejection capture and mailbox scanning are activated. It is off by default, so installations that do not want this feature are unaffected.
- Mailbox Address: The inbox scanned for bounce/NDR reports. This value is the mail profile's From address and cannot be changed here (read-only).
- IMAP Password: Required only when the mailbox is read over IMAP with Basic Auth. Leave empty when reading via the Microsoft Graph API. If left blank when editing, the current password is kept.
- Sender (From) Filters: A message is treated as a bounce when its sender contains one of these hints. The locked defaults (
mailer-daemon,postmaster,microsoftexchange,mail delivery subsystem) always apply and cannot be removed; administrators may add extra hints on top of them. - Subject Filters: A message is treated as a bounce when its subject contains one of these hints. The locked defaults (
undeliverable,delivery status notification,returned mail,mail delivery failed,delivery has failed,nondelivery,non-delivery,failure notice,delivery incomplete) cannot be removed; extra hints may be added. - To: Primary recipient(s) for the bounce alarm email. At least one address is required; use + Add More to add more.
- Cc: Optional carbon copy recipients for the bounce alarm email.
- Mail Subject: Subject line of the bounce alarm email.
- Mail Text: Body template of the bounce alarm email (editable via rich text editor).
To add a filter, type the hint into the relevant box and click Add or press Enter. Default filters carrying a lock icon cannot be removed; custom filters you add can be deleted via the cross (×) icon.
Delivery Alerts List
The System > Mail > Delivery Alerts List screen lists detected delivery-failure reports in a table.
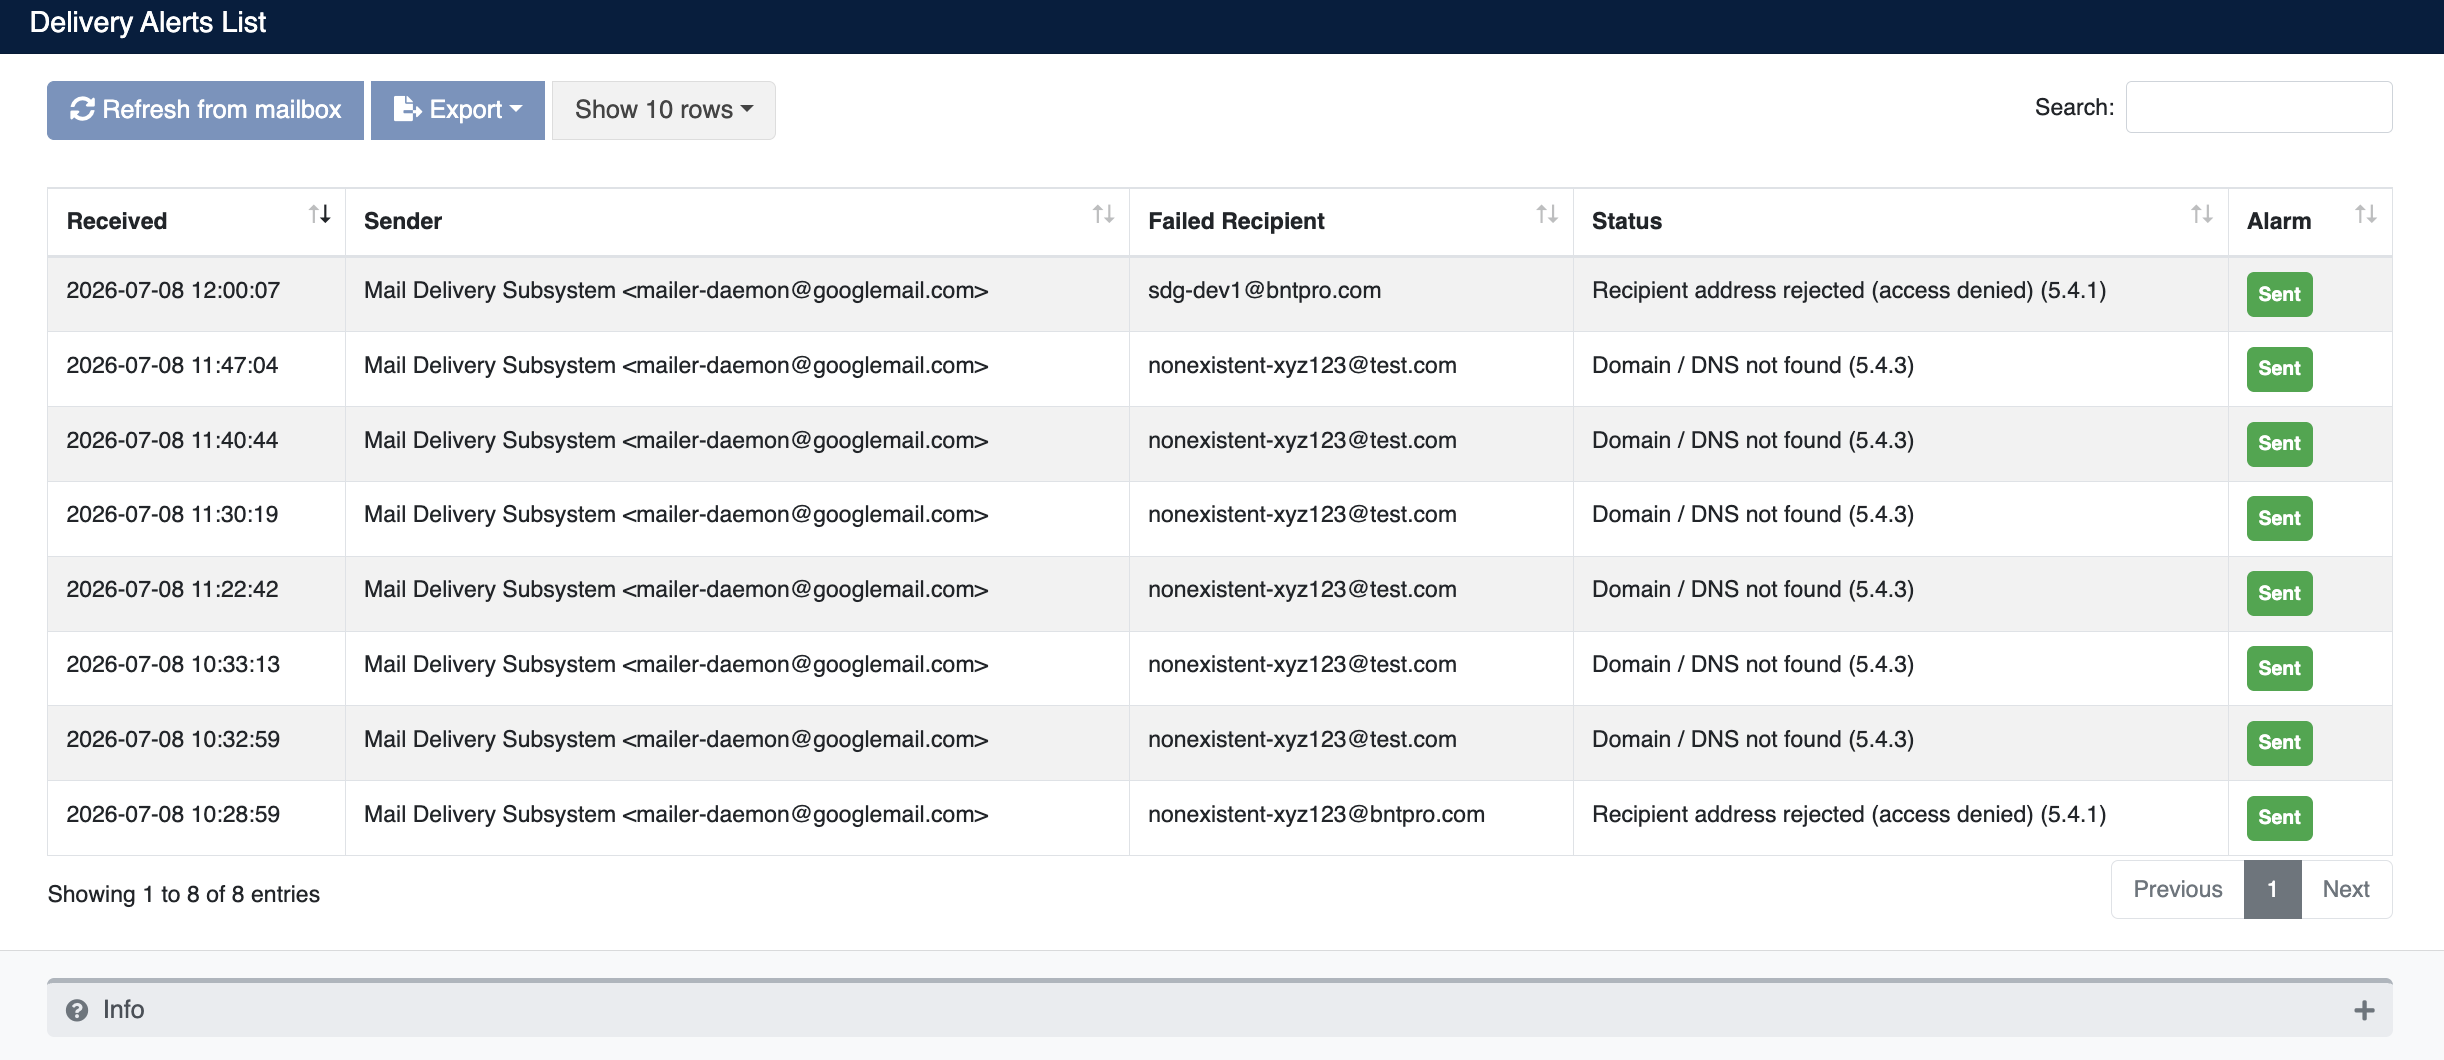
The table has the following columns:
- Received: The actual time the bounce message arrived in the mailbox
- Sender: The address that sent the NDR (e.g.
mailer-daemon@...) - Failed Recipient: The actual recipient address that could not be delivered to
- Status: A human-readable explanation of the SMTP status code (e.g. "Recipient not found (5.1.10)")
- Alarm: A green Sent badge if an alarm email has been sent for this bounce, or a yellow Pending badge if not yet.
By default the page loads instantly from the bounces the background scan has already recorded in the database. To scan the mailbox live at that moment, use the Refresh from mailbox button in the top right — this runs the same scan the background job performs every 10 minutes, recording any new bounces and updating the list. Table data can be exported to Excel, CSV, or PDF.