Distributed Discovery Agents (DDA)
SecTrail CM can reach systems on networks it cannot access directly through Distributed Discovery Agents (DDA) deployed on those networks. An SSH tunnel is established between CM and the agent, and requests destined for the remote network are forwarded over this tunnel.
A DDA serves two purposes:
- Discovery — the discovery engine's scan requests are forwarded to the remote agent over the tunnel, and the scan is performed from the remote network.
- Device integrations — certificate deployment and integration operations are routed to target devices on the remote network through a SOCKS5 proxy opened on the agent.
DDA lets you discover certificates on isolated, directly unreachable network segments (e.g., a different datacenter, a DMZ, or a customer network) and deploy certificates to devices on those segments. Even if the CM server has no direct access to that network, both scanning and integration operations can be carried out through an agent deployed on it.
Agent Installation
The DDA agent is distributed as a ready-made virtual appliance image and is put into service by deploying this image on the target network.
The agent image is provided in OVA (VMware ESXi / vSphere / Workstation) and qcow2 (KVM) formats. Import the format that matches your environment.
Step 1: Import the Image
- Transfer the agent image file (
.ovaor.qcow2) to the target hypervisor.- VMware: Import the
.ovafile via vSphere Client / ESXi Host Client using Deploy OVF Template. - KVM: Copy the
.qcow2file to the target server and attach it as a disk to a new VM definition.
- VMware: Import the
- Start the VM.
Step 2: First Connection and Login
Connect to the VM's console (hypervisor console or similar). The appliance login screen is displayed on boot:
SecTrail Certificate Manager Distributed Discover Agent
Hostname : SecTrailCM-DDA
IP Addr  : 10.34.24.198

SecTrailCM-DDA login:
The username is stadmin. The default password is communicated separately with the installation package.
Step 3: Network Configuration via the Appliance Menu
Logging in with stadmin opens the appliance management menu directly:
========================================================
  SecTrailCM DDA Appliance Menu
========================================================

Current Hostname : SecTrailCM-DDA
Current IP (eth0): 10.34.24.198/24

1) Configure Network with DHCP (Auto IP)
2) Configure Network with Static IP & DNS
3) Configure NTP Server
4) Configure Hostname (Default: SecTrailCM-DDA)
5) Test Network Gateway Reachability
6) Change 'stadmin' Password
7) Reboot Appliance
8) Exit (Logout)

Your Choice (1-8):
Steps needed to bring the agent onto the target network:
| Option | When to use |
|---|---|
| 1) Configure Network with DHCP | If the target network has DHCP and automatic IP assignment is sufficient |
| 2) Configure Network with Static IP & DNS | If the agent needs to run on a fixed IP (this is the IP you'll use in the DDA definition on CM) |
| 3) Configure NTP Server | Recommended for time-synced certificate validation |
| 4) Configure Hostname | To give the appliance a distinguishing name on the network |
| 5) Test Network Gateway Reachability | To verify connectivity after saving the network configuration |
| 6) Change 'stadmin' Password | To change the default password after first login |
When defining the DDA agent on CM, you must enter the IP you configured here in the Remote IP Address field. If the agent's IP changes later (e.g., via DHCP), update the agent definition on CM as well.
Once configuration is complete, you can exit with 8) Exit (Logout), or select 7) Reboot Appliance for network changes to take effect.
Usage
Defining an Agent
Go to Discovery → Distributed Discovery Agents (DDA) → Create.
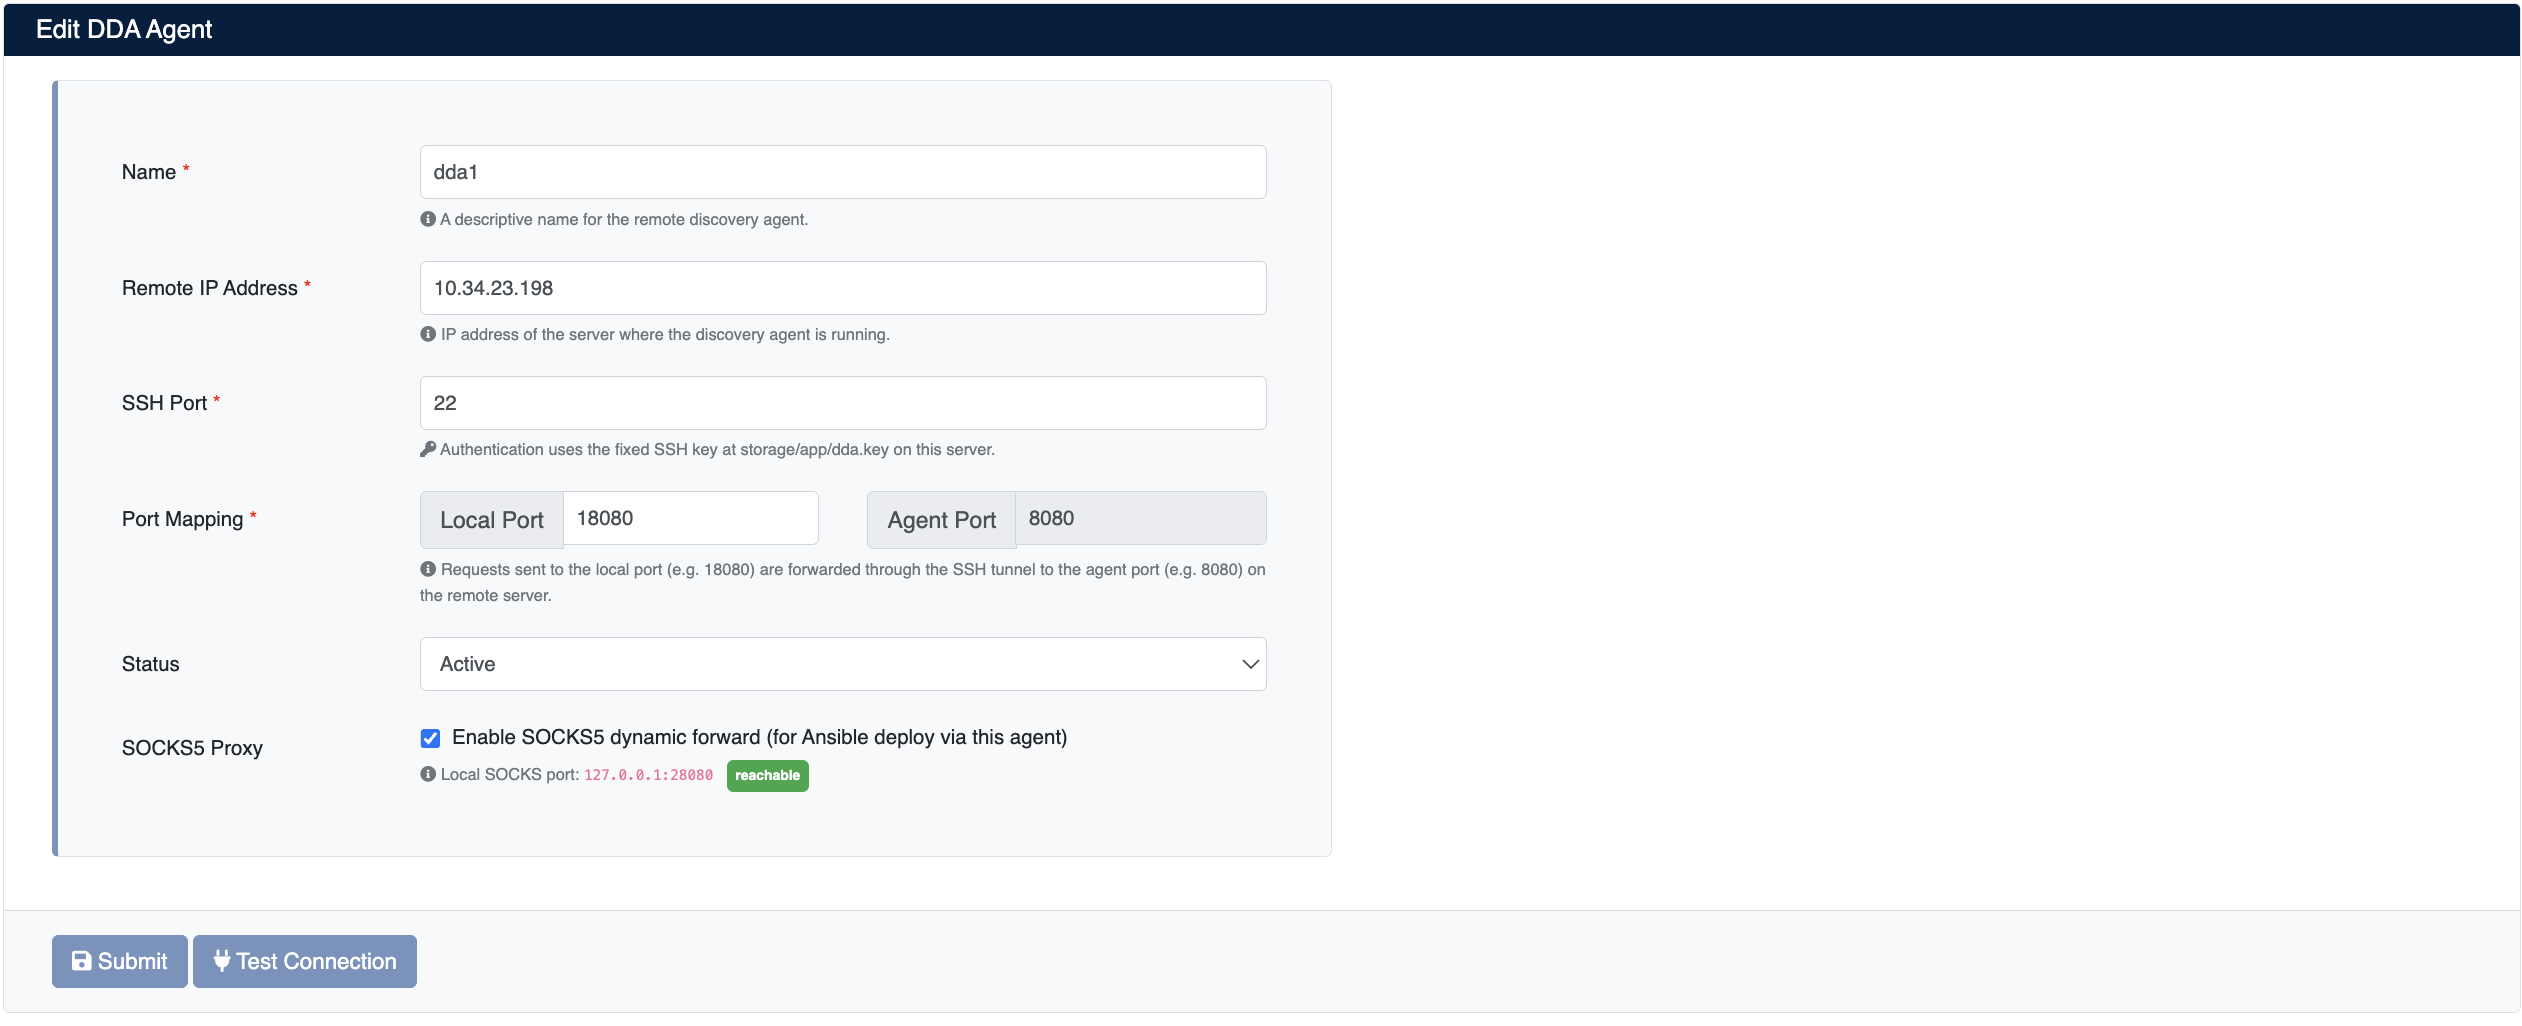
Add DDA Agent Form
| Field | Description |
|---|---|
| Name | A descriptive name for the agent |
| Remote IP Address | IP address of the server where the agent runs |
| SSH Port | SSH port of the remote server (default 22) |
| Port Mapping | Local Port (the tunnel port on the CM side, default 18080, must be unique) and Agent Port (the remote agent port, fixed at 8080) |
| Status | Active / Inactive — only active agents are listed in scan forms |
| SOCKS5 Proxy | Enable SOCKS5 dynamic forward — when checked, device integrations can be run through the agent (see SOCKS5 Proxy for Integrations) |
The Test Connection button on the form verifies SSH access using the entered IP and SSH port before saving.
SOCKS5 Proxy for Integrations
When Enable SOCKS5 dynamic forward is checked in the agent definition, a SOCKS5 dynamic forwarding port is opened on CM in addition to the SSH tunnel. Certificate deployment and other integration operations reach target devices on the remote network through this proxy.
Once the box is checked, the form displays the Local SOCKS port (e.g., 127.0.0.1:28080) along with the port's current status (reachable / unreachable). The SOCKS port is assigned automatically based on the tunnel's Local Port — it is not entered manually.
The SOCKS5 proxy applies to all system integrations — including web and application servers deployed over SSH/WinRM (NGINX, Apache, IIS, Tomcat, JKS, etc.) and devices managed over an HTTPS API (F5 BIG-IP, Citrix NetScaler, Palo Alto, FortiGate, etc.).
This checkbox only makes the agent available for integrations. You choose which agent a given device is managed through in the DDA Agent field of the device definition — see System Integrations → Devices on Remote Networks (DDA).
The SOCKS5 proxy runs on top of the agent's SSH tunnel. If the tunnel is not connected, the proxy is unavailable and the integration operation fails. Make sure the agent's Status is Active and the tunnel status is Connected.
Tunnel Management
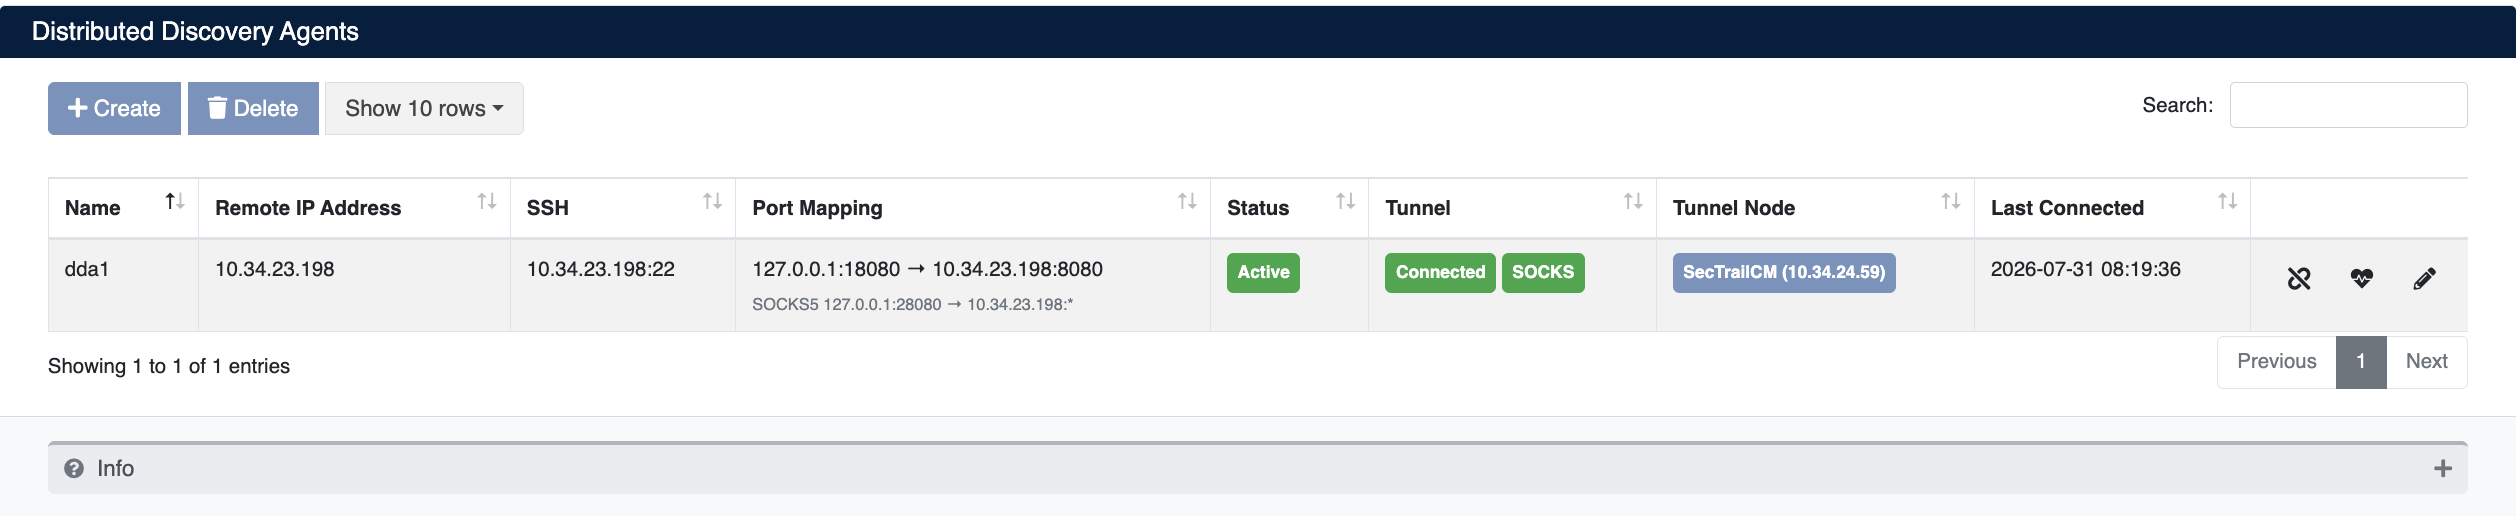
Distributed Discovery Agents List
Action buttons in the agent list:
- 🔗 Connect / Disconnect Tunnel — manually establishes or closes the tunnel.
- ❤️ Test Agent — sends a health check to the agent over the tunnel (the agent expects a POST carrying CM's IP in the body) and reports the result.
- ✏️ Edit — updates the agent definition.
The list also shows SSH (ip:port), Port Mapping (local_port → remote_ip:agent_port), tunnel status (Connected / Disconnected), Tunnel Node (the cluster node that established the tunnel, in hostname (IP) format), and Last Connected time.
For agents with the SOCKS5 proxy enabled, a SOCKS badge also appears in the Tunnel column, and the Port Mapping column shows the proxy forwarding (SOCKS5 127.0.0.1:28080 → <agent_ip>:*). This badge indicates the agent is also available for integration operations.
Do not open the tunnel manually — the application cannot manage the port and will report the status incorrectly. The application is the sole owner of the tunnel.
Starting a Scan
- The automated discovery (Add Discovery form) and manual discovery forms include a Scan Location field: Local (this server) or one of the active DDA agents.
- When an agent is selected, the scan job verifies the tunnel is up before scanning starts; if the tunnel is down, it automatically attempts to re-establish it, and if that fails, the process errors out with "DDA agent is not reachable".
- The Source Server column on the Discover Processes page shows the origin of the scan: the server's hostname (
SecTrailCM) for local scans,DDA: <agent name> (<ip>)for agent scans.
Deploying Certificates to Devices on a Remote Network
To deploy a certificate to a device on a network you cannot reach directly:
- Define the DDA agent on that network — or edit the existing definition — with the SOCKS5 Proxy box checked.
- Make sure the agent's tunnel status is Connected and the SOCKS badge is visible.
- Define the target device on the Automation → Devices page, entering the device's IP address/hostname on the remote network in the IP field.
- Select the relevant agent in the DDA Agent field on the same form.
- Start the certificate deployment as usual — the connection leaves from the tunnel-owning host and is routed through the agent's SOCKS5 proxy.
The connection now originates from the agent's network, not from the CM server. Access rules on the target device (firewalls, allow-lists, management-interface restrictions on the device) must permit the agent's IP, not the CM server's IP.
Self-Healing
When a tunnel goes down (e.g., the agent server or CM restarts), the system automatically re-establishes any tunnels that "should be connected" — usually within seconds. It does not touch tunnels the user deliberately disconnected. When a tunnel is re-established, the SOCKS5 proxy is brought back up along with it if it is enabled for that agent.
Cluster Behavior
SecTrail CM can run in a multi-server (cluster) setup sharing a common database. In this case:
- Whichever node established the tunnel is shown in the Tunnel Node column in the UI.
- Scans are started from the node that owns the tunnel: jobs are routed to the queue consumed by that node. In manual discovery, if the tunnel is on a different node, the scan is not run synchronously — it's dispatched asynchronously to the owner's queue (results are tracked from Discover Processes).
- The watchdog on each node only manages tunnels it owns; other nodes read tunnel status from the shared database.
- If a scan is started with an agent whose tunnel has never been established, whichever node the job runs on establishes the tunnel and becomes its owner.
- For more on starting a scan with a DDA selected, see the Scan Location field on the Discovery Configuration page.
- For deploying certificates to devices on a remote network, see the relevant device page under Integrations.