Installation Guide
This section contains detailed installation steps for SecTrail Certificate Manager.
Installation Overview
SecTrail CM is delivered as a Virtual Appliance in OVA format. This approach greatly simplifies installation:
- ✅ Easy Installation: Deploy the OVA file to your virtualization environment
- ✅ Pre-configured: All components (database, web server, etc.) come ready
- ✅ Quick Start: Just configure network settings and start using
- ✅ No Manual Installation: No package management, dependency resolution, or service configuration needed
Basic Steps:
- Import the OVA image to your virtualization platform
- Start the VM and log in with the
stadminuser - Configure network settings with the
configcommand - Access the system from the web interface
System Requirements
Hardware Requirements
Minimum Requirements
- CPU: 4 Cores
- RAM: 8 GB
- Disk: 100 GB
- Network: 1 Gbps
Recommended Requirements (Production Environment)
- CPU: 8 Cores
- RAM: 16 GB
- Disk: 200 GB
- Network: 1 Gbps
Pre-Installation Preparation
1. Virtualization Environment Requirements
SecTrail CM is distributed as a virtual machine image in OVA format.
2. Network Configuration Preparation
Have the following network information ready before installation:
| Parameter | Description |
|---|---|
| IP Address | Static IP address for SecTrail CM (in CIDR notation) |
| Gateway | Default gateway IP address |
| DNS Servers | Primary (and optionally secondary/tertiary) DNS server addresses |
3. Firewall and Port Configuration
The following ports must be open for SecTrail CM to function properly:
| Port | Protocol | Usage | Direction |
|---|---|---|---|
| 443 | HTTPS | Web Interface | Inbound |
| 22 | SSH | Remote management (optional) | Inbound |
Installation Steps
SecTrail CM is delivered as a Virtual Appliance and distributed in OVA (Open Virtualization Archive) format. Manual package management is not required for installation.
1. Deploying the OVA Image to Virtualization Environment
Deploy the SecTrail CM OVA image to your virtualization environment.
2. Initial Login and Network Configuration
After starting the VM, follow these steps from the console screen:
Login Credentials
Use the following username for initial login:
- Username:
stadmin - Password: Password will be shared with you
Network Configuration
After logging in, start network configuration:
stadmin@SecTrailCM ~]$ config
When the command is executed, the SecTrail CM Configurator will start.
Step 1: IP Address Configuration
Please enter a valid IP Address in CIDR Notation (e.g. 192.168.1.10/24)

IP Address: 10.34.24.56/24
OK
- Enter the IP address and subnet mask in CIDR notation (e.g.,
10.34.24.56/24) - Press Enter to confirm
Step 2: Gateway Address Configuration
Please enter a valid Gateway Address

Gateway IP Address: 10.34.24.1
OK
- Enter the default gateway IP address
- Press Enter to confirm
Step 3: DNS Server Configuration
How many DNS servers do you want to configure? (1-3)
1

Please enter a valid DNS Server Address

DNS Server IP Address: 10.34.24.150
- Enter the number of DNS servers you want to configure (between 1-3)
- Enter the IP address for each DNS server
Step 4: Configuration Summary and Confirmation
IP: 10.34.24.56/24 -- GW: 10.34.24.1 -- DNS SERVERS: 10.34.24.150

Network Configuration will be set. Do you want to continue? (y/n)y
- Review the information you entered
- If correct, press
yto continue
Configuration Activation
Activating Network Configuration

Setting IP Address
IP Address Set

Setting Default Gateway
Default Gateway Set

DNS Servers Set
Connection successfully activated (D-Bus active path: /org/freedesktop/NetworkManager/ActiveConnection/2)

Settings Saved

Network Configuration Completed Successfully
You will see the above messages when network configuration is completed successfully.
3. Application Key Generation (Optional)
After network configuration is completed, SecTrail CM offers the option to generate an application key:
SecTrail CM Application Key Generator

regenerate Application Key

Do you want to generate SecTrail CM Application Key (y/n)?y
- Press
yto generate a new application key - Press
nto keep the existing key
Application key set successfully.
4. Configuration Completed
After configuration is completed, you can use the IP address you set to access the web interface.
Post-Installation Checks
1. Web Interface Access
After network configuration is completed, go to the following address from your browser:
https://your-server-ip
On first access, your browser may display a security warning due to the self-signed SSL certificate. For production environments, it is recommended to use a certificate signed by a corporate CA.
Initial Login Credentials
Default administrator account for initial web interface login:
- Username:
admin - Password:
admin
2. License Activation
You need to activate the license on first login. Follow these steps for license activation:

- The license activation screen will appear when you first log in to the web interface
- Share the App Key and Dossier information shown on the screen with the SecTrail CM support team
- Enter the License Key provided by the support team in the relevant field
- License verification will be performed automatically
After license activation is completed, you can view your license details:
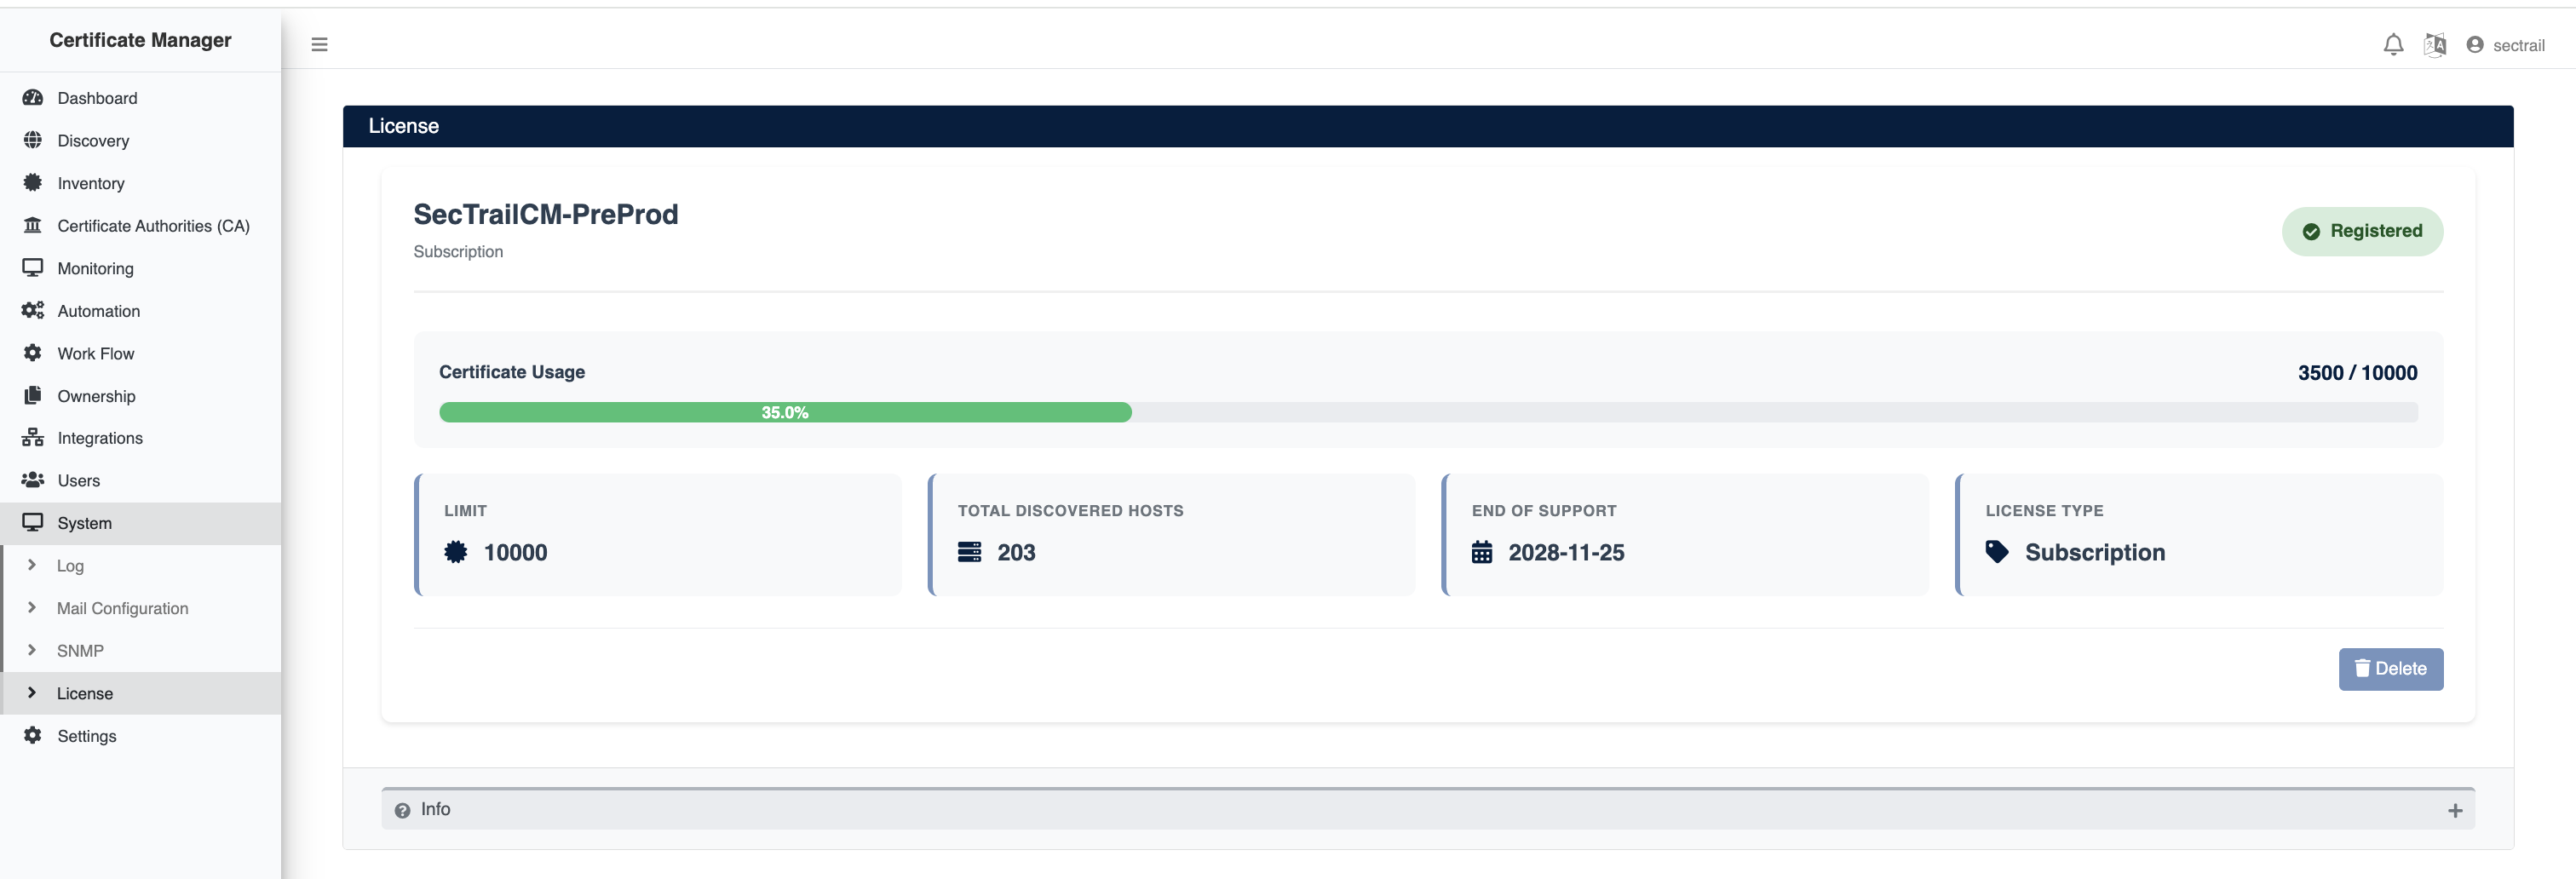
SecTrail CM counts certificates as unique under the license scope. Even if the same certificate is used on different systems (for example, on different servers or load balancers), it is counted only once. This allows you to manage your actual certificate count and use your license efficiently.
You can obtain your license key by sending your App Key and Dossier information to destek@sectrail.com or sdg-dev@bntpro.com.